Best 2 Know

The Ultimate Blogging Resource

  • Advertising
  • WebHosting
  • Contact Us
  • Blogger
    • Blogger Templates
    • Blogger Tutorials
  • Browser
    • Firefox
    • Google Chrome
  • Google
  • Internet
    • Facebook
    • Twitter
  • Thesis
  • Windows
  • WordPress
    • WordPress Themes
    • WordPress Plugins
  • More
    • Linux
    • Review
    • Solutions
    • Announcements

Tag: Tutorials

Top 5 Jquery Slide Gallery

Do you have minimal traffic from your website or blogsite? Is it too plain you wish you could afford to hire web developers and graphic artists to achieve the getting high standard of Internet users and clients?

You need no expertise to achieve that standard. So i gathered the simplified but best and user friendly JQuery to suit your needs and to give hype for your business and personal portfolios to help you maximize your traffic.

SLIDEDECK for WordPress

Though this Slide Jquery Gallery requires more time and effort to have that professional look of your blog or website, this slide deck will give the impression of PERFECTIONISM driving to marketing and advertising strategy. For its free? there is no room for second thoughts of having this and change your life for real.

YOXVIEW 

Aside from its ability to beautify your gallery, it is also capable of embedding your videos. Don’t you think its great to have that creative look in your site? Though i do not advice for business or e-commerce sectors to have this to present your gallery and advertising portfolios.


TRANSPARENT SLIDE GALLERY | tutorial 


This is open for Blogger and WordPress users. It has the simplest and easiest to understand tutorial among jqueries i used. It has automatic slide so i suggest to add more pictures to maximize the slideshow.

SLIDE SHOW JQUERY | tutorial 


I personally like it for your client testimonials. Lets put different strategy to your website. The idea of giving your clients to be heard is a win-win advertisement. The logic? “you value your clients, and your service will speak for it”.

JC FLASH PLAYLIST

It has 3 categories to choose from. The best thing about this Flash playlist, it is 100% FREE. Its like a touch screen, automatically move up and down when you point your cursor to the list. It has quite delay if you have too much pictures loaded in the playlist so have a separate gallery for best views of your work.

If you are familiar with Flash, this one is for you.

Now, doze off to your dashboard and change your blog into more inviting and fun to read. Having second thought? i bet not. On a positive note, for blogger users, they can maximize or minimize the size of their slide. check out tutorials to learn more about the products.

For FREE inquiries for your creative and professional web design, 
email riteshhanap@gmail.com.
For FREE inquiries for advertising and marketing strategies for small business websites, email kumi.atienza@gmail.com.

June 12, 2010 Ritesh Sanap Blogger Tutorials Blog Design Series, Cool things, Jquery, Tutorials

How to RIP A MOVIE

Yes Today I m going to tell all of you how to RIP Movies. Movies are watched by each and everyone in their whole life. they are source of entertainment and also used to spread knowledge so today related to movies I m going to share Knowledge.

What is RIP?
RIP is basically meant to REST IN PEACE . but the termed has been changed that RIP means compressing the content then its original size to extremely small size.

In this tutorial I’m going to explain how to encode movies with MeGUI, First your going to need a good source for your movie your wanting to encode, Anything in the 700Mb xViD encoded range should be good.

Softwares You Need :

  1. Avisynth
  2. MeGUI
  3. Nero AAC (Audio Codec)

All software’s you need have been enclosed in a package.

Download : Click Here

Install MeGUI run it and get it fully updated.

Install AviSynth, Then your going to need Nero AAC (Audio Codec) its excellent for compression,

Install Nero ACC executable files in the MeGUI folder which is;

#/Program files/meGUI

Restart your PC,

Start up MeGUI once its loaded press “CTRL+R“, That will open “AVISynth Script Creator“

1. Select the source movie you want to encode.
2. Make sure “Resize” Is UNTICKED.
3. Click save and save the script.

1. The AVS file you just made should already be selected if not then select it.
2. If the OUTPUT of the encoded file isn’t pre defined define it now.
3. Make sure the Codec is set at “x264”
4. Make sure “MKV” is selected as the file container.
5. Select “HQ-Slower” as the video profile.
6. Select the original video source as the audio input.
7. If the audio output isn’t yet defined define it now.
8. Select “NDAAC-HE-64Kbps” as the audio profile it provides perfect compression to bitrate ratio.
9. Select “ND AAC” as the codec
10. Select “MP4-AAC” as the audio extension.
11. Press “AutoEncode.

1. Select the container as “MKV”
2. Define your desired output of the encoded movie
3. Make sure the file size radio button is selected, And define the file size as 300MB or 400MB depending

on the length of the movie (Try to get the bitrate at 450ish)
4. Select “Queue”
5. Go to the Queue tab once your back on the main MeGUI page and select “Start down the bottum, It will ask

if you want to create a worker, Create one.

And that’s how you do it guys….

NOTE : IF U HAVE LOW CONFIGURATION IT WILL TAKE ABOUT 3 HRS

May 7, 2010 Ritesh Sanap Solutions Hacks, Movies, Software, Tutorials

Hide or Show Label Count In Blogger

I Know Many Of You Have Tried Label Widget in Blogger. And You Know That Blogger Is Displaying Label Count Some people prefer not to display the label count in their blogs as it looks a bit unprofessional. Lets say if you have a label ‘Funny sms’ with 50 label count and another one ‘ Good morning sms’ with 2 as label count… less people will show interest on clicking the second one.

 So, lets see how to hide or remove the Label count in your blogger blog(s)…

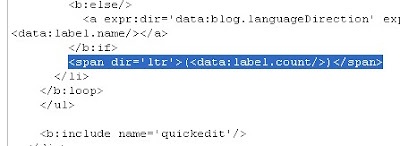
1. Sign into Blogger dashboard » Layout » Edit html

Tick the expand widget templates and remove this line from the template..

<span dir=’ltr’>(<data:label.count/>)</span>

2. Save Changes

You Are Done!!

May 2, 2010 Ritesh Sanap Uncategorized Blog Design Series, Blogger Hacks, Customization, Tutorials

How to create transparent png with photoshop

Hi friends today i m going to tell you how to make transparent png image using photoshop. ya its really to easy.

1. Open Photoshop and open the image you want to make transparent.
2. In layers the click on the lock icon
preview:

3. An new Dialogue Box will open click OK on it.
preview:

4. Click on Magic wand tool ““
5. Using magic wand tool click on the field which you want not to display.
preview:

6. Then just Click Delete Key of the Keyboard.
7. Then what will you get will be like this in checked background.
preveiw:

8. I think now You know what i want to say is if you are happy save it .

July 11, 2009 Ritesh Sanap Solutions, Windows Cool things, Tutorials

Add TwitThis on your Blogger template and drive more traffic on your website

TwitThis is an easy way for people to send Twitter tips messages about your blog post or website. This tutorial illustrates a simple way to add a TwitThis link on each post of your Blogger template. I suggest you to try it because it’s very useful and drive a lot of traffic on your website if you have a good Twitter network.


To add TwitThis on your Blogger template you can using the code you can find here.
That code uses JavaScript. If you want use a simpler way to add it use this alternative.


HTML Code

  1. login to your blogger dashboard
  2. Click on Layout

    preview :
     

  3. Click on Edit HTML

    Preview :

  4. Check Expand Widget Templates

    Preview :

  5. Then add the Below Code Were You Want (This Code Will Only Display Link)

    <a expr:href='”http://twitthis.com/twit?url=” + data:post.url + “&amp;title=” + data:post.title’>Twit This!</a>

    Note : Copy and paste the code exactly how it is in the box above! Don’t remove spaces!

  6. Save Your Template

If you Want To Display With Image Use This CSS Code

If you like my TwitThis link (), add this class in your CSS file and use it in the previous link:


Add the below Code  Before ]]></b:skin>

.share-twitthis{
background:url(http://tinyurl.com/ay2jsc) 10px top no-repeat;
padding-left:42px;
font-size:11px;
line-height:18px;
}

Then add this code where you want it to Display

<div class=’share-twitthis’><a expr:href='”http://twitthis.com/twit?url=” + data:post.url + “&amp;title=” + data:post.title’>Twit This!</a></div>

Thats All Enjoy !

May 8, 2009 Ritesh Sanap Blogger Tutorials, Internet Blogger Hacks, Tutorials

Folder Background Images in WinXP

This brief tutorial explains how to add a background image to any folder in Windows XP.

First, make sure all hidden files are visible on your system. Then, open the folder for which you wish to add a background image. Within the folder, right-click and select Properties » Customize tab » Customize. There, choose any icon, click Apply and OK.

That process should have created a “desktop.ini file. Open that file with a text editor and add these lines of code:

[ExtShellFolderViews]
{BE098140-A513-11D0-A3A4-00C04FD706EC}={BE098140-A513-11D0-A3A4-00C04FD706EC}
[{BE098140-A513-11D0-A3A4-00C04FD706EC}]
IconArea_Image=C:\path\folder\background.jpg


To customize this according to your needs, edit the path in the last line to reflect to the location of the image you wish to use as the background image for that folder. Refresh the folder and the new background should appear.

Finally, to remove the default icon chosen during the creation of the desktop.ini and restore the default folder icon, delete these lines of code from within the desktop.ini file:

[.ShellClassInfo]
IconFile=%SystemRoot%\system32\shell32.dll
IconIndex=(some number)


April 13, 2009 Ritesh Sanap Solutions, Windows Cool things, Hacks, Tutorials

Explorer.exe Deleted Or Taskbar Deleted

As i was on internet my Antivirus find some about 2000 Virus and in that my Explorer.exe was also infected . I dont have saw it so i saved it to Vault . and then after restarting i saw that my Explorer.exe was not there and i have just deleted the vault and the question arises in front of me that how to bring back it. I found Two Ways To Bring it Back :


1. By Using System Restore.
2. Just Downloading an Clean Copy Of Explorer.exe – Easy Way Done Ever you Have Never Done With !

Method 1 – Using System Restore.

  1. Click ” Alt + Ctrl + Delete “
  2. Task Manager Will Open and Then Click “ “
  3. Then in the text box copy and paste this code ” %SystemRoot%\system32\restore\rstrui.exe “

  4.  

  5. Click on ““
  6. Check the ” Restore my Computer to an earlier  time “

  7.  

  8. Then Click On ““
  9. Then Select an earlier time

  10.  

  11. Then Click on ““
  12.  Then Again Click on ““
  13. Your Computer will take some time to restore and will restart and tada !
  14. Task bar is visible and the whole desktop .
  15. Remember After This long Process To make a restore Point by Using System Restore.
  16. Back up your Explorer.exe from ” C:\WINDOWS ” Save it to any other Drive.

Method 2 – Easy and Best For those who have Internet

  1. Click ” Alt + Ctrl + Delete “
  2. Task Manager Will Open and Then Click “ “
  3. Then Click on ““
  4.  

  5. Then Click on “”
  6. Then Select your Browser and Press Open.

  7. Then Just Download The File Created By Me ( Ritesh sanap)
  8. Then Just Open as you Open Other Files Using Task Manager
  9. Just then open Setup.bat . it will do its work. don’t think that Setup.bat is made for Hacking . After one and half of hard work result me in Setup.bat . It was made to reduce the half critical work for doing with Windows File.
At Last Enjoy !

Download

April 9, 2009 Ritesh Sanap Solutions, Windows Tutorials

Make Your CD Write Protected

Friends Many of people thought to make a CD Protected(Non-writable nor copied)

Here Are Some OF the Software Used to Make a CD Protected :

  • CCD-Lock
  • CD-Protector
  • CloneAudioProtector
  • Easy Audio Lock
  • FreeLock
  • TZCopyprotection
  • WinLock
  • WTM CD Prot
  • March 28, 2009 Ritesh Sanap Internet, Solutions Cool things, Hacks, Software, Tutorials

    Posts pagination

    Page 1 Page 2 … Page 4 Next page

    Currently Trending

    • How to download Specific parts of YouTube videos
      How to download Specific parts of YouTube videos
    • Windows Vista CD key
      Windows Vista CD key
    • How to retrieve my Demonoid username
      How to retrieve my Demonoid username
    • How to add Logo to Thesis theme
      How to add Logo to Thesis theme
    • How to Delete Feedbacks from JetPack Contact Form
      How to Delete Feedbacks from JetPack Contact Form
    • List Of All 255 Keyboard All Alt Key Codes
      List Of All 255 Keyboard All Alt Key Codes
    • h4x0r ( Hacker ) - Blogger Template
      h4x0r ( Hacker ) - Blogger Template

    Get Latest post in your Inbox

    Random Posts

    Some Keyboard Keys not Working – What to Do ?

    July 18, 2008 By Ritesh Sanap Leave a Comment

    Best 2 Know was Hacked

    March 8, 2011 By Ritesh Sanap 1 Comment

    Administrator privileges for guest

    March 1, 2009 By Ritesh Sanap Leave a Comment

    NTFS vs. FAT

    February 29, 2008 By Ritesh Sanap Leave a Comment

    Folder Background Images in WinXP

    April 13, 2009 By Ritesh Sanap Leave a Comment

    WordPress

    HTTP2 Server Push for W3 Total Cache Minify plugin

    August 17, 2016 By Ritesh Sanap 5 Comments

    How to Disable Emojis in WordPress

    January 6, 2016 By Ritesh Sanap Leave a Comment

    JetPack Related posts and Sharing not working with NGINX

    November 10, 2015 By Ritesh Sanap Leave a Comment

    Simply Pure – WordPress Theme

    November 2, 2014 By Ritesh Sanap 2 Comments

    Advanced What should we Write about next? – WordPress Plugin

    July 28, 2014 By Ritesh Sanap Leave a Comment

    How to Disable Self Pingback or TrackBack

    January 16, 2014 By Ritesh Sanap Leave a Comment

    BlueStrap – WordPress Theme

    January 1, 2014 By Ritesh Sanap 15 Comments

    How to Create Multiple Excerpts in WordPress

    December 24, 2013 By Ritesh Sanap Leave a Comment

    How to Disable Auto Update in WordPress

    November 21, 2013 By Ritesh Sanap Leave a Comment

    How to Delete Feedbacks from JetPack Contact Form

    November 19, 2013 By Ritesh Sanap 9 Comments

    Recent Posts

    • HTTP2 Server Push for W3 Total Cache Minify plugin
    • How to show hidden files and folders in Mac OS X
    • How to Disable Emojis in WordPress
    • Canva – Online Photo Editor
    • JetPack Related posts and Sharing not working with NGINX

    Archives

    Recommends

    • DigitalOcean – Cloud Hosting
    • Dropbox – Cloud Storage
    • Elegant Themes – WordPress Themes
    • LastPass – Password Manager
    • Like us on Facebook
    • Follow on Twitter
    • +1 on Google
    • Subscribe via Email
    • RSS Feed

    © 2025 Best 2 Know · All Rights Reserved · We ♥ DigitalOcean