Best 2 Know

The Ultimate Blogging Resource

  • Advertising
  • WebHosting
  • Contact Us
  • Blogger
    • Blogger Templates
    • Blogger Tutorials
  • Browser
    • Firefox
    • Google Chrome
  • Google
  • Internet
    • Facebook
    • Twitter
  • Thesis
  • Windows
  • WordPress
    • WordPress Themes
    • WordPress Plugins
  • More
    • Linux
    • Review
    • Solutions
    • Announcements

Tag: Software

Google chrome Final :Evolving from beta to stable

After a bit of evolution and lots of work from the team, we’re thrilled to introduce a new stable version of Chrome for Windows, Mac and Linux. Since last December, we’ve been chipping away at bugs and building in new features to get the Mac and Linux versions caught up with the Windows version, and now we can finally announce that the Mac and Linux versions are ready for prime time.

Google Chrome for Windows

Google Chrome for Mac

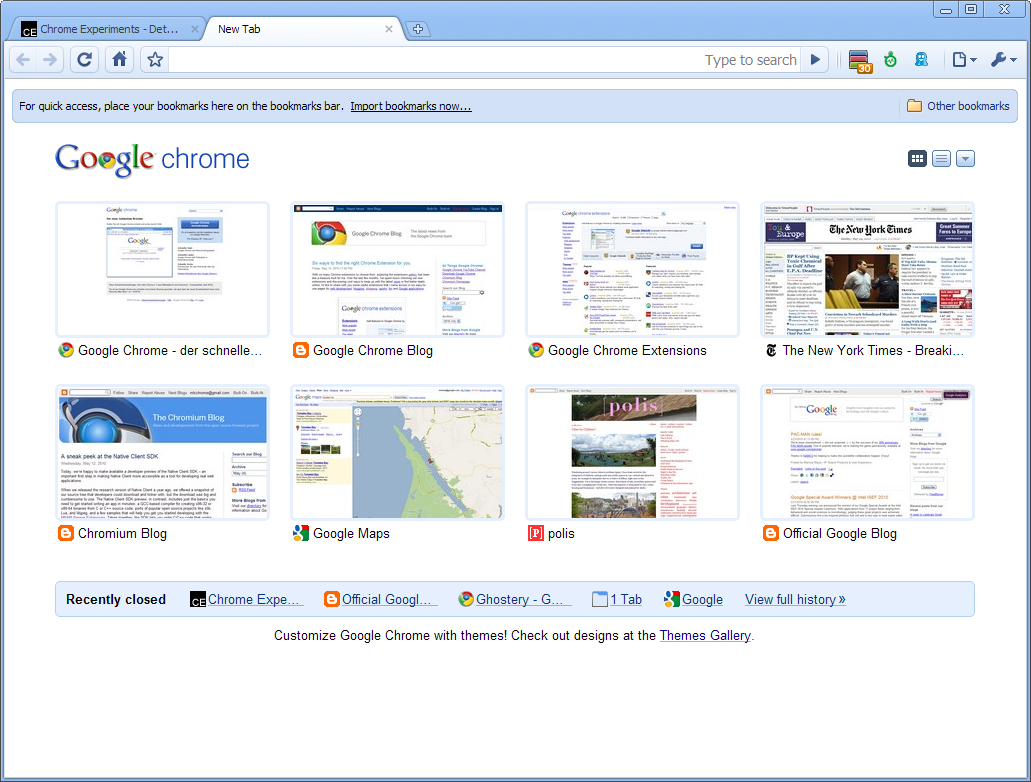
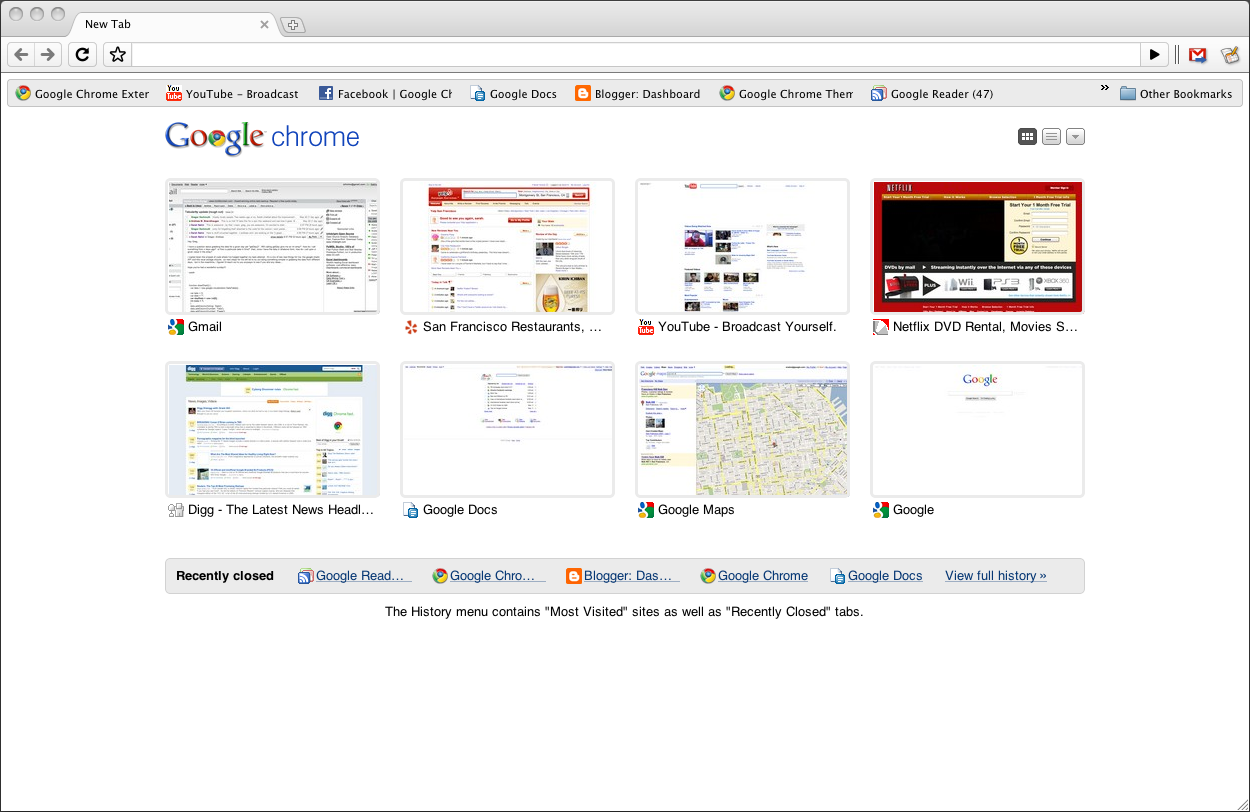
Google Chrome for Linux

The performance bar for all three versions keeps getting higher: today’s new stable release for Windows, Mac and Linux is our fastest yet, incorporating one of our most significant speed improvements to date. We’ve improved by 213 percent and 305 percent in Javascript performance by the V8 and SunSpider benchmarks since our very first beta, back in Chrome’s Cretaceous period (September 2008). To mark these speed improvements, we’ve also released a series of three unconventional speed tests for the browser:

(If you’re interested in how we pitted Chrome against the forces of a potato gun, lightning, and the speed of sound, take a look behind-the-scenes in this video, or read the full technical details in the video’s description drop-down in YouTube).

You may also notice that today’s new stable release comes with a few new features, including the ability to synchronize browser preferences across computers, new HTML5 capabilities and a revamped bookmark manager. For more details, read on in the Google Chrome Blog.

If you haven’t tried Google Chrome since the stone age, check out this brand new stable release. If you’re already using Chrome, you’ll be automatically updated to this new version soon. To try it right away, download the latest version at google.com/chrome.

(First dev, then beta, now stable!)

May 25, 2010 Ritesh Sanap Google, Internet Software

How to RIP A MOVIE

Yes Today I m going to tell all of you how to RIP Movies. Movies are watched by each and everyone in their whole life. they are source of entertainment and also used to spread knowledge so today related to movies I m going to share Knowledge.

What is RIP?
RIP is basically meant to REST IN PEACE . but the termed has been changed that RIP means compressing the content then its original size to extremely small size.

In this tutorial I’m going to explain how to encode movies with MeGUI, First your going to need a good source for your movie your wanting to encode, Anything in the 700Mb xViD encoded range should be good.

Softwares You Need :

  1. Avisynth
  2. MeGUI
  3. Nero AAC (Audio Codec)

All software’s you need have been enclosed in a package.

Download : Click Here

Install MeGUI run it and get it fully updated.

Install AviSynth, Then your going to need Nero AAC (Audio Codec) its excellent for compression,

Install Nero ACC executable files in the MeGUI folder which is;

#/Program files/meGUI

Restart your PC,

Start up MeGUI once its loaded press “CTRL+R“, That will open “AVISynth Script Creator“

1. Select the source movie you want to encode.
2. Make sure “Resize” Is UNTICKED.
3. Click save and save the script.

1. The AVS file you just made should already be selected if not then select it.
2. If the OUTPUT of the encoded file isn’t pre defined define it now.
3. Make sure the Codec is set at “x264”
4. Make sure “MKV” is selected as the file container.
5. Select “HQ-Slower” as the video profile.
6. Select the original video source as the audio input.
7. If the audio output isn’t yet defined define it now.
8. Select “NDAAC-HE-64Kbps” as the audio profile it provides perfect compression to bitrate ratio.
9. Select “ND AAC” as the codec
10. Select “MP4-AAC” as the audio extension.
11. Press “AutoEncode.

1. Select the container as “MKV”
2. Define your desired output of the encoded movie
3. Make sure the file size radio button is selected, And define the file size as 300MB or 400MB depending

on the length of the movie (Try to get the bitrate at 450ish)
4. Select “Queue”
5. Go to the Queue tab once your back on the main MeGUI page and select “Start down the bottum, It will ask

if you want to create a worker, Create one.

And that’s how you do it guys….

NOTE : IF U HAVE LOW CONFIGURATION IT WILL TAKE ABOUT 3 HRS

May 7, 2010 Ritesh Sanap Solutions Hacks, Movies, Software, Tutorials

Team Viewer

Friends today my friend was having problem in editing his template. So he told me to edit his template then i told him how can i edit his template without signing in with his account he told me to download that software and we got connected i get shocked i liked the software very much.

Download 

After Downloading it you can install or directly run it . User of both pc gets an unique id if you want your friend should see your desktop then your friend required your id and password.

Preview: 

June 7, 2009 Ritesh Sanap Internet, Solutions, Windows Cool things, Hacks, Software

Set More Than One Firefox Homepage

For those Firefox advocates including me myself, I relish the thought of knowing another simple trick about the ever powerful Firefox itself that will enhance my web experience. A little unknown feature available in your latest version of Firefox 3 is that is allows you to set more than on homepage. What i mean is that you can now open several instances of Firefox homepage when you first execute and run the popular web browser.

Select and follow the following directions on how to set and run more than one homepage in Firefox.

Tools -> Options -> Main (Home Page)

After which, simply separate each desired homepage with “|”. For example assuming you would like to make Facebook and Google to start up together when your launch Firefox, it should reflect as follows:

Well so what do you think of this simple trick that you’ve just learnt? Not too tough huh?

March 28, 2009 Ritesh Sanap Firefox, Internet, Solutions Cool things, Hacks, Software

Make Your CD Write Protected

Friends Many of people thought to make a CD Protected(Non-writable nor copied)

Here Are Some OF the Software Used to Make a CD Protected :

  • CCD-Lock
  • CD-Protector
  • CloneAudioProtector
  • Easy Audio Lock
  • FreeLock
  • TZCopyprotection
  • WinLock
  • WTM CD Prot
  • March 28, 2009 Ritesh Sanap Internet, Solutions Cool things, Hacks, Software, Tutorials

    Record a Screencast

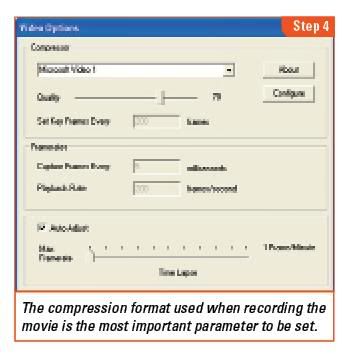
    Do you feel handicapped with the limitations of screen shots? Switch to screencasts and create a movie of your computer screen.

    Everyone knows how to take a simple snapshot of the computer screen. Whether you use the [Print Scrn] keyboard shortcut and paste the image in your computer’s default paint application, or use a more sophisticated application to automate it, the purpose of capturing an image of your computer screen is the same. It is much easier to convey to other people want you want done.

    If a picture is worth a thousand words, then a video should be worth at least ten thousand. We use screenshots a lot in this magazine to effectively communicate how a certain task is to be performed. And, of course, CHIP readers, being the whiz kids that they are, are probably used to being inundated with calls from friends and family for help to sort out their latest computer problems. Wouldn’t things be a whole lot easier for both parties if there was a way to communicate the solution in an easy to understand manner? This is where screencasts come in.

    Screencasts are analogous to screenshots. As a screenshot refers to an image of the computer screen, a screencast is a digital recording or a movie of what one sees on the monitor. The best thing about screencasts is that along with video capture of the screen, one can also include audio in them. This audio might be your voice as you describe the actions taking place, or something entirely different—for instance, background music. While narration will require a microphone to record your voice, music from a file on your computer can be used just as easily as playing it with a standard media player.

    This workshop will deal with how to successfully capture a screencast. For this purpose, we shall use the free product ‘CamStudio’, available on the CHIP DVD or the official website (http://camstudio.org). While there are many shareware applications available on the market, this great piece of screen recording software is released under the GPL license and is open source. Apart from digitally recording the screen and adding audio, CamStudio has the additional capability of inserting high quality screen captions with no jagged edges. Customization of cursors, for instance, using a unique cursor style that you wish to be displayed instead of the default white and black one, is also possible. A special video annotation feature can be used to capture yourself on the screen—a sort of ‘picture-in-picture’ effect.

    The region of the screen can also be specified—the full screen or only a certain portion of it. Changing the quality settings of the movie recorded is easy—smaller videos sizes are better for emailing while high quality ones are appreciated when distributed on optical discs or presented in front of an audience. CamStudio comes with its own Lossless Codec compression format, as well as other video codes. There are two file formats that the application can record the movie in—AVI and SWF. This comes in really handy when you want to embed the Flash video on your blog or website.

    Step 1: Installation

    Install the application CamStudio and its associated video codec from the CHIP DVD or download the installation file from the official website (http://camstudio.org). This should place a shortcut to the application on your desktop, so double-click the icon to run it. CamStudio has a bare-bones feels to it, and its main toolbar reflects that. It only has six main buttons which include the record and playback controls, a shortcut to the annotations window and toggle for the view—’Normal’, ‘Compact’, and ‘Buttons’, and file formats—AVI and SWF.

    Step 2: Screen area

    We are going to make a movie that will capture all the actions taken on the computer screen. The first thing to do is to set the area of the monitor that needs to be recorded. In the CamStudio window, select ‘Region | Fixed Region…’. In the proceeding dialog box titled ‘Fixed Region’, check the option ‘Drag Corners to Pan’. Next, press the ‘Select’ button and drag the crosshair cursor from the top-left of the screen to the bottom-right, excluding the taskbar. This way, the screencast will exclude the taskbar area and not give away to the viewer any other programs or hidden applications you may have running in the background.

    Step 3: Cursor Options

    CamStudio comes with a bevy of in-built cursor options. The normal cursor is a little bland, so we shall choose to record a differently styled one for the movie. Select ‘Options | Cursor Options’. In the window titled ‘Cursor Options’ check the radio button option ‘Use Custom Cursor’ and choose one from the list, for instance ‘PENCIL2’. If you have created a cursor that you want to use, select the option ‘Use Cursor From File’ and press the ‘Browse’ button. Next, browse to the folder location where the CUR (Cursor file) or ICO (Icon file ) file resides, select it and press ‘Open’. The cursor highlight option is available for those users that wish to highlight the cursor in a certain shape, color or size. Finally, exit the ‘Cursor Options’ window by pressing ‘OK’.

    Step 4: Codec Configuration

    To configure the codec that is used when the recording is made, go to ‘Options | Video Options’. The default compressor used is ‘Microsoft Video 1’ and while the video output using this compressor plays well in Windows Media Player, the same can’t be said for others, for instance, VLC player. So, we shall choose a more common compressor, for instance, ‘ffdshow Codec’. However, if you are sure that the end party has Windows Media Player, then just stick with the default option. The ‘CamStudio Lossless Codec v1.0’ is another option, and is available on the CHIP DVD. Make sure that the ‘Auto-Adjust’ option is checked and save your changes by pressing ‘OK’.

    Step 5: Audio In

    Since the movie needs to be accompanied by an audio narration, it is time to plug in your microphone to the ‘Mic in’ jack. Next, in the CamStudio window, select ‘Options | Record audio from microphone’. This tells the application to use the sound signal from the ‘Mic in’ jack as the audio source. To tweak the audio recording settings, go to ‘Options | Audio Option | Audio Options for Microphone’. Press the ‘Volume’ button to adjust the sound settings and press ‘OK’ to save your changes while exiting.

    Now you are ready to press the record button and start recording. The sky’s the limit when it comes to taking digital recordings of your screen.

    March 28, 2009 Ritesh Sanap Internet, Solutions Cool things, Hacks, Software, Tutorials

    How To Make a Bootscreen !


    The Art of Making BootSkins
    BootSkins are certainly the skinning fashion of the moment. These are replacements for the screen that is displayed when Windows is loading.
    Previously, replacing these screens had been a somewhat risky affair involving hacking your Windows application to pieces, but now BootSkin (www.bootskin.com) allows you to replace the screen without risking damage to your Windows installation under Windows 2000 and Windows XP.

    Note : The Software Required are Packed and the link to it is given at the end of the turtorial


    The software allows you to apply one of the default skins or one downloaded from WinCustomize (http://www.wincustomize.com/skins.asp?library=32), but how do you create one of your own?

    Well, it’s actually really easy. All that are required are 2 images and one configuration file. The first thing to do is to design how you want your skin to look when it’s completed.


    This is my image as I want it to look. It’s just a tweak of the standard look. What you need to bear in mind currently is that BootSkin only works with 16 color images. There are plans to change this in the future to allow more colors but we must work with what’s available at the moment so keep your image simple.
    The two images are the background and the progress bar. The background incorporates everything you see above apart from the blue progress bar in the top right. The box surrounding the progress bar is an optional part of the background image.
    A lot of image programs claim to produce 4-bit (16 color) bitmaps but often the format is not quite right without knowing your image editing software well. What is fortunate here is that another Stardock program can help.

    SkinStudio (www.stardock.com/products/SkinStudio) is mainly a tool for creating WindowBlinds and other skins but it has a useful tool built in that can help. If you select Tools … Bootskin … Prepare Image from the menu you will launch a little utility specifically for this purpose.
    If you “browse” for your image you can load it into the utility.

    You should then check the “Dither” option and experiment with the different Resampling and Dithering types to find the closest 16 color representation of your original image. You can then press “Save” and save your background image.

    You can then move on to prepare the progress bar. The best way to do this is to start with an existing image to tweak. Basically however, in the BootSkin, you will eventually specify how much space the progress bar will take up and then this progress bar you create will be animated as Windows loads to fill this space.
    Here we are using a simple image, which also uses the same 16 color palette as the background.

    OK, so on to creating the actual BootSkin.
    Under the directory where you installed BootSkin there is a Skins directory. Within this directory there will be a series of folders for each BootSkin installed. To add your skin, create a subdirectory with the name of your skin. I’m creating a directory called StardockEdition. Within that folder I’m going to place my two image files and a copy of an existing bootskin.ini file from one of the other folders.

    We’re almost there now. We’ve done the hard work in creating the images. Now, we just need to change the .ini file to tell BootSkin how to use these images. Lets take a look at that file now.

    [BootSkin]
    Type=0
    Name = “XXXXXXXXXXXX”
    Author = “XXXXXXXXXXXX”
    Description = “XXXXXXXXXXXX”
    ProgressBar=XXXXXXXXXXXXXXXXX.bmp
    ProgressBarX = XXX
    ProgressBarY = XXX
    ProgressBarWidth = XXX
    Screen=XXXXXXXXXXXXXXXXXX.bmp

    Note that I’ve replaced context with a series of XXXXXs. These are the areas you need to change.
    Name
    Here, simply enter the name of the BootSkin you have created within quotation marks.
    e.g.
    Name = “Windows Stardock Edition”
    Author
    Here, enter your own name so you can get the credit owed for your wonderful skin within quotation marks.
    e.g.
    Author = “_Martin_”
    Description
    Enter some information about the skin you have created, again within quotation marks.
    e.g.
    Description = “A simple twist on the standard login to give credit to Stardock’s wonderful software”
    Progress Bar
    Here, you need to enter the name of the bitmap file you are using for your progress bar.
    e.g.
    ProgressBar=StardockEditionProgress.bmp
    ProgressBarX
    You need to work our where you are placing the progress bar on the screen. This represents the absolute left edge of the bar. You can use your source image to work out the location.
    e.g.
    ProgressBarX = 508
    ProgressBarY
    This is the vertical coordinate of the top left of the progress bar on the screen.
    e.g.
    ProgressBarY = 12
    ProgressBarWidth
    This is how wide you want the progress bar to be. As Windows loads, the Progress bar image that you specified will be moved across this area. Once it has moved across the width of the progress bar you have specified here the progress bar will start again from the left edge of the progress bar.
    e.g.
    ProgressBarWidth = 118
    Screen
    Here, you need to enter the name of the bitmap file you are using for your background.
    e.g.
    Screen=StardockEditionBack.bmp
    OK, so here’s the final version of the bootskin.ini file:

    [BootSkin]
    Type=0
    Name = “Windows Stardock Edition”
    Author = “_Martin_”
    Description = “A simple twist on the standard login to give credit to Stardock’s wonderful software”
    ProgressBar=StardockEditionProgress.bmp
    ProgressBarX = 508
    ProgressBarY = 12
    ProgressBarWidth = 118
    Screen=StardockEditionBack.bmp

    Now that you have edited the file, save it.
    If you load BootSkin now, you can see you skin in the list.


    Click the Apply button and your skin will be shown the next time that Windows restarts.
    The final thing you can do is to share your BootSkin with others. To do this, select your skin, and select File … Export Selected Skin to File. Then, select a name for your file and a location to save it to. You will then have a .bootskin file that you can share with other BootSkin users.

    Note That For This Tutorial You Required SkinStudio 4 !
    Download Software From Here :
    Table Of Content
    1.Skinstudio 4
    2.Bootscreen 10.3
    3.Logonstudio-(Extra)

    March 23, 2009 Ritesh Sanap Solutions, Windows Author, background image, bootscreen, color bitmaps, color images, com, image editing software, image programs, moment, progress, progress bar, replacements, series, skin, Software, space, tool, Tutorials, windows application, windows installation, www

    Compress Your Images To The Last Bytes With Smush It


    If you have followed my posts previously, you will know that I am a fanatic in optimizing my site for the best performance. One of the thing that I do is to optimize and reduce the images to the smallest possible size without losing the visual quality.
    If you are wondering why reducing the size of your images can help in the site’s performance, basically the bigger the size of your images, the slower it takes for the server to load, and the higher probability that your server will crash when you experience a traffic spike (like reach Digg front page). In addition, if you are hosting your images on a third party site, like Amazon S3, having a smaller image also mean lesser cost as the charge is based on the bandwidth and storage space used.

    Smush.it is a service developed by the Yahoo Exceptional Performance team, aimed to improve the performance of your site. What SmushIt does is to strip all the metadata from the images and compress them using an optimization algorithm that will not only reduce the size, but also preserve the visual quality. When I first used it, I were surprised to see a 30% reduction in the size of the image that I have optimized in Photoshop. Most of the time that I use Smushit, it is able to shave 10-50%, occasionally 80% off the image size.
    There are several ways that you can utilize Smush it.

    Upload your image

    If you have some images in your computer that you want to optimize, you can easily upload your images to Smushit via the onsite uploader. There is no limit to the number of images that you can upload, but do bear in mind that the more you upload, the slower it is.
    smushit-upload

    Image URL

    Instead of uploading, you can also point Smushit to a Web URL (for example, your site) and get it to analyze and optimize all the images in that URL.
    smushit-url

    Firefox extension

    This is by far, my favorite way of using Smushit. If you are using Firefox browser, you can install the Smushit Firefox extension and have quick access to it anytime, anywhere. When you are on a web page (perhaps when you are previewing your post article in your site) and you want to optimize the images on that page, simply click on the SmushIt icon on the Status bar and it will analyze and optimize all the images on that page.
    Alternative to the Firefox extension is the bookmarklet that you can place on your Bookmark bar.

    The result

    Once SmushIt has optimized your images, it will show a report of how many bytes it has shaved off the original images and provide you a link to the zipped files of all the compressed images.
    smushit-result

    WordPress Plugin

    Another thing, if you are using WordPress, there is also a Smushit plugin that you can use. Once you have activated the plugin, all the images that you upload to your site will automatically run through SmushIt behind the scene. There is nothing extra that you need to do. Alternatively, you can go to your Media Library in WordPress and process your existing images with SmushIt.
    smushit-medialib

    Have you tried out SmushIt? Is it useful to you? Share with us in the comments.

    March 21, 2009 Ritesh Sanap Internet Cool things, Generator, Hacks, Software

    Posts pagination

    Page 1 Page 2 Page 3 Next page

    Currently Trending

    • How to download Specific parts of YouTube videos
      How to download Specific parts of YouTube videos
    • Windows Vista CD key
      Windows Vista CD key
    • How to retrieve my Demonoid username
      How to retrieve my Demonoid username
    • How to add Logo to Thesis theme
      How to add Logo to Thesis theme
    • How to Delete Feedbacks from JetPack Contact Form
      How to Delete Feedbacks from JetPack Contact Form
    • List Of All 255 Keyboard All Alt Key Codes
      List Of All 255 Keyboard All Alt Key Codes
    • h4x0r ( Hacker ) - Blogger Template
      h4x0r ( Hacker ) - Blogger Template

    Get Latest post in your Inbox

    Random Posts

    Windows 8 slows down on 100% disk usage and Freezes

    January 2, 2014 By Ritesh Sanap 2 Comments

    How To Make or Create Greasemonkey Scripts or User Scripts : Tutorial

    August 7, 2008 By Ritesh Sanap Leave a Comment

    Jquery – Create Float Menu with Scroll Follow Effect

    April 19, 2010 By Ritesh Sanap 5 Comments

    Trily – Blogger Template

    May 30, 2010 By Ritesh Sanap 28 Comments

    Add Button ‘Save Blogger Post As Pdf’ Blogger

    March 18, 2009 By Ritesh Sanap Leave a Comment

    WordPress

    HTTP2 Server Push for W3 Total Cache Minify plugin

    August 17, 2016 By Ritesh Sanap 5 Comments

    How to Disable Emojis in WordPress

    January 6, 2016 By Ritesh Sanap Leave a Comment

    JetPack Related posts and Sharing not working with NGINX

    November 10, 2015 By Ritesh Sanap Leave a Comment

    Simply Pure – WordPress Theme

    November 2, 2014 By Ritesh Sanap 2 Comments

    Advanced What should we Write about next? – WordPress Plugin

    July 28, 2014 By Ritesh Sanap Leave a Comment

    How to Disable Self Pingback or TrackBack

    January 16, 2014 By Ritesh Sanap Leave a Comment

    BlueStrap – WordPress Theme

    January 1, 2014 By Ritesh Sanap 15 Comments

    How to Create Multiple Excerpts in WordPress

    December 24, 2013 By Ritesh Sanap Leave a Comment

    How to Disable Auto Update in WordPress

    November 21, 2013 By Ritesh Sanap Leave a Comment

    How to Delete Feedbacks from JetPack Contact Form

    November 19, 2013 By Ritesh Sanap 9 Comments

    Recent Posts

    • HTTP2 Server Push for W3 Total Cache Minify plugin
    • How to show hidden files and folders in Mac OS X
    • How to Disable Emojis in WordPress
    • Canva – Online Photo Editor
    • JetPack Related posts and Sharing not working with NGINX

    Archives

    Recommends

    • DigitalOcean – Cloud Hosting
    • Dropbox – Cloud Storage
    • Elegant Themes – WordPress Themes
    • LastPass – Password Manager
    • Like us on Facebook
    • Follow on Twitter
    • +1 on Google
    • Subscribe via Email
    • RSS Feed

    © 2025 Best 2 Know · All Rights Reserved · We ♥ DigitalOcean