Best 2 Know

The Ultimate Blogging Resource

  • Advertising
  • WebHosting
  • Contact Us
  • Blogger
    • Blogger Templates
    • Blogger Tutorials
  • Browser
    • Firefox
    • Google Chrome
  • Google
  • Internet
    • Facebook
    • Twitter
  • Thesis
  • Windows
  • WordPress
    • WordPress Themes
    • WordPress Plugins
  • More
    • Linux
    • Review
    • Solutions
    • Announcements

Tag: Cool things

HORIZONTAL AND VERTICAL SPACING


CREATING PARAGRAPH INDENTATION:

There are three main ways of creating paragraph indentation:

1. One method is to create an empty, completely transparent image with a height of 1 pixel and a width of about 40 to 70 pixels (depending on how wide you want your indentation), anchor the image at the beginning of each paragraph, and the text will wrap around the image creating an indentation. It’s too much work for me.

2. You can also create an indentation using the <SPACER> tag, but keep in mind, this tag is recognized by Netscape 3.0 and 4.0, but not by any version of Internet Explorer to date.

Use the HORIZONTAL SIZE attribute of the <SPACER> tag to create a paragraph indentation. For instance, to get a 50 pixel horizontal indentation before a line of text, your HTML should look like this:

<SPACER TYPE=HORIZONTAL SIZE=50>Your text here. Your text here. Your text here. Your text here. Your text here. Your text here. Your text here. Your text here. Your text here. Your text here. Your text here. Your text here. Your text here. Your text here. Your text here. Your text here. Your text here. Your text here. Your text here. Your text here. Your text here. Your text here.

And you will get this (no indentation if you are using Explorer):

Your text here. Your text here. Your text here. Your text here. Your text here. Your text here. Your text here. Your text here. Your text here. Your text here. Your text here. Your text here. Your text here. Your text here. Your text here. Your text here. Your text here. Your text here. Your text here. Your text here. Your text here. Your text here.

3. The quickest way to create paragraph indentation – and the method recognized by all browsers – is to use a series of non-breaking spaces. HTML ignores extra white space within text. A browser will recognize the first space after a character, but any white space after is ignored. However, you can use a non-breaking space (&nbsp;), or a series of non-breaking spaces, to put extra white space within, or at the beginning or end of a text string.

For example, adding 6 non-breaking spaces at the beginning of the text string will indent the following sentence by 6 character spaces:

This text has an indent of 6 non-breaking spaces.

SPACING ABOVE AND BELOW TEXT:

There are two ways to create space above or below text:

1. You can use the VERTICAL SIZE attribute of the <SPACER> tag to create space above text. For instance, to get a 30 pixels of space above text, your HTML should look like this:

<SPACER TYPE=VERTICAL SIZE=30>Your text here. Your text here. Your text here. Your text here. Your text here. Your text here. Your text here. Your text here. Your text here. Your text here. Your text here. Your text here. Your text here. Your text here. Your text here. Your text here. Your text here. Your text here. Your text here. Your text here. Your text here. Your text here.

And you will get this – 30 pixels of space before the following text:

Your text here. Your text here. Your text here. Your text here. Your text here. Your text here. Your text here. Your text here. Your text here. Your text here. Your text here. Your text here. Your text here. Your text here. Your text here. Your text here. Your text here. Your text here. Your text here. Your text here. Your text here. Your text here.

Once again, the <SPACER> tag is recognized by Netscape 3.0 (and later versions), but not by any version of Internet Explorer to date.

2. The cheater’s way to include space above or below text (and the one method recognized by all browsers) is to just add some blank lines. Adding a series of paragraph breaks will not work (i.e. <P> <P> <P> <P> <P> <P>), but add a non-breaking space in between each paragraph break, and you have a very simple way of adding space above or below text:

<P> &nbsp; <P> &nbsp; <P>

SPACING AROUND IMAGES:

Using HSPACE (horizontal space) and VSPACE (vertical space) within the IMG SRC tag will give you horizontal and vertical padding around an image. For example, the following with give you 10 pixels above, below, and on each side of your image:

<IMG SCR=”yourimage.gif” HSPACE=10 VSPACE=10>

May 4, 2009 Ritesh Sanap Internet, Solutions, Windows Cool things, Hacks

MS-DOS and command line overview

Below is a listing of each of the MS-DOS commands currently listed on Computer Hope and a brief explanation of what each of the commands do. The below commands are all MS-DOS commands, which means not all the below commands will work in your version of MS-DOS and/or Windows command line. Clicking on the command will open the help page for that command with full details about it.

CommandDescription
Aansi.sysNSI.SYSDefines functions that change display graphics, control cursor movement,
and reassign keys.
appendCauses MS-DOS to look in other
directories when editing a file or running a command.
arpDisplays, adds, and removes arp
information from network devices.
assignAssign a drive letter to an
alternate letter.
assocView the file associations.
atSchedule a time to execute
commands or programs.
atmadmLists connections and
addresses seen by Windows ATM
call manager.
attribDisplay and change file
attributes.
batchRecovery console command that
executes a series of commands in a file.
bootcfgRecovery console command that
allows a user to view, modify, and rebuild the boot.ini
breakEnable / disable CTRL + C
feature.
caclsView and modify file ACL’s.
callCalls a batch file from
another batch file.
cdChanges directories.
chcpSupplement the International keyboard and character set
information.
chdirChanges directories.
chdskCheck the hard disk drive
running FAT for errors.
chkntfsCheck the hard disk drive
running NTFS for errors.
choiceSpecify a listing of multiple
options within a batch file.
clsClears the screen.
cmdOpens the command interpreter.
colorEasily change the foreground
and background color of the MS-DOS window.
commandOpens the command interpreter.
compCompares files.
compactCompresses and uncompress
files.
controlOpen Control Panel icons from
the MS-DOS prompt.
convertConvert FAT
to NTFS.
copyCopy one or more files to an
alternate location.
cttyChange the computers
input/output devices.
dateView or change the systems
date.
debugDebug utility to create
assembly programs to modify hardware settings.
defragRe-arrange the hard disk drive
to help with loading programs.
delDeletes one or more files.
deleteRecovery console command that
deletes a file.
deltreeDeletes one or more files
and/or directories.
dirList the contents of one or
more directory.
disableRecovery console command that
disables Windows system services or drivers.
diskcompCompare a disk with another
disk.
diskcopyCopy the contents of one disk
and place them on another disk.
doskeyCommand to view and execute
commands that have been run in the past.
dosshellA GUI to help with early
MS-DOS users.
drivparmEnables overwrite of original
device drivers.
echoDisplays messages and enables
and disables echo.
editView and edit files.
edlinView and edit files.
emm386Load extended Memory Manager.
enameRecovery console command to
enable a disable service or driver.
endlocalStops the localization of the
environment changes enabled by the setlocal
command.
eraseErase files from computer.
exitExit from the command
interpreter.
expandExpand a Microsoft Windows
file back to it’s original format.
extractExtract files from the
Microsoft Windows cabinets.
fasthelpDisplays a listing of MS-DOS
commands and information about them.
fcCompare files.
fdiskUtility used to create
partitions on the hard disk drive.
findSearch for text within a file.
findstrSearches for a string of text
within a file.
fixbootWrites a new boot sector.
fixmbrWrites a new boot record to a
disk drive.
forBoolean used in batch files.
formatCommand to erase and prepare a
disk drive.
ftpCommand to connect and operate
on a FTP server.
ftypeDisplays or modifies file types used in file extension associations.
gotoMoves a batch file to a
specific label or location.
graftablShow extended characters in
graphics mode.
helpDisplay a listing of commands
and brief explanation.
ifAllows for batch
files to perform conditional processing.
ifshlp.sys32-bit file manager.
ipconfigNetwork command to view
network adapter settings and assigned values.
keybChange layout of keyboard.
labelChange the label of a disk
drive.
lhLoad a device driver in to
high memory.
listsvcRecovery console command that displays
the services and drivers.
loadfixLoad a program above the first
64k.
loadhighLoad a device driver in to
high memory.
lockLock the hard disk drive.
logoffLogoff the currently profile using the computer.
logonRecovery console command to
list installations and enable administrator login.
mapDisplays the device name of a
drive.
mdCommand to create a new
directory.
memDisplay memory on system.
mkdirCommand to create a new
directory.
modeModify the port or display
settings.
moreDisplay one page at a time.
moveMove one or more files from
one directory to another directory.
msavEarly Microsoft Virus scanner.
msdDiagnostics utility.
msdexUtility used to load and
provide access to the CD-ROM.
nbtstatDisplays protocol statistics and current TCP/IP connections using
NBT
netUpdate, fix, or view the network or
network settings
netshConfigure dynamic and static
network information from MS-DOS.
netstatDisplay the TCP/IP network
protocol statistics and information.
nlsfuncLoad country specific
information.
nslookupLook up an IP
address of a domain or host on a network.
pathView and modify the computers
path location.
pathpingView and locate locations of
network latency.
pauseCommand used in batch files to
stop the processing of a command.
pingTest / send information to
another network computer or network device.
popdChanges to the directory or
network path stored by the pushd
command.
powerConserve power with computer portables.
printPrints data to a printer port.
promptView and change the MS-DOS prompt.
pushdStores a directory or network
path in memory so it can be returned to at any time.
qbasicOpen the QBasic.
rdRemoves an empty directory.
renRenames a file or directory.
renameRenames a file or directory.
rmdirRemoves an empty directory.
routeView and configure windows
network route tables.
runasEnables a user to execute a
program on another computer.
scandiskRun the scandisk utility.
scanregScan registry and recover
registry from errors.
setChange one variable or string to another.
setlocalEnables local environments to
be changed without affecting anything else.
setverChange MS-DOS version to trick
older MS-DOS programs.
shareInstalls support for file sharing and locking capabilities.
shiftChanges the position of replaceable parameters in a batch
program.
shutdownShutdown the computer from the
MS-DOS prompt.
smartdrvCreate a
disk cache in conventional memory or extended memory.
sortSorts
the input and displays the output to the screen.
startStart a separate window in Windows from
the MS-DOS prompt.
substSubstitute a folder on your computer for another drive letter.
switchesRemove add functions from
MS-DOS.
sysTransfer system files to disk
drive.
telnetTelnet
to another computer / device from the prompt.
timeView or modify the system
time.
titleChange the title of their MS-DOS window.
tracertVisually view a network
packets route across a network.
treeView a visual tree of the hard
disk drive.
typeDisplay the contents of a
file.
undeleteUndelete a file that has been
deleted.
unformatUnformat a hard disk drive.
unlockUnlock a disk drive.
verDisplay the version
information.
verifyEnables or disables the feature to determine if files have been written properly.
volDisplays the volume information
about the designated drive.
xcopyCopy multiple files,
directories, and/or drives from one location to another.

April 30, 2009 Ritesh Sanap Internet, Solutions, Windows Cool things, Hacks

How to backup and restore my Internet Favorites / Bookmarks.

Although there are several third-party software programs that will enable you to backup, restore, and manage your Internet browser bookmarks or favorites, all modern browsers today include bookmark managers and are capable of backing up and restoring your bookmarks and/or favorites. Below is a listing of each of the major browsers and how to backup and recover your Internet bookmarks or favorites.

Tip: If you’ve considered moving from one browser to another you can often backup your bookmarks in one browser and then follow the below restore tips to import those bookmarks into your new browser.

Microsoft Internet Explorer

Note: By default, Microsoft Internet Explorer will save your bookmarks as bookmark.htm.

Internet Explorer 5.0 and above users backing up favorites.

1. Within Internet Explorer, click the File menu and “Import and Export…”.
2. Within the Import and Export window click Next.
3. Click “Export Favorites” and click Next.
4. Select the folder wish to backup; if you wish to backup all favorites, leave the Favorites folder highlighted and click Next.
5. Select the destination you wish to save the favorites and click Next.
6. Click Finish.

Internet Explorer 5.0 and above recovering backup files from an Internet Explorer or Netscape backup.

1. Within Internet Explorer, click the File menu and “Import and Export…”.
2. Within the Import and Export window click Next.
3. Click “Import Favorites” and click Next.
4. Select the location that contains your favorites and click Next.
5. Select where you with to save your favorites and click Next.
6. Click Finish.

Mozilla Firefox

Recent versions of Firefox backup

1. Open Mozilla Firefox.
2. Click Bookmarks and then “Organize Bookmarks”.
3. Click “Export HTML” or Click “Import and Backup” and then “Backup”. We suggest Exporting to HTML since all browsers support the ability to easily read these files.
4. Type the filename you wish to save the file as and the destination and then click the Save button.

Recovering favorites in recent versions of Firefox

1. Open Mozilla Firefox.
2. Click Bookmarks and then “Organize Bookmarks”.
3. Click “Import and Backup”.
4. If the file is a JSON file click “Restore” and choose file. If the file is a .HTM/.HTML file or other browser file click “Import HTML” and follow the import wizzard.

Other versions of Firefox backup

1. Open Mozilla Firefox.
2. Click Bookmarks and then “Manage Bookmarks”.
3. In the Bookmarks Manager window click File and choose Export.
4. By default your bookmarks file will be called bookmarks.html. Choose the location you wish to save the bookmarks file to and click the Save button.

Netscape

Note: By default, Netscape will save your bookmarks as bookmarks.html.

Netscape Communicator / Netscape 7.0 and above users backing up bookmarks

1. Within Netscape, click Bookmarks and “Manage Bookmarks…” or CTRL+B.
2. Within the Bookmark manager click Tools and Export
3. Select where you wish to export the file and click ok.

Netscape Communicator / Netscape 7.0 and above users recovering backup files from Netscape backup or Internet Explorer.

1. Within Netscape, click Bookmarks and “Manage Bookmarks…” or CTRL+B.
2. Within the Bookmark manager click Tools and Import
3. Select the file you wish to Import and click open.

Opera

Note: By default, Opera will save your bookmarks as Opera6.adr. If your version of Opera is not 6, this filename may change.

Opera users backing up your bookmarks

1. Within Opera, click the File menu and Export.
2. Select the destination to where you wish to save the backup of your favorites to and click Save.

Opera users recovering a backup of your bookmarks.

1. Within Opera, click the File menu and Import.
2. Select “Opera bookmarks”, “Netscape bookmarks”, or “Internet Explorer favorites” depending on which bookmarks or favorites you wish to recover.
3. Select the file or folder you wish to recover.
4. Click ok.

April 30, 2009 Ritesh Sanap Internet, Solutions, Windows Cool things

Folder Background Images in WinXP

This brief tutorial explains how to add a background image to any folder in Windows XP.

First, make sure all hidden files are visible on your system. Then, open the folder for which you wish to add a background image. Within the folder, right-click and select Properties » Customize tab » Customize. There, choose any icon, click Apply and OK.

That process should have created a “desktop.ini file. Open that file with a text editor and add these lines of code:

[ExtShellFolderViews]
{BE098140-A513-11D0-A3A4-00C04FD706EC}={BE098140-A513-11D0-A3A4-00C04FD706EC}
[{BE098140-A513-11D0-A3A4-00C04FD706EC}]
IconArea_Image=C:\path\folder\background.jpg


To customize this according to your needs, edit the path in the last line to reflect to the location of the image you wish to use as the background image for that folder. Refresh the folder and the new background should appear.

Finally, to remove the default icon chosen during the creation of the desktop.ini and restore the default folder icon, delete these lines of code from within the desktop.ini file:

[.ShellClassInfo]
IconFile=%SystemRoot%\system32\shell32.dll
IconIndex=(some number)


April 13, 2009 Ritesh Sanap Solutions, Windows Cool things, Hacks, Tutorials

A NotePad Trick – What happened on 9/11/2001 !

Amazing but true , Notepad knew about 9/11/2001 ! The flight number which hit the World Trade Centre in New York was Q33N ! And Probably this was the code for the hit. I belive you will be shocked to watch this….

Do it yourself :


1. Open Notepad
2. Type : Q33 N
3. Now, go to Format menu
4. Choose Font.
5. Now, change the size to ’72’
6. Now, change the font to ‘Wingdings’
7. See what is displayed !

Shocked??

March 31, 2009 Ritesh Sanap Uncategorized Cool things

Set More Than One Firefox Homepage

For those Firefox advocates including me myself, I relish the thought of knowing another simple trick about the ever powerful Firefox itself that will enhance my web experience. A little unknown feature available in your latest version of Firefox 3 is that is allows you to set more than on homepage. What i mean is that you can now open several instances of Firefox homepage when you first execute and run the popular web browser.

Select and follow the following directions on how to set and run more than one homepage in Firefox.

Tools -> Options -> Main (Home Page)

After which, simply separate each desired homepage with “|”. For example assuming you would like to make Facebook and Google to start up together when your launch Firefox, it should reflect as follows:

Well so what do you think of this simple trick that you’ve just learnt? Not too tough huh?

March 28, 2009 Ritesh Sanap Firefox, Internet, Solutions Cool things, Hacks, Software

Make Your CD Write Protected

Friends Many of people thought to make a CD Protected(Non-writable nor copied)

Here Are Some OF the Software Used to Make a CD Protected :

  • CCD-Lock
  • CD-Protector
  • CloneAudioProtector
  • Easy Audio Lock
  • FreeLock
  • TZCopyprotection
  • WinLock
  • WTM CD Prot
  • March 28, 2009 Ritesh Sanap Internet, Solutions Cool things, Hacks, Software, Tutorials

    Record a Screencast

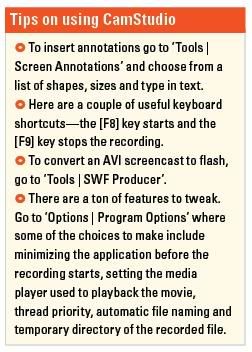
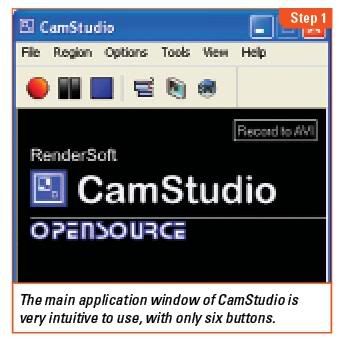
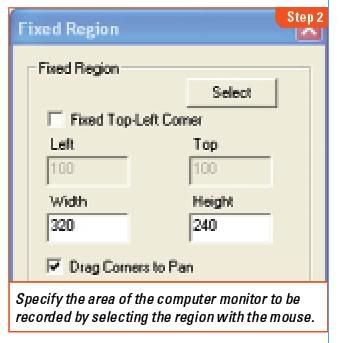
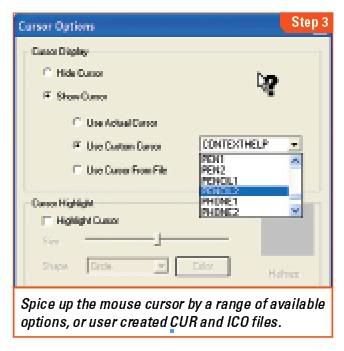
    Do you feel handicapped with the limitations of screen shots? Switch to screencasts and create a movie of your computer screen.
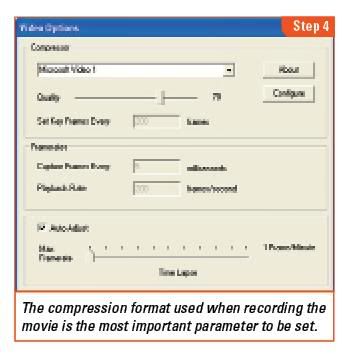
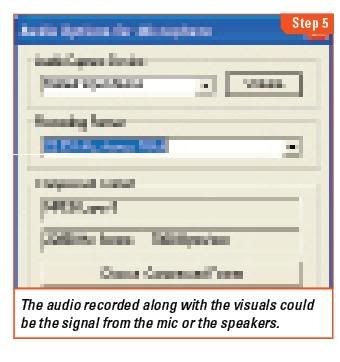
    Everyone knows how to take a simple snapshot of the computer screen. Whether you use the [Print Scrn] keyboard shortcut and paste the image in your computer’s default paint application, or use a more sophisticated application to automate it, the purpose of capturing an image of your computer screen is the same. It is much easier to convey to other people want you want done.

    If a picture is worth a thousand words, then a video should be worth at least ten thousand. We use screenshots a lot in this magazine to effectively communicate how a certain task is to be performed. And, of course, CHIP readers, being the whiz kids that they are, are probably used to being inundated with calls from friends and family for help to sort out their latest computer problems. Wouldn’t things be a whole lot easier for both parties if there was a way to communicate the solution in an easy to understand manner? This is where screencasts come in.

    Screencasts are analogous to screenshots. As a screenshot refers to an image of the computer screen, a screencast is a digital recording or a movie of what one sees on the monitor. The best thing about screencasts is that along with video capture of the screen, one can also include audio in them. This audio might be your voice as you describe the actions taking place, or something entirely different—for instance, background music. While narration will require a microphone to record your voice, music from a file on your computer can be used just as easily as playing it with a standard media player.

    This workshop will deal with how to successfully capture a screencast. For this purpose, we shall use the free product ‘CamStudio’, available on the CHIP DVD or the official website (http://camstudio.org). While there are many shareware applications available on the market, this great piece of screen recording software is released under the GPL license and is open source. Apart from digitally recording the screen and adding audio, CamStudio has the additional capability of inserting high quality screen captions with no jagged edges. Customization of cursors, for instance, using a unique cursor style that you wish to be displayed instead of the default white and black one, is also possible. A special video annotation feature can be used to capture yourself on the screen—a sort of ‘picture-in-picture’ effect.

    The region of the screen can also be specified—the full screen or only a certain portion of it. Changing the quality settings of the movie recorded is easy—smaller videos sizes are better for emailing while high quality ones are appreciated when distributed on optical discs or presented in front of an audience. CamStudio comes with its own Lossless Codec compression format, as well as other video codes. There are two file formats that the application can record the movie in—AVI and SWF. This comes in really handy when you want to embed the Flash video on your blog or website.

    Step 1: Installation

    Install the application CamStudio and its associated video codec from the CHIP DVD or download the installation file from the official website (http://camstudio.org). This should place a shortcut to the application on your desktop, so double-click the icon to run it. CamStudio has a bare-bones feels to it, and its main toolbar reflects that. It only has six main buttons which include the record and playback controls, a shortcut to the annotations window and toggle for the view—’Normal’, ‘Compact’, and ‘Buttons’, and file formats—AVI and SWF.

    Step 2: Screen area

    We are going to make a movie that will capture all the actions taken on the computer screen. The first thing to do is to set the area of the monitor that needs to be recorded. In the CamStudio window, select ‘Region | Fixed Region…’. In the proceeding dialog box titled ‘Fixed Region’, check the option ‘Drag Corners to Pan’. Next, press the ‘Select’ button and drag the crosshair cursor from the top-left of the screen to the bottom-right, excluding the taskbar. This way, the screencast will exclude the taskbar area and not give away to the viewer any other programs or hidden applications you may have running in the background.

    Step 3: Cursor Options

    CamStudio comes with a bevy of in-built cursor options. The normal cursor is a little bland, so we shall choose to record a differently styled one for the movie. Select ‘Options | Cursor Options’. In the window titled ‘Cursor Options’ check the radio button option ‘Use Custom Cursor’ and choose one from the list, for instance ‘PENCIL2’. If you have created a cursor that you want to use, select the option ‘Use Cursor From File’ and press the ‘Browse’ button. Next, browse to the folder location where the CUR (Cursor file) or ICO (Icon file ) file resides, select it and press ‘Open’. The cursor highlight option is available for those users that wish to highlight the cursor in a certain shape, color or size. Finally, exit the ‘Cursor Options’ window by pressing ‘OK’.

    Step 4: Codec Configuration

    To configure the codec that is used when the recording is made, go to ‘Options | Video Options’. The default compressor used is ‘Microsoft Video 1’ and while the video output using this compressor plays well in Windows Media Player, the same can’t be said for others, for instance, VLC player. So, we shall choose a more common compressor, for instance, ‘ffdshow Codec’. However, if you are sure that the end party has Windows Media Player, then just stick with the default option. The ‘CamStudio Lossless Codec v1.0’ is another option, and is available on the CHIP DVD. Make sure that the ‘Auto-Adjust’ option is checked and save your changes by pressing ‘OK’.

    Step 5: Audio In

    Since the movie needs to be accompanied by an audio narration, it is time to plug in your microphone to the ‘Mic in’ jack. Next, in the CamStudio window, select ‘Options | Record audio from microphone’. This tells the application to use the sound signal from the ‘Mic in’ jack as the audio source. To tweak the audio recording settings, go to ‘Options | Audio Option | Audio Options for Microphone’. Press the ‘Volume’ button to adjust the sound settings and press ‘OK’ to save your changes while exiting.

    Now you are ready to press the record button and start recording. The sky’s the limit when it comes to taking digital recordings of your screen.

    March 28, 2009 Ritesh Sanap Internet, Solutions Cool things, Hacks, Software, Tutorials

    Posts pagination

    Previous page Page 1 … Page 3 Page 4 Page 5 … Page 15 Next page

    Currently Trending

    • How to download Specific parts of YouTube videos
      How to download Specific parts of YouTube videos
    • Windows Vista CD key
      Windows Vista CD key
    • How to retrieve my Demonoid username
      How to retrieve my Demonoid username
    • How to add Logo to Thesis theme
      How to add Logo to Thesis theme
    • How to Delete Feedbacks from JetPack Contact Form
      How to Delete Feedbacks from JetPack Contact Form
    • List Of All 255 Keyboard All Alt Key Codes
      List Of All 255 Keyboard All Alt Key Codes
    • h4x0r ( Hacker ) - Blogger Template
      h4x0r ( Hacker ) - Blogger Template

    Get Latest post in your Inbox

    Random Posts

    How to download torrents without utorrent

    May 11, 2011 By Ritesh Sanap Leave a Comment

    How to add Slider to thesis theme

    June 19, 2011 By Ritesh Sanap 6 Comments

    Pinkvice – Blogger Template

    August 11, 2010 By Ritesh Sanap 2 Comments

    Orkut Keyboard Shortcuts

    August 11, 2008 By Ritesh Sanap Leave a Comment

    How to add avatar next to post title in thesis

    April 26, 2011 By Ritesh Sanap 2 Comments

    WordPress

    HTTP2 Server Push for W3 Total Cache Minify plugin

    August 17, 2016 By Ritesh Sanap 5 Comments

    How to Disable Emojis in WordPress

    January 6, 2016 By Ritesh Sanap Leave a Comment

    JetPack Related posts and Sharing not working with NGINX

    November 10, 2015 By Ritesh Sanap Leave a Comment

    Simply Pure – WordPress Theme

    November 2, 2014 By Ritesh Sanap 2 Comments

    Advanced What should we Write about next? – WordPress Plugin

    July 28, 2014 By Ritesh Sanap Leave a Comment

    How to Disable Self Pingback or TrackBack

    January 16, 2014 By Ritesh Sanap Leave a Comment

    BlueStrap – WordPress Theme

    January 1, 2014 By Ritesh Sanap 15 Comments

    How to Create Multiple Excerpts in WordPress

    December 24, 2013 By Ritesh Sanap Leave a Comment

    How to Disable Auto Update in WordPress

    November 21, 2013 By Ritesh Sanap Leave a Comment

    How to Delete Feedbacks from JetPack Contact Form

    November 19, 2013 By Ritesh Sanap 9 Comments

    Recent Posts

    • HTTP2 Server Push for W3 Total Cache Minify plugin
    • How to show hidden files and folders in Mac OS X
    • How to Disable Emojis in WordPress
    • Canva – Online Photo Editor
    • JetPack Related posts and Sharing not working with NGINX

    Archives

    Recommends

    • DigitalOcean – Cloud Hosting
    • Dropbox – Cloud Storage
    • Elegant Themes – WordPress Themes
    • LastPass – Password Manager
    • Like us on Facebook
    • Follow on Twitter
    • +1 on Google
    • Subscribe via Email
    • RSS Feed

    © 2025 Best 2 Know · All Rights Reserved · We ♥ DigitalOcean