Best 2 Know

The Ultimate Blogging Resource

  • Advertising
  • WebHosting
  • Contact Us
  • Blogger
    • Blogger Templates
    • Blogger Tutorials
  • Browser
    • Firefox
    • Google Chrome
  • Google
  • Internet
    • Facebook
    • Twitter
  • Thesis
  • Windows
  • WordPress
    • WordPress Themes
    • WordPress Plugins
  • More
    • Linux
    • Review
    • Solutions
    • Announcements

Tag: Cool things

How to Show offline in Gtalk or How to be invisible in Gtalk

After my last post on GTalk (Google Talk) About the Shorcuts in Gtalk. After that day i started looking for a new stuff in Gtalk that how to show invisible or offline in Gtalk . Because it is very helpful when a person is very busy on the internet. But to be invisible is easy if you are using the chat function that is in Gmail.

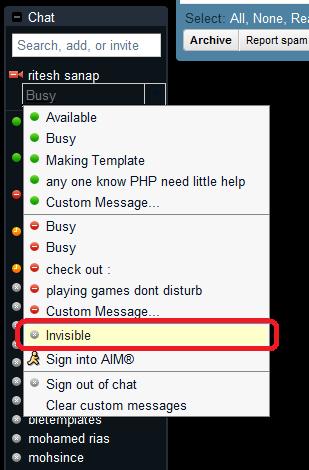
Being Invisible through Gmail Chat :

  1. Login to your Gmail Account.
  2. Then go to the chat and click the down arrow beside the status bar.
  3. then go a bit down and you will see an word Invisible click on it.
    Preview :

Note : If you are logged in with Gtalk That time it will show this error.

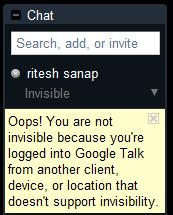
Then for this you have to sign out from Gtalk and have to chat from Gmail Chat.

If you not like to chat from Gmail chat. then I have another Edition of Gtalk which you can use.

Gtalk Labs Edition : this Edition of Gtalk has option of Invisible so you can use it . has an very good looking interface and has every good notification.
preview :

Google Talk Labs Edition is being Discontinued by Google

Well Now you can Invisible using Chat for Google Chrome Extension for that read : Google Talk for Chrome – Chat for Google

April 19, 2010 Ritesh Sanap Google, Internet, Solutions Cool things, Google Talk, Gtalk

GTalk Tips and Tricks / Shortcuts

I think many of the user an visitor of my site might be knowing the google messenger which is called  GTalk (Google Talk) officially released by google . it good simple and lighter it is just about 1 or 2 MB but it is great i too use it and it is too simple to use but today i will make it more simple to you to use by giving some shortcuts.

Dont have GTalk Click Here to Download.

Here are some Keyboard Shorcuts :


CTRL + Mousewheel up/down: Change the font size in a conversation window.
CTRL + E: Center text
CTRL + R: Right justify text
CTRL + L or CTRL+J: Left justify text
F9: Open Gmail to send an email to the person you talk to
F11: Start a call
F12: Stop the current call
ESC: Close the current window
Tab – Switches to next opened gtalk window. (same effect with Ctrl+tab and Shift+tab)
Shift + Tab – The same thing does that Tab but in reverse.
Ctrl + Shift + L – Switch between points, numbers, letters, capital letters, roman numbers and capital roman numbers

Bold Text : Use asterix before and after the text to make it bold. Like *hello* will make it hello.

Italic Text
: Use underscores before and after the text to make it italic. Like _hello_ will make it hello.

Want to leave blank message
: Just Press Shift + Enter together and meassage box will become big then leave shift and Just press Enter and the blank message will be received by your friend.

August 25, 2009 Ritesh Sanap Google, Internet, Solutions, Windows Cool things, Gtalk, Hacks

How to increase twitter followers !

Many of you have twitter account and as it is one of most popular site on the net many twitter user want more followers for them.  How to increase Twitter Followers ? they used it for diverting traffic to their site. now today I am going to tell you an site which will boost your twitter followers. I tried it and work within a day so i think you to try. Twittbank is the site which offers you more followers.

Now lets Get Started to increase Followers :
1. First visit Twittbank.
2. Enter your twitter user id and password.
3. Click on Let’s get started
4. In the Column Looking for people talking about put the Keywords and click on submit.
5.  Then in These people should be from Put the from which place would the users from or leave it default.
6. Then scroll little down and Click on I am Happy, bye !

July 20, 2009 Ritesh Sanap Twitter Cool things, Followers, Let, traffic, Twittbank

How to create transparent png with photoshop

Hi friends today i m going to tell you how to make transparent png image using photoshop. ya its really to easy.

1. Open Photoshop and open the image you want to make transparent.
2. In layers the click on the lock icon
preview:

3. An new Dialogue Box will open click OK on it.
preview:

4. Click on Magic wand tool ““
5. Using magic wand tool click on the field which you want not to display.
preview:

6. Then just Click Delete Key of the Keyboard.
7. Then what will you get will be like this in checked background.
preveiw:

8. I think now You know what i want to say is if you are happy save it .

July 11, 2009 Ritesh Sanap Solutions, Windows Cool things, Tutorials

Team Viewer

Friends today my friend was having problem in editing his template. So he told me to edit his template then i told him how can i edit his template without signing in with his account he told me to download that software and we got connected i get shocked i liked the software very much.

Download 

After Downloading it you can install or directly run it . User of both pc gets an unique id if you want your friend should see your desktop then your friend required your id and password.

Preview: 

June 7, 2009 Ritesh Sanap Internet, Solutions, Windows Cool things, Hacks, Software

ZooZooo – Vodafone Logos

You might have seen Vodafone Advertisement On Television Their is an new advertisement Named Zoo Zoo i thing you have liked them because i have too liked them . you might be thinking from where i can download the stuffs like that so here’ an official Site By Facebook for Zoo zoo lovers and who want to download their Stuffs.

Link to Site : http://www.facebook.com/zoozoo

June 7, 2009 Ritesh Sanap Internet Cool things

Read More hack for Blogger with automatic Thumbnail creator script

You have seen many a times the Read More Widget made by Hackosphere was very popular but was not able complete most of needs.

1. Major Problem
we have to add this code always.


Type your summary here
<span id=”fullpost”>
Type rest of the post here
</span>

2. This feature can be available only for future posts.

That is if you already have 50 posts in your blog and then after that you are adding this hack to your template then you need to add the above tag in each and every previous 50 posts to make this hack working. But it’s a tedious process.

3. Can’t create Thumbnails automatically

This hack can’t create automatic thumbnails for posts.

Now a new version has been developed by my blogger friends. I would like to share that new version of read more hack with you all.

Read More hack with automatic Thumbnail creator script

This hack has overcome all the drawbacks of the previous version of read more hack. This hack is developed by Blogsphera . ( Translated version ).

Let’s see the installation instructions :

Adding the Javascript

To add the javascript files to the header , first login to your blogger account. Then navigate to Layout section of your blog and then move to EDIT HTML sub tab and check ” Expand Widget Templates ” option in the edit html page.

There search for this tag : </head>

Now place the following code above that tag </head> :

<SCRIPT type=’text/javascript’> var thumbnail_mode = &quot;no-float&quot; ; summary_noimg = 500; summary_img = 400; img_thumb_height = 130; img_thumb_width = 281; </SCRIPT> <SCRIPT src=’http://www.smashingtips.com/wp-content/uploads/2009/05/read-more.js’ type=’text/javascript’/>

Then Add This Code
search for this tag  <p><data:post.body/></p> or <data:post.body/>
Now replace that whole tag with the code below :

<b:if cond=’data:blog.pageType == &quot;item&quot;’>
<p><data:post.body/></p>
<b:else/><DIV expr:id=’&quot;summary&quot; + data:post.id’><p><data:post.body/></p></DIV> <SCRIPT type=’text/javascript’>createSummaryAndThumb(&quot;summary<data:post.id/>&quot;);</SCRIPT> <div style=’clear: both;’/> <div style=’border:0px;padding-top:5px;;float:right;text-align:right;’><span class=’readon’><a expr:href=’data:post.url’ rel=’bookmark’><img src=’http://i422.photobucket.com/albums/pp302/bloggeracs/ReadMore.png‘/></a></span></div>
</b:if>

You can now preview your template and then save it.

Customizing The code 

Now let us see how to customize the code to suit your style :

  • var thumbnail_mode = “no-float”;
  • By default i have selected no-float. That the image will be unformatted. If you want the thumbnail to be shown only on left use the option ” float ” instead of “no-float”.

  • summary_noimg = 500 ;
  • This code will decide how much characters must be shown in the post if that post doesn’t contain any images. I have selected 500 characters.. you can customize it to suit ur template.

  • summary_img = 400 ;
  • If the post contains image , then this code will decide how many characters must be shown in that post. Change the number of characters to be shown to suit your template.

  • img_thumb_height = 130;
  • This tag decides the height of the thumbnail to be shown in the post. Vary the number 130 to suit your template.

  • img_thumb_width = 281 ;
  • This tag decides the width of the Thumbnail image to be shown

Adding read more image 

The author of this hack haven’t included any read more buttons in this hack. But I have modified the code and have included a image to link to the full post.


http://i422.photobucket.com/albums/pp302/bloggeracs/ReadMore.png

If you want to change the image then replace the url of the image with your own image

or if you don’t need any read more button , then replace the code in final step to this one :

 <b:if cond=’data:blog.pageType == “item”‘>
<p><data:post.body/></p>
<b:else/><DIV expr:id='”summary” + data:post.id’><p><data:post.body/></p></DIV> <SCRIPT type=’text/javascript’>createSummaryAndThumb(“summary<data:post.id/>”);</SCRIPT> <div style=’clear: both;’/><div style=’border:0px;padding-top:5px;;float:right;text-align:right;’><span class=’readon’><a expr:href=’data:post.url’ rel=’bookmark’>Read More…</a></span></div>
</b:if>

 change the tag in red to suit your style.


source :http://www.techieblogger.com/

May 17, 2009 Ritesh Sanap Blogger Tutorials, Internet, Solutions Blogger Hacks, Cool things, Hacks

How to send content summary only for my feedburner subscribers via email?

Many of the blogger in the world uses Feedburner which is now associated with google and its leading nowadays. You have subscribed to some of the sites you like you see that some of them show only short post How do they do that ? its very simple just follow below Steps:

  1. Log in to your blogger dashboard 
  2. Click on setting link / button
  3. Click on Site Feed
  4. Click on drop arrow and Select Short Instead Of Full 
  5. Click on Save.

Enjoy All the Fun this will increase your page views and Rank too.

May 11, 2009 Ritesh Sanap Blogger Tutorials, Internet, Solutions Blogger Hacks, Cool things, Hacks

Posts pagination

Previous page Page 1 Page 2 Page 3 Page 4 … Page 15 Next page

Currently Trending

  • How to download Specific parts of YouTube videos
    How to download Specific parts of YouTube videos
  • Windows Vista CD key
    Windows Vista CD key
  • How to retrieve my Demonoid username
    How to retrieve my Demonoid username
  • How to add Logo to Thesis theme
    How to add Logo to Thesis theme
  • How to Delete Feedbacks from JetPack Contact Form
    How to Delete Feedbacks from JetPack Contact Form
  • List Of All 255 Keyboard All Alt Key Codes
    List Of All 255 Keyboard All Alt Key Codes
  • h4x0r ( Hacker ) - Blogger Template
    h4x0r ( Hacker ) - Blogger Template

Get Latest post in your Inbox

Random Posts

How to remove category from WordPress URL

January 29, 2012 By Ritesh Sanap Leave a Comment

How to host javascript on blogger

June 21, 2010 By Ritesh Sanap 5 Comments

Hard Drives are not opening/working by Double-Click – Solution

August 16, 2008 By Ritesh Sanap Leave a Comment

How to add Attribution widget in blogger

May 28, 2010 By Ritesh Sanap 3 Comments

XP DLL Library Restore : Restore And Repair All Corrupt DLL Files Back

August 22, 2008 By Ritesh Sanap Leave a Comment

WordPress

HTTP2 Server Push for W3 Total Cache Minify plugin

August 17, 2016 By Ritesh Sanap 5 Comments

How to Disable Emojis in WordPress

January 6, 2016 By Ritesh Sanap Leave a Comment

JetPack Related posts and Sharing not working with NGINX

November 10, 2015 By Ritesh Sanap Leave a Comment

Simply Pure – WordPress Theme

November 2, 2014 By Ritesh Sanap 2 Comments

Advanced What should we Write about next? – WordPress Plugin

July 28, 2014 By Ritesh Sanap Leave a Comment

How to Disable Self Pingback or TrackBack

January 16, 2014 By Ritesh Sanap Leave a Comment

BlueStrap – WordPress Theme

January 1, 2014 By Ritesh Sanap 15 Comments

How to Create Multiple Excerpts in WordPress

December 24, 2013 By Ritesh Sanap Leave a Comment

How to Disable Auto Update in WordPress

November 21, 2013 By Ritesh Sanap Leave a Comment

How to Delete Feedbacks from JetPack Contact Form

November 19, 2013 By Ritesh Sanap 9 Comments

Recent Posts

  • HTTP2 Server Push for W3 Total Cache Minify plugin
  • How to show hidden files and folders in Mac OS X
  • How to Disable Emojis in WordPress
  • Canva – Online Photo Editor
  • JetPack Related posts and Sharing not working with NGINX

Archives

Recommends

  • DigitalOcean – Cloud Hosting
  • Dropbox – Cloud Storage
  • Elegant Themes – WordPress Themes
  • LastPass – Password Manager
  • Like us on Facebook
  • Follow on Twitter
  • +1 on Google
  • Subscribe via Email
  • RSS Feed

© 2025 Best 2 Know · All Rights Reserved · We ♥ DigitalOcean