Best 2 Know

The Ultimate Blogging Resource

  • Advertising
  • WebHosting
  • Contact Us
  • Blogger
    • Blogger Templates
    • Blogger Tutorials
  • Browser
    • Firefox
    • Google Chrome
  • Google
  • Internet
    • Facebook
    • Twitter
  • Thesis
  • Windows
  • WordPress
    • WordPress Themes
    • WordPress Plugins
  • More
    • Linux
    • Review
    • Solutions
    • Announcements

Tag: Blogger Hacks

Google Talk Widget or GTalk Widget For Blogger / BlogSpot

Its been about 1 week that you haven’t read anything new from best2know.info so for that i m absolutely Sorry for that. So today I m going to present you with awesome solution to you.

We all bloggers try our level best to give out the best we can to the readers but sometimes user cannot understand the tutorial or their is a bug or the thing is not working. so sometimes readers hesitate to ask using comment box or your contact me page . So solution to it is the GTalk Chat Badge.

As most of Use Gtalk or Is the worlds most popular to communicate with.

1.Google Chat Back Gadget – This gadget allows your visitors to IM you without revealing your Gmail address.you can chat with your blog visitors like what you normally do with your IM buddies. The only difference here is that your identity wont be revealed.

How to Install the Google Chat Back Gadget?

  1. Login with your Google Account at Google Talk Badges
  2. Copy the HTML Code generated by Google
  3. Now login to your Blogger Account and Navigate to Layout > Page Elements Page
  4. 4.Click the Add Gadget Link and Opt to add an HTML/JavaScript Gadget
  5. Paste the HTML code(that we copied) into the Gadget and Save it.
  6. Now you should see the Google Chat Back Widget on your Blog’s sidebar.

Here is a Live Preview of what the Google Chat Back Widget will look like

2.Google Talk Gadget

This Gadget is just like the Google Talk Interface within your Gmail. This will allow your blog visitors to login to Google Talk. It is better to say that, once you add this gadget, your blog can serve as a Google Talk IM Client. This Widget wont allow the visitors to chat with you. If the visitor logs into his Google Talk account(via this Google Talk Gadget), he will be able to chat with his Google Talk Buddies and not with you(the blog owner)unless you were already on his buddy list

You can add this Widget easily using this One Click Installer. It will Add the Widget to your Blog’s Sidebar.

Add Recent Posts Widget

August 21, 2010 Ritesh Sanap Blogger Blogger Hacks, Cool things, Gtalk

How to add Adsense In between Posts

This Post has been Requested by Glue on Guerilla v2.2 – Blogger Template . As All of the bloggers also know that one of the most biggest earning thing in blogger is Google’s Adsense. From were Most of the bloggers earn revenue and run  their blogs cost of server or of hosting or domain or for their pocket money. But the most targeted area is the post section but how to add the Ads in Post.
So lets Get Started :

  1. Login to your blogger dashboard
  2. Then Click on Edit HTML
  3. Tick the Expand widget Template
  4. Find for <data:post.body/>
  5. If your template is with Automatic Read More Hack with fixed pages Then Find for this code :

    <b:if cond=’data:blog.pageType == &quot;static_page&quot;’><b:else/>

  6. Add your Adsense code before the above code.
  7. If you Want to display the Ads only on the Post Page then with the Reference to : “How to Show sidebar or widgets only on Home page or Post page“

    <b:if cond=’data:blog.pageType == “item”‘>

    You Adsense Code your

    </b:if>

I think this Must be Enough for now.

July 15, 2010 Ritesh Sanap Blogger Tutorials Adsense, Blogger Hacks, Blogger Problems

How to Add Breadcrumb for blogger blog

All of us might have seen breadcrumbs on most wordpress blog.
So why not implement a breadcrumb for the blogger blogs.. For those who don’t know what a breadcrumb is,here is a little defenition from wikipedia.

Breadcrumbs or breadcrumb trail is a navigation aid used in user interfaces. It gives users a way to keep track of their location within programs or documents. The term comes from the trail of breadcrumbs left by Hansel and Gretel in the popular fairytale.

The trails like Home >> Label >> Post Name are the breadcrumbs.

So Now lets get Started :

  1. Login to your blogger dashboard
  2. Go to Layouts and then Edit HTML
  3. Then I would Sugguest you download the whole template first then Continue Editing.
  4. Then Tick the Expand widget Template.
  5. Now find for this Code :
    <b:include data='top' name='status-message'/>

    <b:include data='top' name='status-message'/>

  6. Now Replace it with the below code :

    <b:include data='top' name='status-message'/>
    <b:include data='posts' name='breadcrumb'/>

    <b:include data='top' name='status-message'/> <b:include data='posts' name='breadcrumb'/>

  7. Now Find :
    <b:includable id='main' var='top'>

    <b:includable id='main' var='top'>

  8. Now Replace the above code with below code :
    <b:includable id='breadcrumb' var='posts'>
    <b:if cond='data:blog.homepageUrl == data:blog.url'>
    <!-- No breadcrumb on home page -->
    <b:else/>
    <b:if cond='data:blog.pageType == "item"'>
    <!-- breadcrumb for the post page -->
    <p class='breadcrumbs'>
    <span class='post-labels'>
    <a expr:href='data:blog.homepageUrl' rel='tag'>Home</a>
    <b:loop values='data:posts' var='post'>
    <b:if cond='data:post.labels'>
    <b:loop values='data:post.labels' var='label'>
    <b:if cond='data:label.isLast == "true"'> »
    <a expr:href='data:label.url' rel='tag'><data:label.name/></a>
    </b:if>
    </b:loop>
    <b:else/>
    »Unlabelled
    </b:if>
    » <span><data:post.title/></span>
    </b:loop>
    </span>
    </p>
    <b:else/>
    <b:if cond='data:blog.pageType == "archive"'>
    <!-- breadcrumb for the label archive page and search pages.. -->
    <p class='breadcrumbs'>
    <span class='post-labels'>
    <a expr:href='data:blog.homepageUrl'>Home</a> » Archives for <data:blog.pageName/>
    </span>
    </p>
    <b:else/>
    <b:if cond='data:blog.pageType == "index"'>
    <p class='breadcrumbs'>
    <span class='post-labels'>
    <b:if cond='data:blog.pageName == ""'>
    <a expr:href='data:blog.homepageUrl'>Home</a> » All posts
    <b:else/>
    <a expr:href='data:blog.homepageUrl'>Home</a> » Posts filed under <data:blog.pageName/>
    </b:if>
    </span>
    </p>
    </b:if>
    </b:if>
    </b:if>
    </b:if>
    </b:includable>
    <b:includable id='main' var='top'>

    <b:includable id='breadcrumb' var='posts'> <b:if cond='data:blog.homepageUrl == data:blog.url'> <!-- No breadcrumb on home page --> <b:else/> <b:if cond='data:blog.pageType == "item"'> <!-- breadcrumb for the post page --> <p class='breadcrumbs'> <span class='post-labels'> <a expr:href='data:blog.homepageUrl' rel='tag'>Home</a> <b:loop values='data:posts' var='post'> <b:if cond='data:post.labels'> <b:loop values='data:post.labels' var='label'> <b:if cond='data:label.isLast == "true"'> » <a expr:href='data:label.url' rel='tag'><data:label.name/></a> </b:if> </b:loop> <b:else/> »Unlabelled </b:if> » <span><data:post.title/></span> </b:loop> </span> </p> <b:else/> <b:if cond='data:blog.pageType == "archive"'> <!-- breadcrumb for the label archive page and search pages.. --> <p class='breadcrumbs'> <span class='post-labels'> <a expr:href='data:blog.homepageUrl'>Home</a> » Archives for <data:blog.pageName/> </span> </p> <b:else/> <b:if cond='data:blog.pageType == "index"'> <p class='breadcrumbs'> <span class='post-labels'> <b:if cond='data:blog.pageName == ""'> <a expr:href='data:blog.homepageUrl'>Home</a> » All posts <b:else/> <a expr:href='data:blog.homepageUrl'>Home</a> » Posts filed under <data:blog.pageName/> </b:if> </span> </p> </b:if> </b:if> </b:if> </b:if> </b:includable> <b:includable id='main' var='top'>

  9. Now Find ]]></b:skin> and replace it with the below code :
    .breadcrumbs {
    padding:5px 5px 5px 0px;
    margin: 0px 0px 15px 0px;
    font-size:95%;
    line-height: 1.4em;
    border-bottom:3px double #e6e4e3;
    }
    ]]></b:skin>

    .breadcrumbs { padding:5px 5px 5px 0px; margin: 0px 0px 15px 0px; font-size:95%; line-height: 1.4em; border-bottom:3px double #e6e4e3; } ]]></b:skin>

Now you should have a working breadcrumb navigation on your system.

July 12, 2010 Ritesh Sanap Blogger Tutorials Blog Beginner Series, Blog Design Series, Blogger Hacks, fairytale, hansel and gretel, navigation aid, term comes from, Widget

How to Upload Images by URL in Blogger

Blogger Is getting better and better day by day. Improvement in its Editor and its new improved templates. But all this things are not enough but blogger lacked in one thing that is it doesn’t provide support to upload images by URL (Link).

Why Upload Images to Blogger ?
Blogger Gives it users everything free of cost from hosting of the images to the sub-domain.Hosting Images on blogger users tension of getting images deleted or of bandwidth. And Images loads more quickly then any other host or services that provide hosting of images .

You all now maybe thinking how to upload images by URL (Link).
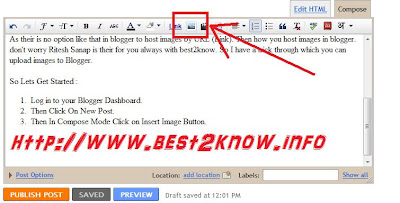
As their is no option like that in blogger to host images by URL (Link). Then how you host images in blogger. don’t worry Ritesh Sanap is their for you always with best2know. So I have a trick through which you can upload images to Blogger.

So Lets Get Started :

  1. Log in to your Blogger Dashboard.
  2. Then Click On New Post.
  3. Then In Compose Mode Click on Insert Image Button.
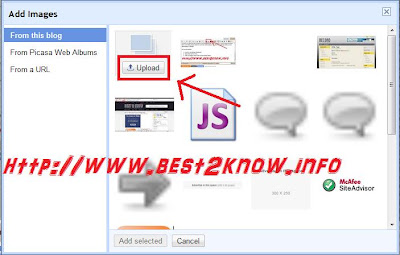
  4. A dialog box will get open
  5. Then Click on Upload Button
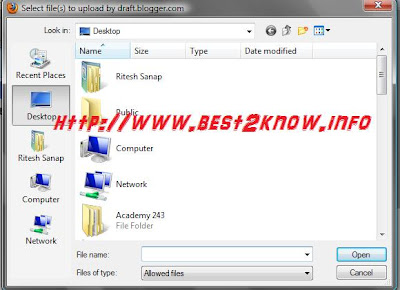
  6. Then Another Dialog Box will pop up
  7. In that Dialog Box add the Link of your image that you want to upload to Blogger.
  8. Then Click On Open. Image will get Uploaded and you are done.

If you like this then I think you might also like the previous post How to Host Javascript on Blogger.

If you Like This post then Please share it with your Friends and Do Comment.

July 3, 2010 Ritesh Sanap Blogger Tutorials Blogger Hacks, Cool things

How to host javascript on blogger

Hello to all my visitors, its been few days that i haven’t wrote anything on best2know.info, but today i have bought something for you all that will help you very very much to keep your blog healthy. Now you all might thing how ? . So here’s my today’s trick i will teach you how host JavaScript in blogger.

Why to host JavaScript in blogger?
Earlier their used to Google pages but now Google has closed them so we cannot use them. Plus the problem with Google pages was that it has a bandwidth limit. so when more visitors some functions of the site wont load then visitors are nervous and some time they don’t come back. So its bad for the blog. we cant also keep it on sites.google.com because it will set the scripts to download and not view.

Plus if you host it outside the server fails or take too much time too load again that causes problems so now we need to host JavaScript in blogger to save time bandwidth and too load fast.

So here’s the trick :

  1. Login to your dashboard.
  2. Click on Design and then on EDIT HTML.
  3. Then Find for </head> and just above this add the below code :

    <script type=’text/javascript’>

    //<![CDATA[

    PASTE THE JAVASCRIPT CODE HERE

    //]]>

    </script>

  4. Now just Replace the PASTE THE JAVASCRIPT CODE HERE with your javascript.
  5. Click on Preview i think now you can see no problem in Javascript and then click on Save.

Too add more then one JavaScript repeat the process.

Benefits of this trick:
» No file size limitations
» No bandwidth limitations
» Super fast page loading (because files are stored in blogger itself)

June 21, 2010 Ritesh Sanap Uncategorized Blog Beginner Series, Blogger Hacks

How to add Custom Favicon to blogger blog

Hello to all my visitors . Today morning I saw a comment on trily – blogger template.That my visitor cryptoGATO wanted to add this own favicon instead of default blogger favicon. so this is my todays topic so i m going to tell to you all how to do it. I think you might have seen my favicon Generator that i have made for you all.

So now lets get started :

  1. Login to your blogger dashboard
  2. Click on Design
  3. Click on Edit HTML
  4. Find this <b:skin><![CDATA[
  5. Then add the below code above the <b:skin><![CDATA[ :
    <link href='YOUR Image Link' rel='shortcut icon' type='image/vnd.microsoft.icon'/>

    <link href='YOUR Image Link' rel='shortcut icon' type='image/vnd.microsoft.icon'/>

  6. Replace Your Image Link with the link of your desired favicon.
  7. Then Click the preview button. If you can see the favicon on the address on the tab then you have successfully installed favicon.
  8. Then Click on Save.

June 17, 2010 Ritesh Sanap Blogger Tutorials Blog Design Series, blogger, Blogger Hacks, CDATA, Customization, dashboard, favicon, favicon generator, image link, link, morning, preview button, Template

How to remove the Blogger Nav bar

Blogger comes with a default navigation bar.This blogger navigaton bar may not be present in most of the templates.But if you are using a default blogger template,then you will see some navigation bars like the one in this picture.These navigation bars can be removed using some simple CSS techniques.

Here are the steps to remove the Blogger Navigation bar /Blogger Nav Bar :

  1. Login to your blogger account
  2. From your Dashboard click on Design
  3. Now choose Edit Html
  4. In that template code find ]]></b:skin>
  5. Add the below code Just before ]]></b:skin>
    #navbar-iframe {display:none !important;}

    #navbar-iframe {display:none !important;}

  6. Then Click on Preview and if everything is right hit the Save button

June 15, 2010 Ritesh Sanap Blogger Tutorials blogger, Blogger Hacks, CSS, css techniques, dashboard, Login, navigation bar, navigation bars, Template, template code

Random post with Summary widget for blogger

Hi to all you might have seen my previous Random Post widget but it was good this widget i have made has a facility to display the summary of that random post. why to display summary when the visitors visit your blog you might have not have an attractive title but your content is Rich but the earlier Random Post Only shows the title it results in loss of visitors.Again i have made it easy for all of you to install this widget.
Just Fill the Below form and enjoy your widget.

If you wish to show only title in recent post widget then use the earlier widget by clicking here.

June 12, 2010 Ritesh Sanap Blogger Tutorials Blogger Hacks

Posts pagination

Page 1 Page 2 … Page 6 Next page

Currently Trending

  • How to download Specific parts of YouTube videos
    How to download Specific parts of YouTube videos
  • Windows Vista CD key
    Windows Vista CD key
  • How to retrieve my Demonoid username
    How to retrieve my Demonoid username
  • How to add Logo to Thesis theme
    How to add Logo to Thesis theme
  • How to Delete Feedbacks from JetPack Contact Form
    How to Delete Feedbacks from JetPack Contact Form
  • List Of All 255 Keyboard All Alt Key Codes
    List Of All 255 Keyboard All Alt Key Codes
  • h4x0r ( Hacker ) - Blogger Template
    h4x0r ( Hacker ) - Blogger Template

Get Latest post in your Inbox

Random Posts

Peek-A-Boo Widget for Blogger

March 5, 2009 By Ritesh Sanap 2 Comments

XP Tips & Tricks

March 16, 2009 By Ritesh Sanap Leave a Comment

Make Firefox Work Faster Than Ever

February 29, 2008 By Ritesh Sanap Leave a Comment

Team Viewer

June 7, 2009 By Ritesh Sanap 5 Comments

Add Button ‘Save Blogger Post As Pdf’ Blogger

March 18, 2009 By Ritesh Sanap Leave a Comment

WordPress

HTTP2 Server Push for W3 Total Cache Minify plugin

August 17, 2016 By Ritesh Sanap 5 Comments

How to Disable Emojis in WordPress

January 6, 2016 By Ritesh Sanap Leave a Comment

JetPack Related posts and Sharing not working with NGINX

November 10, 2015 By Ritesh Sanap Leave a Comment

Simply Pure – WordPress Theme

November 2, 2014 By Ritesh Sanap 2 Comments

Advanced What should we Write about next? – WordPress Plugin

July 28, 2014 By Ritesh Sanap Leave a Comment

How to Disable Self Pingback or TrackBack

January 16, 2014 By Ritesh Sanap Leave a Comment

BlueStrap – WordPress Theme

January 1, 2014 By Ritesh Sanap 15 Comments

How to Create Multiple Excerpts in WordPress

December 24, 2013 By Ritesh Sanap Leave a Comment

How to Disable Auto Update in WordPress

November 21, 2013 By Ritesh Sanap Leave a Comment

How to Delete Feedbacks from JetPack Contact Form

November 19, 2013 By Ritesh Sanap 9 Comments

Recent Posts

  • HTTP2 Server Push for W3 Total Cache Minify plugin
  • How to show hidden files and folders in Mac OS X
  • How to Disable Emojis in WordPress
  • Canva – Online Photo Editor
  • JetPack Related posts and Sharing not working with NGINX

Archives

Recommends

  • DigitalOcean – Cloud Hosting
  • Dropbox – Cloud Storage
  • Elegant Themes – WordPress Themes
  • LastPass – Password Manager
  • Like us on Facebook
  • Follow on Twitter
  • +1 on Google
  • Subscribe via Email
  • RSS Feed

© 2025 Best 2 Know · All Rights Reserved · We ♥ DigitalOcean