Best 2 Know

The Ultimate Blogging Resource

  • Advertising
  • WebHosting
  • Contact Us
  • Blogger
    • Blogger Templates
    • Blogger Tutorials
  • Browser
    • Firefox
    • Google Chrome
  • Google
  • Internet
    • Facebook
    • Twitter
  • Thesis
  • Windows
  • WordPress
    • WordPress Themes
    • WordPress Plugins
  • More
    • Linux
    • Review
    • Solutions
    • Announcements

Tag: Blog Design Series

TipTip Jquery – Change Default Hyperlink’s Title Style

Long time not posting… Now I’ll share how to integrate TipTip Jquery plugin to your blog. This plugin will change the default title attribute style become interest one. Don’t worry, this plugin is containing no images, it’s all using CSS, so it will load lightly. But, this plugin will not work in IE that we know doesn’t support CSS3.

Well, I don’t have any words again, so let’s go to the steps

Javascript

To use the plugins from Jquery, we must add the library script from jquery. Find </head> and paste the script below above </head>.

<script src=’http://ajax.googleapis.com/ajax/libs/jquery/1.3.2/jquery.min.js’ type=’text/javascript’/> 

If you have already add this code, you no longer need to add this code again.

After that, add the script below. This script is the core of TipTip Jquery.

&lt;script src=’http://mbahrizh.googlecode.com/files/jquery.tipTip.js’ type=’text/javascript’/&gt; 

Also add this script. This script to call the TipTip Jquery.

<script type=”text/javascript”>
$(function(){
$(“.tooltip”).tipTip();
});
</script> 


CSS

This plugin use bundled CSS file, so copy code below before </head>.

<link rel=”stylesheet” href=”http://mbahrizh.googlecode.com/files/tipTip.css” /> 


HTML

To activate TipTip, you must add class and title attribute to your tag, such as a, div, p, input, etc.
Example below use a tag

<a href=’YOUR-LINK-HERE’ class=’tooltip’ title=’THIS IS THE TITLE COLUMN OR YOU CAN ADD DESCRIPTION’ >This is a link</a> 

If you hover at that link, the container which contain the title attribute will show interestly with some CSS styles.

Some Options

You can add following options to customize it as you wish. Example below is added maxwidth and edgeoffset option.

$(function(){
$(“.tooltip”).tipTip({maxWidth: “auto”, edgeOffset: 10});
}); 

Some other options:

  • activation: string (“hover” by default) – jQuery method TipTip is activated with. Can be set to: “hover”, “focus” or “click”.
  • keepAlive: true or false (false by default) – When set to true the TipTip will only fadeout when you hover over the actual TipTip and then hover off of it.
  • maxWidth: string (“200px” by default) – CSS max-width property for the TipTip element. This is a string so you can apply a percentage rule or ‘auto’.
  • edgeOffset: number (3 by default) – Distances the TipTip popup from the element with TipTip applied to it by the number of pixels specified.
  • defaultPosition: string (“bottom” by default) – Default orientation TipTip should show up as. You can set it to: “top”, “bottom”, “left” or “right”
  • delay: number (400 by default) – Number of milliseconds to delay before showing the TipTip popup after you mouseover an element with TipTip applied to it.

Thats all. See you!!!

Note : If you want completely CSS based tooltip you can click here.

May 13, 2010 Ritesh Sanap Blogger Tutorials Blog Design Series, Blogger Hacks, Cool things, Customization, Jquery

Add/Remove page/Post View Counter Widget For Blogger

Most of you are always thinking of a way to track that how many times is your posts or articles on your blog are viewed. Blogger a major free blog hosting provider does not have a individual post views counter widget like other blogging platforms, wordpress have. This is new improved version must work smoothly for all blogger blogs.

 
Features Added
  • New code makes Faster loading
  • Post views shown as image rather than text
  • You can show counter on Homepage too.
  • No ads at all. Advert Free.


How To install individual Page views counter widget for Blogger ??
Step#1 Log into your Blogger dashboard. Go to layout and than click on edit/html
Now check on expand widget content , than find the bellow code

<div class=’post-header-line-1′>

 and paste the bellow code after the above line

<b:if cond=’data:blog.pageType == &quot;item&quot;’><img height=’16’ src=’http://forums.bit-tech.net/images-light/misc/stats.gif’ width=’16’/><img alt=’counter’ expr:src=’&quot;http://demo.bloggerwidgets.cz.cc/counter.php?page=&quot; + data:post.id + &quot;&amp;digit=4&quot;’/>  <b>Views</b><b:else/><img height=’16’ src=’http://forums.bit-tech.net/images-light/misc/stats.gif’ width=’16’/><img alt=’counter’ expr:src=’&quot;http://demo.bloggerwidgets.cz.cc/counter2.php?page=&quot; + data:post.id + &quot;&amp;digit=4&quot;’/>  <b>Views</b></b:if>

Save your template and your new individual post views counter widget is ready

May 8, 2010 Ritesh Sanap Uncategorized Advert, blog, Blog Design Series, Blogger Hacks, code lt, cond, counter php, div class, expr, free blog, gif width, header line, Homepage, img, img height, quot, version, View, Widget

Hide or Show Label Count In Blogger

I Know Many Of You Have Tried Label Widget in Blogger. And You Know That Blogger Is Displaying Label Count Some people prefer not to display the label count in their blogs as it looks a bit unprofessional. Lets say if you have a label ‘Funny sms’ with 50 label count and another one ‘ Good morning sms’ with 2 as label count… less people will show interest on clicking the second one.

 So, lets see how to hide or remove the Label count in your blogger blog(s)…

1. Sign into Blogger dashboard » Layout » Edit html

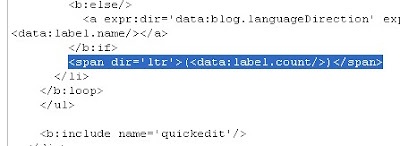
Tick the expand widget templates and remove this line from the template..

<span dir=’ltr’>(<data:label.count/>)</span>

2. Save Changes

You Are Done!!

May 2, 2010 Ritesh Sanap Uncategorized Blog Design Series, Blogger Hacks, Customization, Tutorials

Create Four Column Footer Section Instead Of Three Column In Blogger Blog

As You All Know That blogger is allow only Three Column  Footer Section so i am coming with another hack  To Creat four column footer section so you can add many widgets

Steps You Need to Add 4 Column Section at the Bottom of the Blogger

Step 1. Login to your Blogger Dashboard

Step 2. Go to Layout >> Edit HTML , do not check the “expand widget templates” box. This will simplifies the process

Step 3. Back up your existing blogger template (Click on ‘Download Full Template’ to Back up)

Step 4. Now search these line of codes or similar ( footer-wrap, footer, footer-end etc… )

<div id=’footer-wrapper’>
<b:section class=’footer’ id=’footer’/>
</div>

<div id=’footer-wrapper’> <b:section class=’footer’ id=’footer’/> </div>

Step 5. Replace section code in red with below code

<div id='footer-column-container'>
<div id='footer1' style='width: 225px; float: left; margin:0; '>
<b:section class='footer-column' id='footer-column-1' preferred='yes' style='float:left;'>
<b:widget id='Text1' locked='false' title='About B-G' type='Text'/>
 
</b:section>
</div>
 
<div id='footer2' style='width: 225px; float: left; margin:0; '>
<b:section class='footer-column' id='footer-column-2' preferred='yes' style='float:left;'>
<b:widget id='Text4' locked='false' title='About Author' type='Text'/>
</b:section>
</div>
 
<div id='footer3' style='width: 225px; float: right; margin:0; '>
<b:section class='footer-column' id='footer-column-3' preferred='yes' style='float:right;'>
<b:widget id='Text3' locked='false' title='Subscribe in Reader' type='Text'/>
</b:section>
</div>
 
<div id='footer4' style='width: 225px; float: right; margin:0; '>
<b:section class='footer-column' id='footer-column-4' preferred='yes' style='float:right;'>
<b:widget id='Text2' locked='false' title='Access B-G on Go' type='Text'/>
</b:section>
</div>
 
<div style='clear:both;'/>
</div>

<div id='footer-column-container'> <div id='footer1' style='width: 225px; float: left; margin:0; '> <b:section class='footer-column' id='footer-column-1' preferred='yes' style='float:left;'> <b:widget id='Text1' locked='false' title='About B-G' type='Text'/></b:section> </div><div id='footer2' style='width: 225px; float: left; margin:0; '> <b:section class='footer-column' id='footer-column-2' preferred='yes' style='float:left;'> <b:widget id='Text4' locked='false' title='About Author' type='Text'/> </b:section> </div><div id='footer3' style='width: 225px; float: right; margin:0; '> <b:section class='footer-column' id='footer-column-3' preferred='yes' style='float:right;'> <b:widget id='Text3' locked='false' title='Subscribe in Reader' type='Text'/> </b:section> </div><div id='footer4' style='width: 225px; float: right; margin:0; '> <b:section class='footer-column' id='footer-column-4' preferred='yes' style='float:right;'> <b:widget id='Text2' locked='false' title='Access B-G on Go' type='Text'/> </b:section> </div><div style='clear:both;'/> </div>

Step 6. Now you need to add CSS for these section, add below CSS code right above ]]></b:skin>

#footer-column-container { border: .3px dotted #cccccc;}
 
.footer-column { margin: 0 10px 0 10px; padding:5px;
color: #666666; line-height: 1.5em; font-size:12px;}
 
.footer-column h2 {
padding-bottom:.15em; text-align:center;
font:"normal normal 80% 'Comic Sans MS','Lucida Sans Unicode','Trebuchet MS',Sans-serif";
color:#333333;
line-height:1em; letter-spacing:.1em;
border-bottom: 1px solid #cccccc;}
 
.footer-column ul { list-style:none; margin:0 0 0; padding:0 0 0;}
 
.footer-column ul li {
background: url(http://i421.photobucket.com/albums/pp296/rnbutpur/bullet-1.gif) no-repeat;
margin:0 0 0; padding-left: 16px;
padding-bottom: 0.5em; line-height:1.2em;}
 
.footer-column .widget {margin:0 0 .5em; padding:0 0 1em;}

#footer-column-container { border: .3px dotted #cccccc;}.footer-column { margin: 0 10px 0 10px; padding:5px; color: #666666; line-height: 1.5em; font-size:12px;}.footer-column h2 { padding-bottom:.15em; text-align:center; font:"normal normal 80% 'Comic Sans MS','Lucida Sans Unicode','Trebuchet MS',Sans-serif"; color:#333333; line-height:1em; letter-spacing:.1em; border-bottom: 1px solid #cccccc;}.footer-column ul { list-style:none; margin:0 0 0; padding:0 0 0;}.footer-column ul li { background: url(http://i421.photobucket.com/albums/pp296/rnbutpur/bullet-1.gif) no-repeat; margin:0 0 0; padding-left: 16px; padding-bottom: 0.5em; line-height:1.2em;}.footer-column .widget {margin:0 0 .5em; padding:0 0 1em;}

Step 7. Preview and Save your template. Now you will have four column at footer section

KEEP VISITING

May 2, 2010 Ritesh Sanap Uncategorized Blog Design Series, Customization

How to create a blogger blog

Today I m going to tell you how to create a blogger blog. Blogger blogs are really good and Easy to use every beginner can understand to use it.

1. Visit Blogger.com
2. If you have gmail or google account use it.

3. Then Fill your email address and Password of it (Google or Gmail account details)
Preview :

4. Then Fill The Details such as Display name and Etc.
Preview :

5. Then Click On

6. Then Fill Details like Blog Title and Link of blog.
Preview :

7.  The Last and Final Step To Choose an Template and Click on

August 9, 2009 Ritesh Sanap Uncategorized Blog Design Series

Blog Design Series

All of my visitors today i going to announce that i m thing to start an blog design series in which you all will learn every single part and code of the blogger code I tell you how to modify it every single part of it. how i design them some easy to convert tricks and many more i will only start it if i get more response about it. every possible and every little stuff .

August 8, 2009 Ritesh Sanap Uncategorized Blog Design Series

Posts pagination

Previous page Page 1 Page 2

Currently Trending

  • How to download Specific parts of YouTube videos
    How to download Specific parts of YouTube videos
  • Windows Vista CD key
    Windows Vista CD key
  • How to retrieve my Demonoid username
    How to retrieve my Demonoid username
  • How to add Logo to Thesis theme
    How to add Logo to Thesis theme
  • How to Delete Feedbacks from JetPack Contact Form
    How to Delete Feedbacks from JetPack Contact Form
  • List Of All 255 Keyboard All Alt Key Codes
    List Of All 255 Keyboard All Alt Key Codes
  • h4x0r ( Hacker ) - Blogger Template
    h4x0r ( Hacker ) - Blogger Template

Get Latest post in your Inbox

Random Posts

Make Autorun For Ur CDs n DVDs

February 29, 2008 By Ritesh Sanap Leave a Comment

Before Starting a Blog

March 14, 2012 By Ritesh Sanap 3 Comments

How to Save Online Flash Games and Greetings from the Internet for Offline Play ?

February 27, 2009 By Ritesh Sanap Leave a Comment

Add Social Bookmarking Icons After Every Post In Blogger Blog

April 29, 2010 By Ritesh Sanap 8 Comments

Hear FM in Gtalk

May 14, 2010 By Ritesh Sanap Leave a Comment

WordPress

HTTP2 Server Push for W3 Total Cache Minify plugin

August 17, 2016 By Ritesh Sanap 5 Comments

How to Disable Emojis in WordPress

January 6, 2016 By Ritesh Sanap Leave a Comment

JetPack Related posts and Sharing not working with NGINX

November 10, 2015 By Ritesh Sanap Leave a Comment

Simply Pure – WordPress Theme

November 2, 2014 By Ritesh Sanap 2 Comments

Advanced What should we Write about next? – WordPress Plugin

July 28, 2014 By Ritesh Sanap Leave a Comment

How to Disable Self Pingback or TrackBack

January 16, 2014 By Ritesh Sanap Leave a Comment

BlueStrap – WordPress Theme

January 1, 2014 By Ritesh Sanap 15 Comments

How to Create Multiple Excerpts in WordPress

December 24, 2013 By Ritesh Sanap Leave a Comment

How to Disable Auto Update in WordPress

November 21, 2013 By Ritesh Sanap Leave a Comment

How to Delete Feedbacks from JetPack Contact Form

November 19, 2013 By Ritesh Sanap 9 Comments

Recent Posts

  • HTTP2 Server Push for W3 Total Cache Minify plugin
  • How to show hidden files and folders in Mac OS X
  • How to Disable Emojis in WordPress
  • Canva – Online Photo Editor
  • JetPack Related posts and Sharing not working with NGINX

Archives

Recommends

  • DigitalOcean – Cloud Hosting
  • Dropbox – Cloud Storage
  • Elegant Themes – WordPress Themes
  • LastPass – Password Manager
  • Like us on Facebook
  • Follow on Twitter
  • +1 on Google
  • Subscribe via Email
  • RSS Feed

© 2025 Best 2 Know · All Rights Reserved · We ♥ DigitalOcean