Best 2 Know

The Ultimate Blogging Resource

  • Advertising
  • WebHosting
  • Contact Us
  • Blogger
    • Blogger Templates
    • Blogger Tutorials
  • Browser
    • Firefox
    • Google Chrome
  • Google
  • Internet
    • Facebook
    • Twitter
  • Thesis
  • Windows
  • WordPress
    • WordPress Themes
    • WordPress Plugins
  • More
    • Linux
    • Review
    • Solutions
    • Announcements

How to Add Breadcrumb for blogger blog

All of us might have seen breadcrumbs on most wordpress blog.
So why not implement a breadcrumb for the blogger blogs.. For those who don’t know what a breadcrumb is,here is a little defenition from wikipedia.

Breadcrumbs or breadcrumb trail is a navigation aid used in user interfaces. It gives users a way to keep track of their location within programs or documents. The term comes from the trail of breadcrumbs left by Hansel and Gretel in the popular fairytale.

The trails like Home >> Label >> Post Name are the breadcrumbs.

So Now lets get Started :

  1. Login to your blogger dashboard
  2. Go to Layouts and then Edit HTML
  3. Then I would Sugguest you download the whole template first then Continue Editing.
  4. Then Tick the Expand widget Template.
  5. Now find for this Code :
    <b:include data='top' name='status-message'/>

    <b:include data='top' name='status-message'/>

  6. Now Replace it with the below code :

    <b:include data='top' name='status-message'/>
    <b:include data='posts' name='breadcrumb'/>

    <b:include data='top' name='status-message'/> <b:include data='posts' name='breadcrumb'/>

  7. Now Find :
    <b:includable id='main' var='top'>

    <b:includable id='main' var='top'>

  8. Now Replace the above code with below code :
    <b:includable id='breadcrumb' var='posts'>
    <b:if cond='data:blog.homepageUrl == data:blog.url'>
    <!-- No breadcrumb on home page -->
    <b:else/>
    <b:if cond='data:blog.pageType == "item"'>
    <!-- breadcrumb for the post page -->
    <p class='breadcrumbs'>
    <span class='post-labels'>
    <a expr:href='data:blog.homepageUrl' rel='tag'>Home</a>
    <b:loop values='data:posts' var='post'>
    <b:if cond='data:post.labels'>
    <b:loop values='data:post.labels' var='label'>
    <b:if cond='data:label.isLast == "true"'> »
    <a expr:href='data:label.url' rel='tag'><data:label.name/></a>
    </b:if>
    </b:loop>
    <b:else/>
    »Unlabelled
    </b:if>
    » <span><data:post.title/></span>
    </b:loop>
    </span>
    </p>
    <b:else/>
    <b:if cond='data:blog.pageType == "archive"'>
    <!-- breadcrumb for the label archive page and search pages.. -->
    <p class='breadcrumbs'>
    <span class='post-labels'>
    <a expr:href='data:blog.homepageUrl'>Home</a> » Archives for <data:blog.pageName/>
    </span>
    </p>
    <b:else/>
    <b:if cond='data:blog.pageType == "index"'>
    <p class='breadcrumbs'>
    <span class='post-labels'>
    <b:if cond='data:blog.pageName == ""'>
    <a expr:href='data:blog.homepageUrl'>Home</a> » All posts
    <b:else/>
    <a expr:href='data:blog.homepageUrl'>Home</a> » Posts filed under <data:blog.pageName/>
    </b:if>
    </span>
    </p>
    </b:if>
    </b:if>
    </b:if>
    </b:if>
    </b:includable>
    <b:includable id='main' var='top'>

    <b:includable id='breadcrumb' var='posts'> <b:if cond='data:blog.homepageUrl == data:blog.url'> <!-- No breadcrumb on home page --> <b:else/> <b:if cond='data:blog.pageType == "item"'> <!-- breadcrumb for the post page --> <p class='breadcrumbs'> <span class='post-labels'> <a expr:href='data:blog.homepageUrl' rel='tag'>Home</a> <b:loop values='data:posts' var='post'> <b:if cond='data:post.labels'> <b:loop values='data:post.labels' var='label'> <b:if cond='data:label.isLast == "true"'> » <a expr:href='data:label.url' rel='tag'><data:label.name/></a> </b:if> </b:loop> <b:else/> »Unlabelled </b:if> » <span><data:post.title/></span> </b:loop> </span> </p> <b:else/> <b:if cond='data:blog.pageType == "archive"'> <!-- breadcrumb for the label archive page and search pages.. --> <p class='breadcrumbs'> <span class='post-labels'> <a expr:href='data:blog.homepageUrl'>Home</a> » Archives for <data:blog.pageName/> </span> </p> <b:else/> <b:if cond='data:blog.pageType == "index"'> <p class='breadcrumbs'> <span class='post-labels'> <b:if cond='data:blog.pageName == ""'> <a expr:href='data:blog.homepageUrl'>Home</a> » All posts <b:else/> <a expr:href='data:blog.homepageUrl'>Home</a> » Posts filed under <data:blog.pageName/> </b:if> </span> </p> </b:if> </b:if> </b:if> </b:if> </b:includable> <b:includable id='main' var='top'>

  9. Now Find ]]></b:skin> and replace it with the below code :
    .breadcrumbs {
    padding:5px 5px 5px 0px;
    margin: 0px 0px 15px 0px;
    font-size:95%;
    line-height: 1.4em;
    border-bottom:3px double #e6e4e3;
    }
    ]]></b:skin>

    .breadcrumbs { padding:5px 5px 5px 0px; margin: 0px 0px 15px 0px; font-size:95%; line-height: 1.4em; border-bottom:3px double #e6e4e3; } ]]></b:skin>

Now you should have a working breadcrumb navigation on your system.

July 12, 2010 Ritesh Sanap Blogger Tutorials Blog Beginner Series, Blog Design Series, Blogger Hacks, fairytale, hansel and gretel, navigation aid, term comes from, Widget

Mozilla Firefox 4 beta 1

Hello to you, do you know after the success of mozilla firefox 3 mozilla is developing its forth version and it has released Firefox 4 beta 1 . As all of you know Mozilla Firefox is considered the best browser in the world and Most of the Users of the Net Uses firefox so its got a demand.

Features :

  1. WebSockets

    Developers will be able to build real-time online interactions like gaming and chatting.

  2. Stylin’ Pages with CSS3

    With support for new CSS3 features, web designers can make their pages both look prettier and display faster.

  3. HTML5 Support

    A new HTML5 parser and full support for web video, audio, drag & drop, and file handling means Firefox 4 is ready to run the best web apps of both today and tomorrow.

  4. Web Console

    With this experimental analysis tool for modern sites, Firefox allows you to peek under the hood of dynamic web pages.

  5. JetPack SDK (Making Add-On Development Easier)

    Add-Ons can be installed without restarting the browser, and can be developed more easily using the new JetPack SDK and js-ctypes.

  6. Indexed DB

    Developers will be able to store application data locally, making cloud applications like Gmail or GDocs work more quickly and reliably, even when not connected to a network.

  7. Crash Protection

    Firefox provides uninterrupted browsing for Windows, Linux, and now Mac when there is a crash in the Adobe Flash, Apple Quicktime or Microsoft Silverlight plugins. If one of these commonly-used plugins crashes or freezes, it won’t affect the rest of Firefox. Instead, you can simply reload the page to restart the plugin and try again.

  8. New Add-Ons Manager

    An easier way to manage your add-ons and discover new options for personalizing your browsing.

  9. WebM and HD Video

    As pioneers of HTML5 video standards, Firefox also supports the WebM format so you can watch open HD quality video.

  10. Protecting Your Privacy

    Firefox puts your privacy first, fixing flaws in some web standards that allow bad guys to snoop around and expose your browser history.

So I think now you all are impressed and wanted to download it so Download it from here.

July 7, 2010 Ritesh Sanap Firefox

Happy Birthday

Hello to all of you, you all might be thinking why the title of the post is like that and some of them have guessed it right. So This is the title because today is the birthday of Best2know.info . Today’s date 6 July 2010 and Best2know.info was started on 6 July 2007 . It Means 3 years ago . From Their it went under several changes like earlier is was know as riteshsanap4u and then Tips and Tricks and Latest Updates and After that Tips and Tricks . Even if it went under several changes the motto of the best2know.info didn’t changed. From Beginning Best2know.info was helping the people and till this date its still doing the same. And Thanks to users for their Supports so Say Happy Birthday Best2know.info

One More Fact : The Birth date of Best2know.info is similar to Birth Date of Ritesh Sanap. Just The difference is in the years means Best2know.info was born on 6 July 2007 and Ritesh Sanap was born 6 July 1994. So Happy Birthday to ME (Ritesh Sanap) also.

July 6, 2010 Ritesh Sanap Announcements Cool things

Guerilla v2.2 – Blogger Template

Hello to everyone its been some time that i haven’t released any blogger template and Today i received an Request from aRkimz™. He Requested me to convert a Template named Guerilla v2.2 this template is simple but Completes each and every need of the users From Social Bookmarking to Related posts and Adsense Ready. You can also Request to convert from wordpress to Blogger Here.

Features :
1. Simple Minimalist Looks :

2. Below Post (Related Posts, Social Bookmarking, Adsense) :

3. Breadcrumb , Subscription :

Live Preview : Click Here
Download : Click Here

Request For WordPress to Blogger for Free

July 6, 2010 Ritesh Sanap Blogger Templates

How to Upload Images by URL in Blogger

Blogger Is getting better and better day by day. Improvement in its Editor and its new improved templates. But all this things are not enough but blogger lacked in one thing that is it doesn’t provide support to upload images by URL (Link).

Why Upload Images to Blogger ?
Blogger Gives it users everything free of cost from hosting of the images to the sub-domain.Hosting Images on blogger users tension of getting images deleted or of bandwidth. And Images loads more quickly then any other host or services that provide hosting of images .

You all now maybe thinking how to upload images by URL (Link).
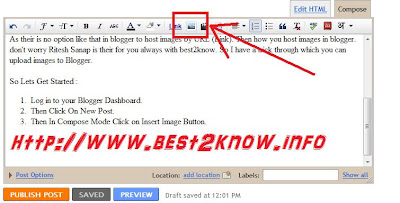
As their is no option like that in blogger to host images by URL (Link). Then how you host images in blogger. don’t worry Ritesh Sanap is their for you always with best2know. So I have a trick through which you can upload images to Blogger.

So Lets Get Started :

  1. Log in to your Blogger Dashboard.
  2. Then Click On New Post.
  3. Then In Compose Mode Click on Insert Image Button.
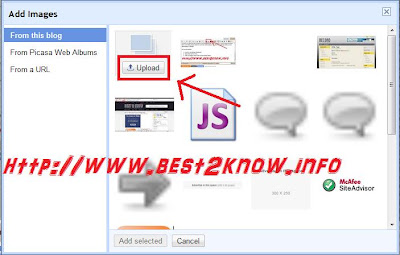
  4. A dialog box will get open
  5. Then Click on Upload Button
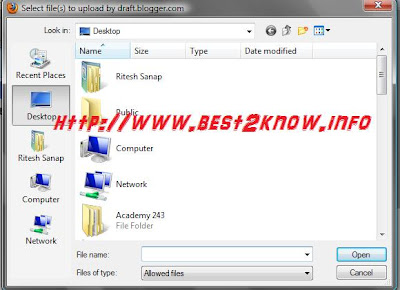
  6. Then Another Dialog Box will pop up
  7. In that Dialog Box add the Link of your image that you want to upload to Blogger.
  8. Then Click On Open. Image will get Uploaded and you are done.

If you like this then I think you might also like the previous post How to Host Javascript on Blogger.

If you Like This post then Please share it with your Friends and Do Comment.

July 3, 2010 Ritesh Sanap Blogger Tutorials Blogger Hacks, Cool things

Record – blogger Template

Hello my friends you might have seen my previous blogger template wood is good and all other different blogger template. so today i m going to introduce you to a new template who is going to take you of the record. So heres the New template named Record.Its been Tagged Under Dark, Elegant, Ads Ready, Three Columns, Right Sidebar, Fixed Width, Blogging.

Preview :

Live Preview : CLICK HERE
Download : CLICK HERE
Do you Have your Theme that you want to get converted then just contact Here. Your Theme Will be converted free of cost.

June 24, 2010 Ritesh Sanap Blogger Templates

How to host javascript on blogger

Hello to all my visitors, its been few days that i haven’t wrote anything on best2know.info, but today i have bought something for you all that will help you very very much to keep your blog healthy. Now you all might thing how ? . So here’s my today’s trick i will teach you how host JavaScript in blogger.

Why to host JavaScript in blogger?
Earlier their used to Google pages but now Google has closed them so we cannot use them. Plus the problem with Google pages was that it has a bandwidth limit. so when more visitors some functions of the site wont load then visitors are nervous and some time they don’t come back. So its bad for the blog. we cant also keep it on sites.google.com because it will set the scripts to download and not view.

Plus if you host it outside the server fails or take too much time too load again that causes problems so now we need to host JavaScript in blogger to save time bandwidth and too load fast.

So here’s the trick :

  1. Login to your dashboard.
  2. Click on Design and then on EDIT HTML.
  3. Then Find for </head> and just above this add the below code :

    <script type=’text/javascript’>

    //<![CDATA[

    PASTE THE JAVASCRIPT CODE HERE

    //]]>

    </script>

  4. Now just Replace the PASTE THE JAVASCRIPT CODE HERE with your javascript.
  5. Click on Preview i think now you can see no problem in Javascript and then click on Save.

Too add more then one JavaScript repeat the process.

Benefits of this trick:
» No file size limitations
» No bandwidth limitations
» Super fast page loading (because files are stored in blogger itself)

June 21, 2010 Ritesh Sanap Uncategorized Blog Beginner Series, Blogger Hacks

Change Blog’s Font Type with Cufón


Still at the font embedding series, this time I’ll share how to change blog’s font type with Cufón. Few days ago, I write about how to change blogs font using some services. Also I’ve write about one of them, sIFR, which we know it use Flash. Cufón is different, it use javascript to render the font type.

Step 1 – Download Cufón

Download the Cufón javascript file. You can download the compressed version or uncompressed version. But I suggest you to use the compressed version.

Step 2 – Generate Font

Generate your font on its official site. The name of the resulting file will include the name of the font and the weight of the font (as a number – 400 is equivalent to “normal” and 600 means “bold”). The name of the file doesn’t actually matter at all, but it makes it easier for you to identify your fonts.

Step 3 – Integrate on the Blog

This is the step where you must add the javascript code to your blog. This code placed before </head>

<script src=”cufon-yui.js” type=”text/javascript”></script>
<script src=”Vegur_300.font.js” type=”text/javascript”></script>
<script type=”text/javascript”>
Cufon.replace(‘h1’);
</script>

Code above is just example and it use one type of font.

Step 4 – Make IE Work

Unfortunately one problem remains with Internet Explorer. In most cases, there is a short but visible delay before the text is replaced. You can avoid this issue by inserting the following code right before the closing </body> tag (or before any external scripts such as Google Analytics).

<script type=”text/javascript”> Cufon.now(); </script>

Its Done!!! Save your template and preview.

Also see

>>> Official Cufón Documentation

June 17, 2010 Ritesh Sanap Blogger Tutorials Blog Design Series, Font embedding

Posts pagination

Previous page Page 1 … Page 21 Page 22 Page 23 … Page 52 Next page

Currently Trending

  • How to download Specific parts of YouTube videos
    How to download Specific parts of YouTube videos
  • Windows Vista CD key
    Windows Vista CD key
  • How to retrieve my Demonoid username
    How to retrieve my Demonoid username
  • How to add Logo to Thesis theme
    How to add Logo to Thesis theme
  • How to Delete Feedbacks from JetPack Contact Form
    How to Delete Feedbacks from JetPack Contact Form
  • List Of All 255 Keyboard All Alt Key Codes
    List Of All 255 Keyboard All Alt Key Codes
  • h4x0r ( Hacker ) - Blogger Template
    h4x0r ( Hacker ) - Blogger Template

Get Latest post in your Inbox

Random Posts

Trily – Blogger Template

May 30, 2010 By Ritesh Sanap 28 Comments

Create a Password Reset Disk

February 29, 2008 By Ritesh Sanap Leave a Comment

Special Google Services

February 29, 2008 By Ritesh Sanap Leave a Comment

Install Windows from a USB drive

March 14, 2009 By Ritesh Sanap 12 Comments

MadBlogger – Blogger Template

July 14, 2010 By Ritesh Sanap 2 Comments

WordPress

HTTP2 Server Push for W3 Total Cache Minify plugin

August 17, 2016 By Ritesh Sanap 5 Comments

How to Disable Emojis in WordPress

January 6, 2016 By Ritesh Sanap Leave a Comment

JetPack Related posts and Sharing not working with NGINX

November 10, 2015 By Ritesh Sanap Leave a Comment

Simply Pure – WordPress Theme

November 2, 2014 By Ritesh Sanap 2 Comments

Advanced What should we Write about next? – WordPress Plugin

July 28, 2014 By Ritesh Sanap Leave a Comment

How to Disable Self Pingback or TrackBack

January 16, 2014 By Ritesh Sanap Leave a Comment

BlueStrap – WordPress Theme

January 1, 2014 By Ritesh Sanap 15 Comments

How to Create Multiple Excerpts in WordPress

December 24, 2013 By Ritesh Sanap Leave a Comment

How to Disable Auto Update in WordPress

November 21, 2013 By Ritesh Sanap Leave a Comment

How to Delete Feedbacks from JetPack Contact Form

November 19, 2013 By Ritesh Sanap 9 Comments

Recent Posts

  • HTTP2 Server Push for W3 Total Cache Minify plugin
  • How to show hidden files and folders in Mac OS X
  • How to Disable Emojis in WordPress
  • Canva – Online Photo Editor
  • JetPack Related posts and Sharing not working with NGINX

Archives

Recommends

  • DigitalOcean – Cloud Hosting
  • Dropbox – Cloud Storage
  • Elegant Themes – WordPress Themes
  • LastPass – Password Manager
  • Like us on Facebook
  • Follow on Twitter
  • +1 on Google
  • Subscribe via Email
  • RSS Feed

© 2025 Best 2 Know · All Rights Reserved · We ♥ DigitalOcean