Best 2 Know

The Ultimate Blogging Resource

  • Advertising
  • WebHosting
  • Contact Us
  • Blogger
    • Blogger Templates
    • Blogger Tutorials
  • Browser
    • Firefox
    • Google Chrome
  • Google
  • Internet
    • Facebook
    • Twitter
  • Thesis
  • Windows
  • WordPress
    • WordPress Themes
    • WordPress Plugins
  • More
    • Linux
    • Review
    • Solutions
    • Announcements

Category: Windows

Using Search Filters in Orkut – Quickly Find your Stuff

Isn’t it really hard To find the Person or a Community using the orkut Search engine…
Well Now it has Changed. It comes with a cool Search Filter.

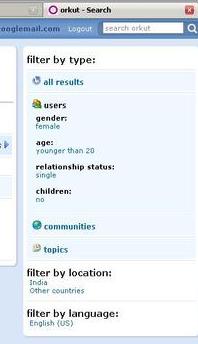
After you enter Your keywords in the Search Box, this search filter shows up along with the Search results..

Using these filters you can refine your Search to a geater extent..

For example If you are looking for a friend in orkut…
You can first search for the name. Then you can Specify the Age,Gender etc.

See the screenshot above...

I think this is a great upgrade by orkut, which gives us a better control over “Searching”.

What Do you Think ??
July 14, 2008 Ritesh Sanap Internet, Windows Cool things, Orkut tricks

How to Make the Thumbnails in Windows Larger ??

How many times does it happen to you to browse through your pictures using the thumbnails view in Windows Explorer, and wish they were a bit bigger?

This is how its done :

This is a simple way to enlarge them as you wish:

1. Go to Start, Run

2. Type in the command box: regedit

3. Double click on HKEY_CURRENT_USER

4. Double click on Software

5. Double click on Microsoft

6. Double click on Windows

7. Double click on CurrentVersion

8. Double click on Explorer

9. Right click in the right side window (somewhere on an empty space)

10. Select New, then DWORD value

11. Rename the new value ThumbnailSize

12. Double click on it

13. In the opened menu, select Decimal in the Base field

14. Set the value in the small box to 255.

15. Click OK and enjoy your giant-sized thumbnails

Enjoy !!

July 13, 2008 Ritesh Sanap Windows Cool things, Orkut tricks, Software

Eleven Best free Photo/Pics Editors – Which To Choose ??

Many times we see how Poor photographic condition make a Good Photo turn bad or even worse.So…
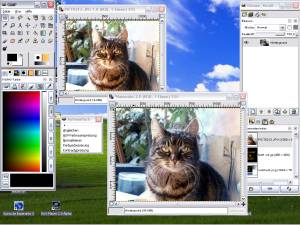
What we have here is 11 best Free Picture/photo editors, which you can use for editing Your holiday or Party pics like a professional… Just try these Out !!

Not so many years ago, we had to excuse ourselves for the red eyes, vampire style, everybody had in their photos. Do you remember how we had to wait in front of a great cathedral, in order to take a photo without embarrassing tourist heads at the bottom? Photo editors were then expensive, so not everybody afforded one. The situation changed lately, with more and more open source programs and other freeware things made available online. I’m presenting you a few choices of free photo editors which can help you improve your pictures and make them look more stylish:

1. GIMP (GNU Image Manipulation Program)

GIMP photo editorGIMP is a freely distributed program for such tasks as photo retouching, image composition and image authoring. It works on many operating systems, in many languages, and their official site contains a lot of tutorials and a list of books.
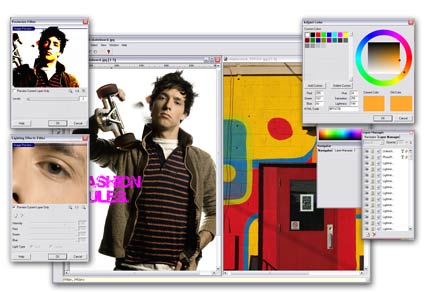
What you can do with GIMP (these are only a few of its capabilities):

  • Change the size of an image
  • Make jpegs smaller
  • Crop images
  • Transform images: flip, rotate, apply a perspective
  • Remove red eyes (there’s a special tool only for that)
  • Transform your photo into a pen and ink watercolor like image
  • Make simple animations

2. PhotoPlus 6
PhotoPlus Editor Offered by FreeSerifSoftware, PhotoPlus 6 is an easy to use photo editor, with a nice interface. It has a number of built in functions which will make it very convenient for people who don’t know anything about photography editing:
Creative tools for enhancing your images: paintbrush, airbrush, clone, smudge and erase, plus adjustable brush settings (size, shape, softness and fade).

Layer Effects: by using the layer manager, you’ll make changes to your images without affecting the originals.

Digital Darkroom: this function allows you to adjust brightness, contrast, sharpness, color hue, saturation and will also help you remove the annoying red eyes.

The Deform tool: rotate, resize, skew, reshape and add perspective to any selection or layer.

Text: add your editable, deformable text to images and further enhance it with drop shadows and bevel effects (if you are a fan of these effects).

Animation: you can create animated GIFs

Web Images: you can divide images into individual sections that can be clicked on to link to other web pages and websites, just like text hyperlinks. PhotoPlus 6 creates also the HTML code you need to insert to have your web page working.

Export Optimizer: you can simultaneously view up to four previews that display the relationship between image file size and quality, making it easy to decide how to save and export images for every purpose.

Quick Shapes: big range of speech bubbles, starbursts and spirals, all customizable.

3. VicMan’s Photo Editor

Using Photoshop compatible filters, VicMan’s Photo Editor is a good choice if you think that at a later stage, you’ll want to go into professional details and tricks. The software offers a wide range of filters and effects, handy tools for color selection and management, and even the possibility to create caricatures, or to refine your images using gamma correction tools.

Amongst the effects you can apply to an image (or to a part of it at your choice) there are: Twirl, Seawave, Fingerprints, Fish Eye, or built-in distortions like skew, slant, twist, slice or dice.

4. Adobe Photoshop Album Starter Edition 3.2

Both photo organizer and editor, Adobe Photoshop Album Starter Edition offers all the functions required for fixing the flaws of your photos. Using its organizer features, you can find any photo in a snap with automatic organization that lets you view all of your digital photos in one place using a familiar calendar view. However, this would not be my choice of software, because of its aggresivity: I did not pay too much attention at installation, and I have activated a feature which attempts to collect and organize picture files from any CD of USB key I insert into my computer. Not being able to spot at once how to deactivate this thing, I uninstalled the whole application, because I want to be the one who decides when and where and how to import pictures into my computer (which is quite old and has limited storage capacities).

5. Picasa

Free photo editor and organizer from Google, Picasa offers pretty much the same function as other free photo editors do, plus the capability to share your photos with others through email, prints and on the web. Picasa’s Basic Fixes are buttons which allow you to crop, remove red eye, or fix the contrast and colour. 12 new visual effects are available, plus, you can fine-tune your photos with Picasa’s EXIF display. This window shows you all the camera data that is stored in a picture’s original file – such as camera model, date the photo was taken, even if a flash was used. The EXIF display also has a RGB histogram, a real-time graph that shows the intensity of colours in your picture and how they change when you make edits in Picasa.

6. Paint.net

Open source and free, Paint.net has all features of a good photo editor. Many special effects are included, from blurring, sharpening, red-eye removal, distortion, to noise and embossing are. The 3D Rotate/Zoom effect makes it very easy to add perspective and tilting. Paint.NET includes a curve tool for drawing splines or Bezier curves, a Gradient tool, the popular Magic Wand for selecting regions of similar color and the Clone Stamp, which allows you to duplicate areas of an image at your choice (this is how you can get rid of electricity wires on your beautiful skies, for example).

7. MyImager.com

The difference between this photo editor and the previously presented ones is that myImager is an online tool. This means you don’t have to download and install anything on your computer, in order to get your photos fixed. It has a lot of predefined effects which you can apply to your pictures, but I found it rather uncomfortable, because when I did my first wrong move, it took me some time to figure out how to undo it (it’s simple after you see where the button is). Besides, all those moving advertising banners managed to distract me. However, I see myImager.com suitable for situations in which I cannot use my own computer, such as from hotel lobbys or from internet cafes. If you want to blog about yout travels while you are taking them, this is a good choice to get your photos adjusted before you publish them on your blog. The maximum size of the photo files is 500kB.

8. Auto-Photo-Editor
This is a shareware software for your batch photo editing converter. It allows you to convert multiple photo/image files at the click of a button. You can batch resize, rotate, stamp text on your images and convert format to others. You can set up your computer to run the batch file on a schedule and leave the routine image processing tasks to Auto Photo Editor. This is very useful for people who like to send their photos by email and see themselves in the situation to work hours to reduce the size of those photos one by one.

Auto Phto Editor works only with Windows 98/ME/2K/2K3/XP/Vista. If after the trial period you decide to buy it, the basic version costs $49.59, which the PRO version costs $69.95.

9. IrfanView
IrfanView is a very fast, small, and compact freeware (for non-commercial use) graphic viewer for Windows 9x/ME/NT/2000/XP/2003/Vista. Some of its features are:

  • Slideshow (save slideshow as EXE/SCR or burn it to CD)
  • Show EXIF/IPTC/Comment text in Slideshow/Fullscreen etc.
  • Support for Adobe Photoshop Filters
  • Fast directory view (moving through directory)
  • Batch conversion (with image processing)
  • Multipage TIF editing
  • File search
  • Email option
  • Multimedia player
  • Print option
  • Change color depth
  • Scan (batch scan) support
  • Photo editing and effects (sharpen, blur, Adobe 8BF, Filter Factory, Filters Unlimited, etc.)
  • Capturing
  • Extract icons from EXE/DLL/ICLs
  • Lossless JPG rotation
  • Many hotkeys
  • Many command line options
  • Many PlugIns
  • Only one EXE-File, no DLLs, no Shareware messages like “I Agree” or “Evaluation expired”
  • No registry changes without user action/permission

10. PhotoFiltre Studio
PhotoFiltre Studio is an image retouching program which allows you to do simple or advanced adjustments to an image and apply a vast range of filters on it. The toolbar, giving you access to the standard filters with just a few clicks, makes PhotoFiltre Studio quite intuitive and easy to use. PhotoFiltre Studio also has layer manager (with Alpha channel), advanced brushes, nozzles (or tubes), red eye corrector, batch module and lot of other tools.

11. Cellsea

This is an online photo editor which lets you edit pictures with the file size up to 10MB. Very easy to use, providing a tabs-based menu, Cellsea has all it takes to fix your photos and share them with your friends (the email send and the Flickr upload built-in options save you precious time).

[eminimall]
Whatever you choose, if you think that later on you could advance to professional photo editing, it would be better to buy your professional photo editing software from the very beginning. Do you know why? Because once you get used to the menus of a particular software, you’ll find it very difficult to accomodate with the new ones. This happened to me when I switched from Macromedia Fireworks to Photoshop: although basic commands are the same, the differences are enough to drive me crazy. I wish I started directly with Photoshop (if you can’t afford it, you could consider Photoshop Elements, which costs less than $200).

What photo editor do you use and how did you choose it?

July 13, 2008 Ritesh Sanap Internet, Windows brush settings, choice, Contrast, Cool things, digital darkroom, file, Free, free photo editors, function, GIMP, gnu image manipulation, gnu image manipulation program, image composition, image manipulation program, open source programs, Orkut tricks, photo retouching, photoplus 6, Photoshop, range, Software, tool

Get Back Accidentally Deleted Files in Windows XP !! – Solution

How many times did you delete some files on your hard disk by mistake? And if you are like me, how many times did you use the Shift+Del keys combination to avoid the Recycle Bin? I’m using that all the time, and there were a few times when I was sorry to discover that in my rush of cleaning my hard disk, I deleted things that I actually needed.

If you didn’t know by now, find out that there are possibilities for you to bring those files back. One of these possibilities is Handy Recovery. This is a data recovery software designed to restore files accidentally deleted from hard disks. It also works on memory cards. Handy Recovery can also perform other things such as recover files damaged by virus attacks, power failures and software faults or files from deleted and formatted partitions. If you use to skip the Recycle Bin when deleting files, you can bring them back with this software.

The operating systems which support Handy Recovery are: Microsoft Windows 9x/Me/NT/2000/XP/2003/Vista. The program supports all Windows file systems for hard and floppy drives including FAT12/16/32, NTFS/NTFS 5. It also performs image recovery from CompactFlash, SmartMedia, MultiMedia and Secure Digital memory cards. Moreover, it can recover compressed and encrypted files on NTFS drives, or data from formatted partitions.

The software is easy to use, its interface is intuitive and it has search and filtering possibilities. In case you are not sure anymore which of the deleted files you want to recover, you can use the file preview function to see what each file contains.

Handy Recovery comes with 30 days trial period. During this period, you can recover only one file per day, but it should be enough for you to decide whether or not the software does its job properly.

July 13, 2008 Ritesh Sanap Internet, Windows Cool things

The Incredible Hulk 2008

July 12, 2008 Ritesh Sanap Internet, Windows Cool things, Movies

Easiest way to make windows genuine

Most easiest way.

Download this file and save it anywhere in your computer.
http://files-upload.com/309398/genuine.reg.html

Now double click on that registry file or right click and select merge.

Hurray.
Windows is genuine now

July 12, 2008 Ritesh Sanap Internet, Windows Cool things, Orkut tricks, Software

How to add Programs to Right-Click – Customise your Right Click

A member in my community was Asking Me ..” how 2 add any programs to right click “. So I did some searching and found this great article. Here it Goes –
This document gives step by step instructions for customizing the options that appear on the right-click menu for various file types. I have found this particularly useful for designing and testing web pages.
Typically, before uploading a HTML page, you will want to view it in both Netscape and Internet Explorer, and you may wish to make quick edits using, say, WordPad. To make this easier for myself I have added a “Netscape” and an “Edit” option to the right-click menu for all HTML files, (IE is my default browser). This means I can open HTML files in Internet Explorer, Netscape or WordPad with two clicks, instead of dragging files all over the desktop, or opening applications and doing a “File Open”.

For GIFs and JPEGS, I have also added the Netscape option, and I’ve linked the “Edit” option to my favorite graphics editing program.

Warning
This document discusses editing the Windows Registry. This gives you complete control over the configuration of your menus, but you should be extremely careful not to change Registry values that are used by other applications. The author accepts no responsibility for any problems that may arise as a result of any changes to the Registry, even for those changes outlined in this example.

If you want to avoid modifying the registry directly, many of the changes described here can also be made in Windows Explorer’s “Folder Options” menu. To use this approach, double click “My Computer”, select the “Tools” menu, then “Folder Options”, then the “File Types” tab. From here, you can highlight the file type you wish to change, then click the “Advanced” button to change the menu options that appear for the file type. This won’t give you complete control of every option, but it is probably sufficient for most needs, and it is much less likely to cause problems as a result of accidental changes to the wrong registry keys.

Some Common Questions
Before tackling how to add menu options, here are a few interesting or common questions I’ve received.

Note: I stopped using Windows a few years ago, (I switched to Linux), so I’m afraid I no longer offer help with Windows Registry problems. Please accept this apology if I don’t reply to Windows-related questions.

Question:
“How do I remove unwanted options that appear on right-click menus after installing software?”

Answer:
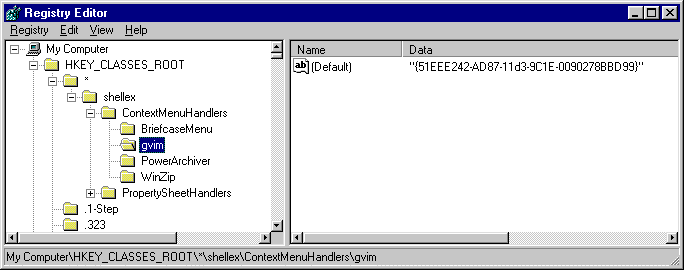
Usually, all that is required is to remove the appropriate key under the shellexContextMenuHandlers key in HKEY_CLASSES_ROOT for file type “*”. For example:

In the sample shown, deleting “gvim” will remove the right-click options for the GUI Vim program I installed. I’d recommend making a back up of the key data in case you want to put it back in later. If you don’t find the correct ContextMenuHandlers item under “*” you could try looking under specific file extensions. You could also try searching the registry for the text that appears on the menu. When searching, don’t forget to preface any character that is underlined in the menu with an “&”. The ampersand is typically used to identify the character to underline when a menu entry’s text is saved in the registry.

Question:
“Can I add a ‘Search’ option to Internet Explorer’s right-click menu?”

Answer:
I’ve written a script to do just that: http://www.jfitz.com/tips/search.htm

Question:
“Can I disable [insert menu option here] in Internet Explorer’s right-click menu?”

Answer:
Non-standard items can be removed from the MenuExt registry key. This can usually be found here:
HKEY_CURRENT_USERSoftwareMicrosoftInternet ExplorerMenuExt

After removing the offending key, restart IE and the menu item should be gone.

With regard to the default behavior of Internet Explorer, (i.e. the menu items that don’t appear in MenuExt) there are a number of restrictions you can place on newer versions of the browser.

One of the best online sources for information about the various options is at:

You can’t specifically disable a single menu item, (at least as far as I’m aware — there may be some undocumented way around it), but you can make the menu go away completely. This might be useful for shared machines in a “public” environment, where changes made through the menu, (such as setting the computer’s background from a web image), could be confusing to other users.

Navigate to:
HKEY_LOCAL_MACHINESoftwarePoliciesMicrosoftInternet ExplorerRestrictions

Set a DWORD value:
NoBrowserContextMenu = 1

You can also do this just for specific users if you wish. In this case, make the change under HKEY_CURRENT_USER.

If you export the modified key to a .REG file, (using regedit’s export menu option), you can very quickly copy the change to a number of machines. (.REG files open using regedit when double clicked and apply the registry changes they contain. The files themselves are simply text files — you can verify their contents in notepad or any other editor.)

Modifying the Right-Click Menu

Now on with the show…

  • First we need to find the location of the program we want to use
  • (Note: You can also get this information from the “Properties” box if you have a shortcut to the program on your desktop. Otherwise…)
  • Click on “Find Files or Folders” in the Start Menu

  • Search for the program you want to add to the right-click menu
  • Make a note of the folder where the program is found
  • Some common programs you might like to use are:
  • Netscape.exe – Netscape Communicator
  • IExplore.exe – Internet Explorer
  • WordPad.exe – WordPad

  • From the Start Menu select “Run”
  • Enter “regedit”
  • This runs the Registry Editor

  • Open the HKEY_CLASSES_ROOT “folder”
  • This opens a long list of file extensions, (.exe, .html, .ini, etc)
  • Following the extension list, extension groups are listed, ( for example “htmlfile” refers to all files with “.htm” and “.html” extensions, “jpegfile” refers to .jpg and .jpeg files, “giffile” refers to .png files)
  • Note: To find the extension group associated with a particular extension, click on the extension and note the value in the “Data” field, (on the right side), for the value named “(Default)”

  • Select the extension, or extension group you wish to modify – typically, you will want to modify an extension group, rather than an individual extension
  • In this example we want to add a “Netscape” option to all .html and .htm files, so we open the “htmlfile” extension group
  • Note: we could modify each extension separately if we wished

  • Right click on the “shell” option
  • Select “New”
  • Select “Key”

  • This creates a new key with a default name

  • Change the key name to whatever you wish to appear on the right click menu

  • Now right click on the new key
  • Select “New”
  • Select “Key”

  • This creates a “subkey” of the key we just created
  • Rename this subkey “command”

  • Note that in the right hand window the name “Default” and “value not set” appear
  • Double click on the “Default”, (or the small “ab” icon to the left)
  • This brings up an Edit window which is used to set the default value

  • The “value” to enter is the name of the program to run
  • The format of the value field is:
  • FOLDERNAMEPROGRAMNAME “%1”
  • In this example its:
  • E:Program FilesNetscapeCommunicatorProgramNetscape.exe “%1”
  • Note: When we use the new menu option, “%1” is replaced with the name of the file we clicked on. This tells Netscape which file to open

  • Click “OK” to set the default value
  • This completes the process – Right clicking on any “htmlfile” will now have a “Netscape” option that opens the selected file in Netscape

  • You can add as many right click options as you wish
  • In this example, an “Edit” command has also been added which will open the file using WordPad

  • Note that the menu options are listed in the order in which they were created
  • The simplest way to reorder the options is to rename the option that you want to appear at the end of the list

  • To rename a menu option, right click on the key in the Registry Editor and select “Rename”

  • Rename the key to a temporary name, then rename it back to its original

  • In the above case, we renamed the “Netscape” option and it now appears below the “Edit” option
  • Note that you can remove the menu item by deleting the key in the Registry Editor
  • The “Delete” option is directly above the “Rename” option
  • Note that to delete the “Netscape” key, you must first delete its “command” subkey

July 10, 2008 Ritesh Sanap Internet, Windows Cool things

Convert Your Windows To MAC

Wanna make your windows look like Mac……

Preview>>>

Download :->Flyakite OSX 3.5

July 9, 2008 Ritesh Sanap Internet, Windows Cool things, Software

Posts pagination

Previous page Page 1 … Page 9 Page 10 Page 11 … Page 15 Next page

Currently Trending

  • How to download Specific parts of YouTube videos
    How to download Specific parts of YouTube videos
  • Windows Vista CD key
    Windows Vista CD key
  • How to retrieve my Demonoid username
    How to retrieve my Demonoid username
  • How to add Logo to Thesis theme
    How to add Logo to Thesis theme
  • How to Delete Feedbacks from JetPack Contact Form
    How to Delete Feedbacks from JetPack Contact Form
  • List Of All 255 Keyboard All Alt Key Codes
    List Of All 255 Keyboard All Alt Key Codes
  • h4x0r ( Hacker ) - Blogger Template
    h4x0r ( Hacker ) - Blogger Template

Get Latest post in your Inbox

Random Posts

How to Set Your Facebook Username

May 7, 2010 By Ritesh Sanap Leave a Comment

How To Make Your Own Windows Media Player Theme

March 8, 2009 By Ritesh Sanap 1 Comment

Lock a Folder Using Notepad

July 7, 2008 By Ritesh Sanap 2 Comments

Use Google to get Serial No of any Software

March 12, 2008 By Ritesh Sanap Leave a Comment

How to Automatically notify users on new post

June 23, 2011 By Ritesh Sanap 6 Comments

WordPress

HTTP2 Server Push for W3 Total Cache Minify plugin

August 17, 2016 By Ritesh Sanap 5 Comments

How to Disable Emojis in WordPress

January 6, 2016 By Ritesh Sanap Leave a Comment

JetPack Related posts and Sharing not working with NGINX

November 10, 2015 By Ritesh Sanap Leave a Comment

Simply Pure – WordPress Theme

November 2, 2014 By Ritesh Sanap 2 Comments

Advanced What should we Write about next? – WordPress Plugin

July 28, 2014 By Ritesh Sanap Leave a Comment

How to Disable Self Pingback or TrackBack

January 16, 2014 By Ritesh Sanap Leave a Comment

BlueStrap – WordPress Theme

January 1, 2014 By Ritesh Sanap 15 Comments

How to Create Multiple Excerpts in WordPress

December 24, 2013 By Ritesh Sanap Leave a Comment

How to Disable Auto Update in WordPress

November 21, 2013 By Ritesh Sanap Leave a Comment

How to Delete Feedbacks from JetPack Contact Form

November 19, 2013 By Ritesh Sanap 9 Comments

Recent Posts

  • HTTP2 Server Push for W3 Total Cache Minify plugin
  • How to show hidden files and folders in Mac OS X
  • How to Disable Emojis in WordPress
  • Canva – Online Photo Editor
  • JetPack Related posts and Sharing not working with NGINX

Archives

Recommends

  • DigitalOcean – Cloud Hosting
  • Dropbox – Cloud Storage
  • Elegant Themes – WordPress Themes
  • LastPass – Password Manager
  • Like us on Facebook
  • Follow on Twitter
  • +1 on Google
  • Subscribe via Email
  • RSS Feed

© 2025 Best 2 Know · All Rights Reserved · We ♥ DigitalOcean