Best 2 Know

The Ultimate Blogging Resource

  • Advertising
  • WebHosting
  • Contact Us
  • Blogger
    • Blogger Templates
    • Blogger Tutorials
  • Browser
    • Firefox
    • Google Chrome
  • Google
  • Internet
    • Facebook
    • Twitter
  • Thesis
  • Windows
  • WordPress
    • WordPress Themes
    • WordPress Plugins
  • More
    • Linux
    • Review
    • Solutions
    • Announcements

Author: Ritesh Sanap

How To Make Any Firefox Add-on Compatible with All Versions

Sometimes trying out newer versions of Firefox, especially ones that are still in beta, comes at a cost. Since the version you’re running is so new, add-on developers haven’t had the chance to update their add-ons to work with the newer versions.

So this is when you stumble upon an add-on that conveys the following message to you: “This add-on is for older versions of Firefox”.


Fix Incompatible Add-ons

Since your sights are set on using Firefox extensions that keep telling you they’re incompatible with the version you have, and downgrading a version or two isn’t an option, now you can discover a nifty tool called Nightly Tester Tools.


Ironically this is a Firefox add-on that will help you make all other incompatible extensions compatible with the browser version you’re running.

What’s Next

The first step you need to take is to download Nightly Tester Tools here, if you haven’t already

Next if you still have the extension that was disabled when you upgraded to a newer version of Firefox in your add-ons menu, then you will go to Tools/Add-ons and right-click on your disabled extension, then choose Override Compatibility.


now it will ask you to confirm your selection by clicking Force Install.


Bonus Features

Here you thought it was the end of this add-ons story but actually there are a few other features that this extension allows you to take full advantage of.

With Nightly Tester Tools you’re also able to take screenshots of any webpage and save them in JPEG format. You can easily restore tabs from a previous session if it just so happens that your PC froze and you didn’t have time to properly close your browser window.


Feel free to test all other Nightly Tester Tools features and let us know how you like them in a comment below!

March 21, 2009 Ritesh Sanap Internet, Solutions Hacks

How To Show/Hide Text Using JavaScript Toggle Method


Show/Hide

This is Hidden Text


For this method there are two steps, one is to add a code to the template <Head> </Head> region, so that you can use this anywhere [in posts, as well as widgets]

Then the second part of the code has to wherever you want to display text / images in this way.

First Step:
Log in to Blogger, go to “Layout”, click on “Edit HTML” tab.
Now find for this code: </Head>

Then immediately BEFORE this code, paste this:

<script language=”javascript”>
function toggle() {
var ele = document.getElementById(“toggleText”);
var text = document.getElementById(“displayText”);
if(ele.style.display == “block”) {
ele.style.display = “none”;
text.innerHTML = “show”;
}
else {
ele.style.display = “block”;
text.innerHTML = “hide”;
}
}
</script>


Second Step:
Now wherever you want to show this type of text, add code like this:

<a href=”javascript:toggle();” id=”displayText”>Show/Hide</a>
<div id=”toggleText” style=”display: none;”>This is Hidden Text</div>


here’s the method to add this hack two times in your blog !

Once you have done the process described above, do this:

Third Step:
Log in to Blogger, go to “Layout”, click on “Edit HTML” tab.
Now find for this code: </Head>

Then immediately BEFORE this code, paste this:

<script language=”javascript”>
function toggle2() {
var ele = document.getElementById(“toggleText”);
var text = document.getElementById(“displayText”);
if(ele.style.display == “block”) {
ele.style.display = “none”;
text.innerHTML = “show”;
}
else {
ele.style.display = “block”;
text.innerHTML = “hide”;
}
}
</script>


Fourth Step:
Now wherever you want to show this type of text, add code like this:

<a href=”javascript:toggle2();” id=”displayText”>Show/Hide</a>
<div id=”toggleText” style=”display: none;”>This is Hidden Text</div>

Similarly you can add any number of times, by changing the code in red to toggle3(), toggle4() etc.
But if you add it many times, then it may slow down your blog !

March 19, 2009 Ritesh Sanap Blogger Tutorials, Solutions Blogger Hacks, Tutorials

Add Your Sign Below All Posts In Blogger / BlogSpot Blogs

Add Your Sign Below All Posts In Blogger / BlogSpot Blogs

If you are using Blogger, and want to show your signature below all the posts, then you can do this in two possible ways: either add it in an HTML/JavaScript widget with the image of your signature or you can directly edit the HTML template of your blog. The second approach is recommended, as the first one may increase the loading time of blog.

In both the methods, first step is common and important, i.e. to get an image of your signature,.For this, either you can
– draw it and scan it, or
– draw it in MS paint / Adobe Photoshop or any other image editing software and save it, or
– (Recommended) Use MyLiveSignature, and type the letters (use capital letters wherever required), and continue: select font, size and color for the sign. Save / download the image.

Now upload it to either Pages.Google.com or GigaImage.com or HotLinkFiles.com, to get direct link of the image(your sign).
You will get a link like this:

http://ANY_WEBSITE.com/images/MY_SIGN.jpg

Now put that link in this code:

<img src="YOUR_DIRECT_LINK_HERE" />

Replace the code in RED color with the direct link of your sign image.

This is the second step, which has two choices (second one is recommended):

1. Adding the sign to HTML/JavaScript widget:

Log in to Blogger, go to Layout, click on Add a Gadget -> HTML/JavaScript type.
Now copy the above code and paste it here. Save the widget, then drag & drop it below the blog posts widget.

2. Adding the sign to the blog’s template.

Log in to Blogger, go to Layout, click on “Edit HTML” tab and click the radio button “Expand Widget Templates“,and find (CTRL+F) this code:

<data:post.body>

And immediately BELOW this, add the above code. And save the template.
That’s it…

It will be displayed like this:

March 19, 2009 Ritesh Sanap Blogger Tutorials, Internet, Solutions Blogger Hacks, Cool things, Hacks, Tutorials

Embed Text Resizing Widget To Increase or Decrease The Font Size

As you know, that some visitors prefer reading in small text size while others prefer larger, depending on their eye power, screen resolution, and monitor distance. So for those visitors, you can place a convenient widget to increase/decrease the font size easily.


Look the example below:
Change Text Size

+ + + + +
Or this one:

Change Text Size:

Small
Medium
Large
Larger
Largest

If you want to use any of the abve widgets, use this code:

Change Text Size<br/>
<a href=”javascript:void(0);” onclick=”javascript:body.style.fontSize=’.5em'”><span style=”font-size: xx-small;”>+</span></a> <a href=”javascript:void(0);” onclick=”javascript:body.style.fontSize=’1em'”><span style=”font-size: x-small;”>+</span></a> <a href=”javascript:void(0);” onclick=”javascript:body.style.fontSize=’1.5em'”><span style=”font-size: small;”>+</span></a> <a href=”javascript:void(0);” onclick=”javascript:body.style.fontSize=’2em'”><span style=”font-size: large;”>+</span></a> <a href=”javascript:void(0);” onclick=”javascript:body.style.fontSize=’2.5em'”><span style=”font-size: x-large;”>+</span></a>


And to use the second one, use this code:

Change Text Size<br/>
<a href=”javascript:void(0);” onclick=”javascript:body.style.fontSize=’.5em'”><span style=”font-size: xx-small;”>Small</span></a>
<a href=”javascript:void(0);” onclick=”javascript:body.style.fontSize=’1em'”><span style=”font-size: x-small;”>Medium</span></a>
<a href=”javascript:void(0);” onclick=”javascript:body.style.fontSize=’1.5em'”><span style=”font-size: small;”>Large</span></a>
<a href=”javascript:void(0);” onclick=”javascript:body.style.fontSize=’2em'”><span style=”font-size: large;”>Larger</span></a>
<a href=”javascript:void(0);” onclick=”javascript:body.style.fontSize=’2.5em'”><span style=”font-size: x-large;”>Largest</span></a>


If you want you can add this by HTML/JAVASCRIPT

or If you Want to appear this in the post than
Goto Layout > Edit HTML

And check Expand Widget Box

and search for <data:post.body/>

Then If you want it to appear on the top paste the code above <data:post.body/>

If you want it to appear on the bottom paste the code down the <data:post.body/>

And At Last Save It Over Enjoy !

March 19, 2009 Ritesh Sanap Blogger Tutorials, Solutions Blogger Hacks, Cool things, Hacks

ASCII Text Generator

Before blogging, I used to upload files on RapidShare and earn points with it to get premium account. It was really a great job to earn for my pocket money.

If you are a RapidShare uploader, you might have seen the ReadMe files where users write their website’s name in different styles. Here is a JavaScript code with which you can create your own beautiful ASCII text easily.

Description: “With
this wizard, you can generate your own ASCII (a.k.a. plain text) logo for your
web site. These logos are ideal if you want a catchy page header but don’t want
to have to deal with the loading time of an image or an ActiveX object.”


Important: If
you intend on putting your text logo in a standard html document, surround it
with opening and closing <PRE> tags to avoid common distortions.


Example:


Input:

Logo Text: Logo Style:
Preview Text Style

Output:

Click To Close

_                                          
_|_       _|_         __  o   __ _|_  o |__, 
 |  (__(_  |_, (__(_ |  ' | __)   |_, | |  \ 


Click To Close

_____   _       _____   _____   _   _   
|  _  \ | |     /  _  \ /  ___| | | / /  
| |_| | | |     | | | | | |     | |/ /   
|  _  { | |     | | | | | |     | |\ \   
| |_| | | |___  | |_| | | |___  | | \ \  
 |_____/ |_____| \_____/ \_____| |_|  \_\
Click To Close

\ |\ | | |¯| |¯ |¯ |¯| /¯\ |\/| |¯ 
 \| \| | |¯\ |¯ |¯ |¯\ |¯| |  | |¯ 
               ¯                  ¯

March 19, 2009 Ritesh Sanap Blogger Tutorials Blogger Hacks, Cool things, Generator

Submit To All Social Bookmarking Websites At Once

Being a webmaster/blogger, after writing every interesting article you would like it to be added in as many of  the popular social bookmarking websites as possible. But presently with more than 100 of these websites, the whole work of writing the same description and adding the same article-link again again everywhere, becomes too boring and almost impossible.


But now you have a website/tool – SocialPoster.com to make the process quite easier. You may be having the buttons like “AddThis” or “AddToAny”, but this website is very different from them because through this website, you have to type the url and the description only once and then simply start adding it to the large number of social bookmarking websites, available alongside.

Sites included in the list are:
Digg.com, Propeller.com, Reddit.com, Del.icio.us, Stumbleupon.com, Socialogs.com, Indianpad.com, Google.com/Bookmarks, Technorati.com, Slashdot.org, Getigadget.com, Furl.net, Diigo.com, Wirefan.com, Bibsonomy.org, Blinklist.com, Blogmemes.net, Bluedot.us, Myjeeves.ask.com, Simpy.com, Backflip.com and many more.

March 19, 2009 Ritesh Sanap Uncategorized Cool things, Generator

Fixed Side Menu For Blogger

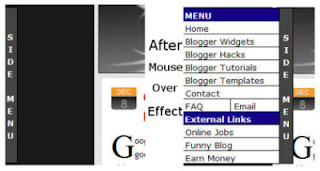
Fixed side menu for blogger blogspot or some says it as fixed slide in menu for blogger as was seen only in wordpress but now can be used in bloggers also.As you could see it in my blog i have side menu that moves together with you scroll movement up and down on my blog.I am sharing this with you because many of my readers were asking how to make it as they liked it much and wanted to add it to there blogs so if you liked side menu in my blog you can go further to install it in your blog too.For Demo Of Side Menu Visit for Here:-Blogger Widgets

First Download these two files to your computer.
ssm.js
ssmItems.js

Now open the ssmItems.js file in notepad
After opening it in notepad you will see the codes like written below.

<!–


/*
Configure menu styles below
NOTE: To edit the link colors, go to the STYLE tags and edit the ssm2Items colors
*/
YOffset=150; // no quotes!!
XOffset=0;
staticYOffset=30; // no quotes!!
slideSpeed=20 // no quotes!!
waitTime=100; // no quotes!! this sets the time the menu stays out for after the mouse goes off it.
menuBGColor=”black”;
menuIsStatic=”yes”; //this sets whether menu should stay static on the screen
menuWidth=150; // Must be a multiple of 10! no quotes!!
menuCols=2;
hdrFontFamily=”verdana”;
hdrFontSize=”2″;
hdrFontColor=”white”;
hdrBGColor=”#170088″;
hdrAlign=”left”;
hdrVAlign=”center”;
hdrHeight=”15″;
linkFontFamily=”Verdana”;
linkFontSize=”2″;
linkBGColor=”white”;
linkOverBGColor=”#FFFF99″;
linkTarget=”_top”;
linkAlign=”Left”;
barBGColor=”#444444″;
barFontFamily=”Verdana”;
barFontSize=”2″;
barFontColor=”white”;
barVAlign=”center”;
barWidth=20; // no quotes!!
barText=”SIDE MENU”; // <IMG> tag supported. Put exact html for an image to show.


///////////////////////////


// ssmItems[…]=[name, link, target, colspan, endrow?] – leave ‘link’ and ‘target’ blank to make a header
ssmItems[0]=[“MENU”] //create header
ssmItems[1]=[“Home“, “http://riteshsanap4u.blogspot.com“, “”]
ssmItems[2]=[“Blogger Widgets“, “http://riteshsanap4u.blogspot.com/search/label/Tutorials“,””]
ssmItems[3]=[“Blogger Hacks“, “http://riteshsanap4u.blogspot.com/search/label/Tutorials“, “”]
ssmItems[4]=[“Blogger Tutorials“, “http://riteshsanap4u.blogspot.com/search/label/Tutorials“, “_new”]
ssmItems[5]=[“Grab This Menu Here”, “http://riteshsanap4u.blogspot.com/search/label/Tutorials“, “”]
ssmItems[6]=[“Contact“, “http://riteshsanap4u.blogspot.com/“, “”]


ssmItems[7]=[“FAQ“, “#nogo“, “”, 1, “no”] //create two column row
ssmItems[8]=[“Email“, “#nogo“, “”,1]


ssmItems[9]=[“External Links”, “”, “”] //create header
ssmItems[10]=[“Online Jobs“, “#“, “”]
ssmItems[11]=[“Funny Blog“, “#“, “”]
ssmItems[12]=[“Earn Money“, “#“, “”]


buildMenu();


//–>

Now just edit the the links in red in codes to place your own link which you want to display and text in blue which you want to show up the title for that link.

After editing all these links just save the file.
Now upload both files ssm.js and ssmItems.js to your own server.

Now GO To LAYOUT > EDIT HTML
and find the </head> tag and place the below codes before it.

<!–SLIDE MENU–>
<style type=’text/css’>
<!–
A.ssmItems:link {color:black;text-decoration:none;}
A.ssmItems:hover {color:black;text-decoration:none;}
A.ssmItems:active {color:black;text-decoration:none;}
A.ssmItems:visited {color:black;text-decoration:none;}
//–>
</style>

<SCRIPT SRC=’http://riteshsanap4u.googlepages.com/ssm.js‘ language=’JavaScript1.2’>
//Dynamic-FX slide in menu v6.5 (By maXimus,
//Updated July 8th, 03&#39; for doctype bug
//For full source, and 100&#39;s more DHTML scripts, visit http://www.dynamicdrive.com
</SCRIPT>
<SCRIPT SRC=’http://riteshsanap4u.googlepages.com/ssmItems.js‘ language=’JavaScript1.2’/>
<!–SLIDE MENU END–>


And don’t forget to change the links in red above with the links of yours where ssm.js and ssmItems.js file is uploaded to your own server.

And now SAVE It.

Yup you have just Done now. View your blog. If you have any problem please write below in comments i will help you out.I think you will enjoy this widget for sure.

March 19, 2009 Ritesh Sanap Blogger Tutorials Blogger Hacks, Tutorials

Add Button ‘Save Blogger Post As Pdf’ Blogger

How to add ‘save As Pdf Button’ in each blogger post of your blogger so as the readers can save your post in pdf format which they like.This tool will really help your readers in saving your post they like.I am vey happy to post this button as i m sure my readers will like this for sure as is very useful.After this post i will post an trick ‘how to save any blogger all posts as pdf too’ i.e to download all bloggers posts of any blog in pdf format.

How to add ‘save As Pdf Button’ ?

Login to Blogger > Layout > Edit HTML > Expand Widgets > Press Ctrl+F > Search For Below Codes

<data:post.body/>

<data:post.body/>

If you are using Read More Hack you will find above code twice so use second code.

Add the below codes after the above codes

<script type="text/javascript">
</script>
<script src="http://web2pdf.freepdfconvert.com/pdfbutton.js" type="text/javascript">
</script>

<script type="text/javascript"> </script> <script src="http://web2pdf.freepdfconvert.com/pdfbutton.js" type="text/javascript"> </script>

Preview it.If its work fine.Save your template.

March 18, 2009 Ritesh Sanap Blogger Tutorials, Internet Blogger Hacks, Cool things, Hacks, Tutorials

Posts pagination

Previous page Page 1 … Page 34 Page 35 Page 36 … Page 52 Next page

Currently Trending

  • How to download Specific parts of YouTube videos
    How to download Specific parts of YouTube videos
  • Windows Vista CD key
    Windows Vista CD key
  • How to retrieve my Demonoid username
    How to retrieve my Demonoid username
  • How to add Logo to Thesis theme
    How to add Logo to Thesis theme
  • How to Delete Feedbacks from JetPack Contact Form
    How to Delete Feedbacks from JetPack Contact Form
  • List Of All 255 Keyboard All Alt Key Codes
    List Of All 255 Keyboard All Alt Key Codes
  • h4x0r ( Hacker ) - Blogger Template
    h4x0r ( Hacker ) - Blogger Template

Get Latest post in your Inbox

Random Posts

How to get Start Menu back in Windows 8

November 23, 2012 By Ritesh Sanap 2 Comments

Chit Chat for Facebook

December 3, 2010 By Ritesh Sanap Leave a Comment

[How-To] Access Facebook Chat On Desktop With Gabtasik And Digsby

May 7, 2010 By Ritesh Sanap Leave a Comment

How to recover you hard disc ?

June 7, 2009 By Ritesh Sanap Leave a Comment

Simply Pure – WordPress Theme

November 2, 2014 By Ritesh Sanap 2 Comments

WordPress

HTTP2 Server Push for W3 Total Cache Minify plugin

August 17, 2016 By Ritesh Sanap 5 Comments

How to Disable Emojis in WordPress

January 6, 2016 By Ritesh Sanap Leave a Comment

JetPack Related posts and Sharing not working with NGINX

November 10, 2015 By Ritesh Sanap Leave a Comment

Simply Pure – WordPress Theme

November 2, 2014 By Ritesh Sanap 2 Comments

Advanced What should we Write about next? – WordPress Plugin

July 28, 2014 By Ritesh Sanap Leave a Comment

How to Disable Self Pingback or TrackBack

January 16, 2014 By Ritesh Sanap Leave a Comment

BlueStrap – WordPress Theme

January 1, 2014 By Ritesh Sanap 15 Comments

How to Create Multiple Excerpts in WordPress

December 24, 2013 By Ritesh Sanap Leave a Comment

How to Disable Auto Update in WordPress

November 21, 2013 By Ritesh Sanap Leave a Comment

How to Delete Feedbacks from JetPack Contact Form

November 19, 2013 By Ritesh Sanap 9 Comments

Recent Posts

  • HTTP2 Server Push for W3 Total Cache Minify plugin
  • How to show hidden files and folders in Mac OS X
  • How to Disable Emojis in WordPress
  • Canva – Online Photo Editor
  • JetPack Related posts and Sharing not working with NGINX

Archives

Recommends

  • DigitalOcean – Cloud Hosting
  • Dropbox – Cloud Storage
  • Elegant Themes – WordPress Themes
  • LastPass – Password Manager
  • Like us on Facebook
  • Follow on Twitter
  • +1 on Google
  • Subscribe via Email
  • RSS Feed

© 2025 Best 2 Know · All Rights Reserved · We ♥ DigitalOcean