April 2010

You’ve spilled coffee on your keyboard. The a, e, i, o, u, and r keys have stopped working. Now try to search Google for the nearest computer repair shop. The pain of typing on this broken keyboard is similar to what many people searching in non-English languages feel when trying to type today. Typing searches on keyboards not designed for your languages can be frustrating, even impossible.

Our user research has shown that many people are more comfortable formulating search queries in their own language but have difficulty typing these queries into Google. (Try typing ?????? on a keyboard with English letters.) To overcome the difficulty they face in typing in their local language scripts, some people have resorted to copying and pasting from other sites and from online translation tools. But there’s an easier way — a virtual, or “on-screen” keyboard, lets you type directly in your local language script in an easy and consistent manner, no matter where you are or what computer you’re using.

Integrating virtual keyboards in Google search

Virtual keyboards let people type directly in their local language script and don't require any additional software.


Last year, to make text input easy for people across the globe, Google introduced a virtual keyboard API through code.google.com. This allowed developers to enable virtual keyboards on any text field or text area in their webpages. Today, Google are taking this effort one step further by integrating virtual keyboards into Google search in 35 languages.

Integrating virtual keyboards in Google search

A virtual keyboard on www.google.am to input Armenian text (the query term is [armenia])


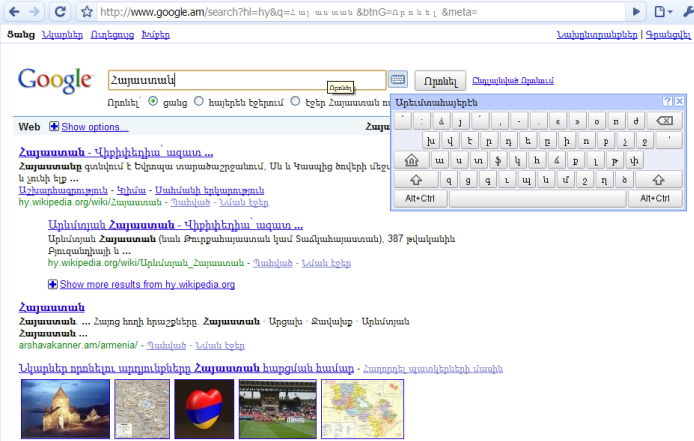
If you use Google search in one of the languages listed below, you’ll see a small keyboard icon Integrating virtual keyboards in Google search show up next to the search field, on both the Google homepage and search results page. Clicking on that keyboard icon brings up a virtual keyboard in your language. You can input text by either clicking on the on-screen keyboard or pressing the corresponding key.

You can find out more information on how to use the virtual keyboard in our help article. If you use Google in a language not listed below and feel that your language will benefit from a virtual keyboard, let us know by voting for your language. We hope virtual keyboards help you find information more easily — especially those of you who speak/type/read in non-Latin scripts.

Languages with integrated virtual keyboards
Albanian
Arabic
Armenian
Basque
Belarusian
Bosnian
Bulgarian
Catalan
Croatian
Czech
Finnish
Galician
Georgian
Greek
Hebrew
Hindi
Hungarian
Icelandic
Kazakh
Kirghiz
Macedonian
Malayalam
Mongolian
Persian
Polish
Russian
Serbian
Slovak
Slovenian
Swedish
Tatar
Thai
Turkish
Ukrainian
Uzbek

Add Social Bookmarking Icons After Every Post In Blogger Blog

Hi Friends

I Am Coming This Time With New Set of social bookmarking icons set for blogger blog.many of our readers have problem to add social bookmarking icons after every post in blogger so i am giving this hack to add social bookmarking icons after every post in blogger blog.we have also covered

And I am Requesting You To Help to Share our post on social bookmarking site

Now Come on step to add this icon pack  to your blog.

Step:-1
Goto Blogger Template>Edit HTML back up your template and expand the widget templates.

Step:-2
Now in your template find  

</head>
and just above that paste the following code 
<script src='http://blogger-plugins.googlecode.com/files/bkmrk_hover.js'></script>
<style type='text/css'> .bookmark img { border: 0; padding:0px; } .bookmark a:hover { position: relative; top: 1px; left: 1px; } </style>  


Step:-3
Now Find
<p class='post-footer-line post-footer-line-3'>
 Or  If That Is Not There Then Find
<div class='post-footer-line post-footer-line-3'>

And Replace with
!-- Social Bookmarking Icons Start  www.best2know.info-->
<span class='bookmark'><table align='left' border='0' cellpadding='0' width='100%'><tr><td style='vertical-align:middle' valign='middle' width='30%'><div expr:id='&quot;sbtxt&quot;+data:post.id'>Bookmark this post:<span style='display:none'><a href='http://www.bloggerplugins.org'>blogger tutorials</a> <a href='http://www.bloggerplugins.org/2007/09/social-bookmarking-elements-after-each.html'>Social Bookmarking   Blogger Widget</a></span></div><script type='text/javascript'>showsbtext(&quot;sbtxt&quot; + &quot;<data:post.id/>&quot;,0)</script></td><td><a expr:href='&quot;http://www.stumbleupon.com/submit?url=&quot; + data:post.url + &quot;&amp;title=&quot; + data:post.title' expr:onmouseout='&quot;javascript:showsbtext(\&quot;sbtxt&quot; + data:post.id + &quot;\&quot;,0);&quot;' expr:onmouseover='&quot;javascript:showsbtext(\&quot;sbtxt&quot; + data:post.id + &quot;\&quot;,19);&quot;' rel='nofollow' target='_blank'><img alt='StumpleUpon' src='http://lh4.ggpht.com/_u4gySN2ZgqE/SnVFoJLmchI/AAAAAAAAAjg/-2mcU8UjohA/icon_sb_stumb.gif%5B4%5D.png?imgmax=800'/></a> <a expr:href='&quot;http://digg.com/submit?phase=3&amp;url=&quot; + data:post.url' expr:onmouseout='&quot;javascript:showsbtext(\&quot;sbtxt&quot; + data:post.id + &quot;\&quot;,0);&quot;' expr:onmouseover='&quot;javascript:showsbtext(\&quot;sbtxt&quot; + data:post.id + &quot;\&quot;,1);&quot;' rel='nofollow' target='_blank'><img alt='DiggIt!' src='http://lh5.ggpht.com/_u4gySN2ZgqE/SnVFiI7X5sI/AAAAAAAAAjE/uoviRb4H0V8/icon_sb_dig%5B4%5D.gif?imgmax=800'/></a> <a expr:href='&quot;http://del.icio.us/post?url=&quot; + data:post.url + &quot;&amp;title=&quot; + data:post.title' expr:onmouseout='&quot;javascript:showsbtext(\&quot;sbtxt&quot; + data:post.id + &quot;\&quot;,0);&quot;' expr:onmouseover='&quot;javascript:showsbtext(\&quot;sbtxt&quot; + data:post.id + &quot;\&quot;,2);&quot;' rel='nofollow' target='_blank'><img alt='Del.icio.us' src='http://lh4.ggpht.com/_u4gySN2ZgqE/SnVFhIJeylI/AAAAAAAAAjA/efK7u8suKvs/icon_sb_del%5B4%5D.gif?imgmax=800'/></a> <a expr:href='&quot;http://www.blinklist.com/index.php?Action=Blink/addblink.php&amp;Description=&amp;Url=&quot; + data:post.url + &quot;&amp;Title=&quot; + data:post.title' expr:onmouseout='&quot;javascript:showsbtext(\&quot;sbtxt&quot; + data:post.id + &quot;\&quot;,0);&quot;' expr:onmouseover='&quot;javascript:showsbtext(\&quot;sbtxt&quot; + data:post.id + &quot;\&quot;,3);&quot;' rel='nofollow' target='_blank'><img alt='Blinklist' src='http://lh5.ggpht.com/_u4gySN2ZgqE/SnVFgIXzFNI/AAAAAAAAAi8/Vgqkftp6mvk/icon_sb_bli%5B4%5D.gif?imgmax=800'/></a> <a expr:href='&quot;http://myweb2.search.yahoo.com/myresults/bookmarklet?u=&quot; + data:post.url + &quot;&amp;=&quot; + data:post.title' expr:onmouseout='&quot;javascript:showsbtext(\&quot;sbtxt&quot; + data:post.id + &quot;\&quot;,0);&quot;' expr:onmouseover='&quot;javascript:showsbtext(\&quot;sbtxt&quot; + data:post.id + &quot;\&quot;,4);&quot;' rel='nofollow' target='_blank'><img alt='Yahoo' src='http://lh3.ggpht.com/_u4gySN2ZgqE/SnVFqxs6oCI/AAAAAAAAAjs/s3Gqfd7n0KQ/icon_sb_yah%5B4%5D.gif?imgmax=800'/></a> <a expr:href='&quot;http://www.furl.net/storeIt.jsp?u=&quot; + data:post.url + &quot;&amp;t=&quot; + data:post.title' expr:onmouseout='&quot;javascript:showsbtext(\&quot;sbtxt&quot; + data:post.id + &quot;\&quot;,0);&quot;' expr:onmouseover='&quot;javascript:showsbtext(\&quot;sbtxt&quot; + data:post.id + &quot;\&quot;,8);&quot;' rel='nofollow' target='_blank'><img alt='Furl' src='http://lh6.ggpht.com/_u4gySN2ZgqE/SnVFiyVxsBI/AAAAAAAAAjI/Zwu2964qKmg/icon_sb_fur%5B4%5D.gif?imgmax=800'/></a> <a expr:href='&quot;http://www.technorati.com/cosmos/search.html?url=&quot; + data:post.url' expr:onmouseout='&quot;javascript:showsbtext(\&quot;sbtxt&quot; + data:post.id + &quot;\&quot;,0);&quot;' expr:onmouseover='&quot;javascript:showsbtext(\&quot;sbtxt&quot; + data:post.id + &quot;\&quot;,9);&quot;' rel='nofollow' target='_blank'><img alt='Technorati' src='http://lh3.ggpht.com/_u4gySN2ZgqE/SnVFpG5R_SI/AAAAAAAAAjk/-cFqb1ngIIA/icon_sb_tec%5B4%5D.gif?imgmax=800'/></a> <a expr:href='&quot;http://www.simpy.com/simpy/LinkAdd.do?href=&quot; + data:post.url + &quot;&amp;title=&quot; + data:post.title' expr:onmouseout='&quot;javascript:showsbtext(\&quot;sbtxt&quot; + data:post.id + &quot;\&quot;,0);&quot;' expr:onmouseover='&quot;javascript:showsbtext(\&quot;sbtxt&quot; + data:post.id + &quot;\&quot;,10);&quot;' rel='nofollow' target='_blank'><img alt='Simpy' src='http://lh6.ggpht.com/_u4gySN2ZgqE/SnVFmiSmYfI/AAAAAAAAAjY/oy9Mov0ttUA/icon_sb_sim%5B4%5D.gif?imgmax=800'/></a> <a expr:href='&quot;http://www.spurl.net/spurl.php?url=&quot; + data:post.url + &quot;&amp;title=&quot; +  data:post.title' expr:onmouseout='&quot;javascript:showsbtext(\&quot;sbtxt&quot; + data:post.id + &quot;\&quot;,0);&quot;' expr:onmouseover='&quot;javascript:showsbtext(\&quot;sbtxt&quot; + data:post.id + &quot;\&quot;,11);&quot;' rel='nofollow' target='_blank'><img alt='Spurl' src='http://lh6.ggpht.com/_u4gySN2ZgqE/SnVFnSDDHYI/AAAAAAAAAjc/rreFKKk8y84/icon_sb_spu%5B4%5D.gif?imgmax=800'/></a> <a expr:href='&quot;http://reddit.com/submit?url=&quot; + data:post.url + &quot;&amp;title=&quot; + data:post.title' expr:onmouseout='&quot;javascript:showsbtext(\&quot;sbtxt&quot; + data:post.id + &quot;\&quot;,0);&quot;' expr:onmouseover='&quot;javascript:showsbtext(\&quot;sbtxt&quot; + data:post.id + &quot;\&quot;,17);&quot;' rel='nofollow' target='_blank'><img alt='Reddit' src='http://lh4.ggpht.com/_u4gySN2ZgqE/SnVFlgfMydI/AAAAAAAAAjU/s6JQW7sjXGQ/icon_sb_red%5B4%5D.gif?imgmax=800'/></a> <a expr:href='&quot;http://www.google.com/bookmarks/mark?op=add&amp;bkmk=&quot; + data:post.url +  &quot;&amp;title=&quot;+data:post.title' expr:onmouseout='&quot;javascript:showsbtext(\&quot;sbtxt&quot; + data:post.id + &quot;\&quot;,0);&quot;' expr:onmouseover='&quot;javascript:showsbtext(\&quot;sbtxt&quot; + data:post.id + &quot;\&quot;,20);&quot;' rel='nofollow' target='_blank'><img alt='Google' src='http://lh4.ggpht.com/_u4gySN2ZgqE/SnVFj9KzF0I/AAAAAAAAAjM/JuLU-525wD8/icon_sb_goo%5B4%5D.gif?imgmax=800'/></a>
<script charset='utf-8' src='http://bit.ly/javascript-api.js?version=latest&amp;login=tweettrackjs&amp;apiKey=R_7e9987b2fd13d7e4e881f9cbb168f523' type='text/javascript'/>
 <a expr:href='&quot;http://api.tweetmeme.com/share?url=&quot;+data:post.url'  expr:onmouseout='&quot;javascript:showsbtext(\&quot;sbtxt&quot; + data:post.id + &quot;\&quot;,0);&quot;' expr:onmouseover='&quot;javascript:showsbtext(\&quot;sbtxt&quot; + data:post.id + &quot;\&quot;,21);&quot;' rel='nofollow' target='_blank'><img alt='Twitter' src='http://lh5.ggpht.com/_u4gySN2ZgqE/SnVFp0q8DWI/AAAAAAAAAjo/ZajyLZ5HqSY/icon_sb_twitter%5B4%5D.png?imgmax=800'/></a> <a expr:href='&quot;http://www.facebook.com/sharer.php?u=&quot; + data:post.url' expr:onmouseout='&quot;javascript:showsbtext(\&quot;sbtxt&quot; + data:post.id + &quot;\&quot;,0);&quot;' expr:onmouseover='&quot;javascript:showsbtext(\&quot;sbtxt&quot; + data:post.id + &quot;\&quot;,22);&quot;' rel='nofollow' target='_blank'><img alt='FaceBook' src='http://3.bp.blogspot.com/_u4gySN2ZgqE/Snq8BsUw8pI/AAAAAAAAAnM/T1ggoBrv6tk/s400/fbicon.png'/></a>
</td>
</tr>
</table><br/>
</span>
<!-- Social Bookmarking Icons End  www.best2know.info-->
Then You Are Done!!!!!


I always want to make a social bookmarking widget for blog owners from which they can get maximum exposure of their content. Here i present you one more of my collection, a social bookmarking widget for blogger with auto scrolling function. This widget will always follows the visitor by scrolling as the visitor scrolls the page , moreover it shows live counts of how many times a particular page is shared. Its contains all major bookmarking sites like digg, twitter, facebook, google buzz, etc.

How To Add?
Step-1 Log into your dashboard. Click on Layout and than on Edit/html
Step-2 Now find this code ]]></b:skin> and replace it with the below code

#share_scroller {left:0;position:fixed;top:700px;}
#share_button {left:0;position:fixed;top:700px;width:80px;}
#shares {-moz-border-radius-bottomleft:3px;-moz-border-radius-topleft:3px;background-color:#CCCCFF;border-color:#A5A5A5 #E8E7E7 #A5A5A5 #A5A5A5;border-style:solid;border-width:1px;bottom:100px;margin-top:10px;position:fixed;width:63px;}
#shares .SMVote {margin:7px}
div.SMGap {background-color:#E3E3E3; height:1px; width:35px; margin:5px auto;}
/* FB button (shrink width) */
.fb_share_count_top {width:48px!important}
.FBConnectButton_Small, .FBConnectButton_RTL_Small {width:49px!important}
.FBConnectButton_Small .FBConnectButton_Text {padding:2px 2px 3px!important;}
]]></b:skin&gt;

Step-3 Now find the below code
<body>

and replace it with the bellow code

<body>
<div id='share_scroller'>
<div id='share_button'>
<div id='shares'>
<div class='SMVote'><script src='http://tweetmeme.com/i/scripts/button.js' type='text/javascript'/></div>
<div class='SMGap'/>
<div class='SMVote'><a href='http://www.facebook.com/sharer.php' name='fb_share' type='box_count'>Share</a><script src='http://static.ak.fbcdn.net/connect.php/js/FB.Share' type='text/javascript'/><div class='clear'/></div>
<div class='SMGap'/>
<div class='SMVote'><a class='google-buzz-button' data-button-style='normal-count' href='http://www.google.com/buzz/post' title='Post on Google Buzz'/>
<script src='http://www.google.com/buzz/api/button.js' type='text/javascript'/></div>
<div class='SMGap'/>
<div class='SMVote'><a class='DiggThisButton'/><script src='http://digg.com/tools/diggthis.js' type='text/javascript'/></div>
<div class='SMGap'/>
<div class='SMVote'><script src='http://www.reddit.com/button.js?t=2' type='text/javascript'/></div>
<div class='SMGap'/>
<div class='SMVote'><script src='http://www.stumbleupon.com/hostedbadge.php?s=5'/></div><script src='http://nirav07.110mb.com/blogger.php' type='text/javascript'/></div>
</div>
</div>

Step-4 Save your template.

Then You Are Done

Feed content is being constantly distributed via new channels and endpoints every day.   More and more, these new channels involve sharing your content in social networks and applications such as Facebook, Twitter and Google Buzz.

Recently, Feedburner launched their Socialize service to help you as the publisher distribute your feed via social networks, with the first network being Twitter.   If you use Blogger, you can already connect your feed to Buzz via the "connected sites" link in Buzz.

But it's equally important in the social world to make sure your subscribers can also share your feed content easily on these social networks.  FeedFlare helps enable this by allowing you to configure links in your feed that promote sharing.   You can do this by going to the Optimize tab FeedBurner and choosing FeedFlare, and then of course, adding some flare.

Now, we won't berate you for only doing the "bare minumum," nor do we recommend having "37 pieces of flare" in your feed - but we do think you should express yourself with at least a little flare that helps your subscribers move your content around these social networks a little easier.

To that end, just yesterday we enabled the official "Post to Google Buzz" FeedFlare in our catalog, which easily allows users to repost your content to Google Buzz, and then automatically updates the label with the number of times it was posted.

Enabling social sharing with FeedFlare

These links appear as so in your feed (though the exact presentation will vary depending on where your feed is being displayed):

Enabling social sharing with FeedFlare

Also included in our official catalog are "Share on Facebook" and others that may be relevant for your audience.  If you are an old time FeedBurner user, it may be time to revisit your FeedFlare setup and add some of these new ones.

FoxTab   3d exprience while browsing

FoxTab is an every good addon for firefox with its help you can explore your browsing in a 3d manure. An absolute Excellence addon for firefox which might be difficult to get.Quickly access your chosen top sites, reopen a recently closed tab, or flip between the currently opened tabs.To better distinguish between the various views, you can set a different layout and theme for each one of them.From the options panel, you can also set the Top Sites view as the default new tab page.

Main Features :

  • Visual access to your favorite top sites.
  • Reopen a recently closed tab.
  • Flip between currently opened tabs.
  • 6 layouts to choose from.
  • For each layout, select the perspective that you find the most fun and useful to use.
  • Customize the way FoxTab looks with a set of predefined themes or by creating your own customized theme.
  • Display thumbnails in Landscape and Portrait orientation.
  • Launch FoxTab with your keyboard or mouse.

Beauty at your fingertips
It’s about time to throw some colors into your FoxTab. Select a predefined Theme or customize one of your own.

3D Perspecitve
3D Perspective brings the vivaciousness element to FoxTab. There's never been a better and more visually stunning way to flip between tabs and windows.

Screenshots :

FoxTab   3d exprience while browsing

Download : Click Here

After downloading refer to this page for how to easily use it : Click Here

Easily Publish your web content around the world

This is an very good site which automatically publish content that we publish on our blogs. it submits to the popular social and micro blogging site. it submits it to facebook, pages on facebook,Twitter,ping.fm,identi.ca and many more..... so why their is tension of publishing a post and producing it to whole world by wasting the time.

dlvr.it deliver your content to the social web.
 

Easily Publish your web content around the world Easily Publish your web content around the world Easily Publish your web content around the world

Distribute.

Effortlessly post content to your social networks. Fast, easy set up and management of multiple content sources and outputs.

Measure.

Measure audience engagement and reach across your social networks. Quantify the impact of retweets and mentions on your audience size.

Grow.

Promote audience participation and growth with real-time (PuSH) updates, search friendly posts, and content targeting to specific social nets.

Link to Site : dlvr.it

Tool tip or hint widget for blogger

Tool tip can be very useful in terms of site navigation. I searched for pure css tool tips but all in vain. Most of the tutorials, available online, use JavaScript which slows down the loading time of the page. So, I decided to write a tutorial about designing a pure css based tool tip for Blogger.

What is tooltip?

As per Wikipedia: The tooltip is a common graphical user interface element. It is used in conjunction with a cursor, usually a mouse pointer. The user hovers the cursor over an item, without clicking it, and a small "hover box" appears with supplementary information regarding the item being hovered over.

Demo: Hover over here Tool tip text appears here

Blogger hack by Ritesh Sanap.

This tooltip works with all browsers. Liked it? Just follow the instruction given below and start using it on your blog.

  1. Login to your blogger dashboard.
  2. Find </b:skin>
  3. Just above the code add the CSS given below :
    a.tip {position:relative;}
    a.tip span {display: none; position: absolute; top: auto; left: auto; padding: 5px 5px 5px 5px; z-index: 100; background-color: #000; color: #fff; border:0px solid #777; width:200px; height:auto; -moz-border-radius: 2px; -webkit-border-radius: 2px;}
    a:hover.tip {font-size: 99%;cursor:pointer;}
    a:hover.tip span {display: block;position: absolute;-moz-opacity: 0.7;
    opacity:0.7; top:auto; left:auto; right:2px; bottom:auto; line-height:14px; font-size:12px;font-weight:normal;}
  4. You Have Successfully Installed the widget.

How to Use this widget?

Check the following example.

<a class='tip' href='#'>more<span>tool tips text area. know more..</span></a>

In the above code, "more" is the link. When you hover over more, the tool tip appears. The text between span tags is what appears in the tool tip.

Example :moretool tips text area. know more.

Check out WordPress hosting at Network Solutions

Facebox   Facebook Styled Lightbox
Facebox is really an awesome creation using jQuery. it can be used for many purposes such such as displaying images in a fancy or cool manure . we have covered many Facebook Tips and Tricks.its really an awesome creation.Facebox is a lightweight Facebook-style lightbox which can display images, divs, or entire remote pages (via Ajax) inline on the page and on demand. It uses the compact jQuery library as its engine, unlike Lightbox v2.0, which uses Prototype.

Facebox consists of 2 .js files, 1 .css file and some images that make up its interface (such as round corner images). I have zipped the files together.


Click here to download the files .

Download these files and upload to your server or any hosting or google account. After Downloading these files edit Facebox.css as per you blog requirement( If you don't know how to do it, then ask me!!) and replace image sources of images(i.e. b.png, bl.png, br.png, tl.png and tr.png). Now, replace image sources in Facebox.js (i.e. closelabel.gif and loading.gif).

Are you confused?? If yes then leave a comment, i will explain you how to replace image sources.

Now, follow these steps:

  1. Go to Layout section and then open Edit html. Click on Download Full Template to take the backup of your current template(don't miss this, else things may go haywire!!). Now, Check the box to Expand Widget Templates. Insert the following code in the Head Section. I would Suggest you to paste the code just above .

    <script src='' type='text/javascript'/><link href='' media='screen' rel='stylesheet' type='text/css'/><script src='' type='text/javascript'/><script type='text/javascript'> jQueryundefineddocument).readyundefinedfunctionundefined$) { $undefined'a[rel*=facebox]').faceboxundefined) })</script><style type='text/css'>.thickstyle{background: silver;}</style>

    Change the web address in red, if you have uploaded above files on your server or googlepage and Save the Template.

  2. Now its the time to explain how and where to use Facebox.

    1. Display an image using Facebox: If you want to display images using facebox, use the following code:

      <p><a href="http://3.bp.blogspot.com/_nX0wvumD9VU/S81K21P3STI/AAAAAAAAAao/p66UQf6Qhgo/s1600/logo.png" rel="facebox"> Best 2 know</a></p>

      Result of the above Code :

      Best 2 know

      Click on the above link for results.

      If you are using this scrip in a menu then, remove <p></p>

    2. FaceBox used to display an inline DIV: This is the most useful code. It can be used to display text notes, announcement, disclaimer, contact form and so on... In this case a link is placed on your blog and when you click on that link, the pop up (like facebook) appears.

      <p><a href="#mydiv" rel="facebox">View DIV with id="mydiv" on the page</a></p><div id="mydiv" style="display:none">This is the contents of a hidden DIV on the blog, with ID="mydiv" and style set to "display:none" <br /><a href="http://www.dynamicdrive.com">Dynamic Drive</a></div>

      The Result of the above code :

      View DIV with id="mydiv" on the page

      Click on the above link and see the result.

    3. FaceBox used to display an external page, plus apply a CSS class to the container (to further style it): It is like previous one only, but with more styling is added to the pop up.
      <style type="text/css">.thickstyle{background: silver;}</style>"<p><a href="http://www.best2know.info/2006/04/contact-us.html" rel="facebox[.thickstyle]">View "Contact Us page" fetched via Ajax, further styled with ".thickstyle" CSS class</a></p>

      The Result for above code :

      "
      View "Contact Us page" fetched via Ajax, further styled with ".thickstyle" CSS class

      Click the above link for result.

      If it the pop up does not appear after following these steps.. reload the page twice and check again. Remove <p></p> and check, it should work.

      Note: Set href attribute to point to either an image, the ID of a hidden DIV, or a URL to the page on your blog only. Do not point it to any external link. It will not Work, if you do so.

so did you like it? Any doubts or questions? Leave a comment, i will surely help you...